Thursday, February 27, 2014

Lack of Communication

I have recently started a board on my Pinterest that is completely dedicated to the blog here that you can follow for all of the recent posts. While I was going through and pinning all of the old blog posts one by one, I realized that I left my readers at a bit of an open-ended post about our living room. The last thing you guys saw was this picture.


This was supposed to be followed up by the final picture of our living room, completely painted and ready to go. Unfortunately, it took a while for us to get up to that corner of the room because it involved a ladder which we did not have at the time.

Realizing that this has happened, allow me to convey my deepest apologies.


To right that wrong, allow me to introduce, the finished living room wall!


You might recognize the deer head from this post a couple of months ago. (And yes, in case you were wondering, my eyes do often wander over to the stag head. He's still so cute!) Now he has some friends! 


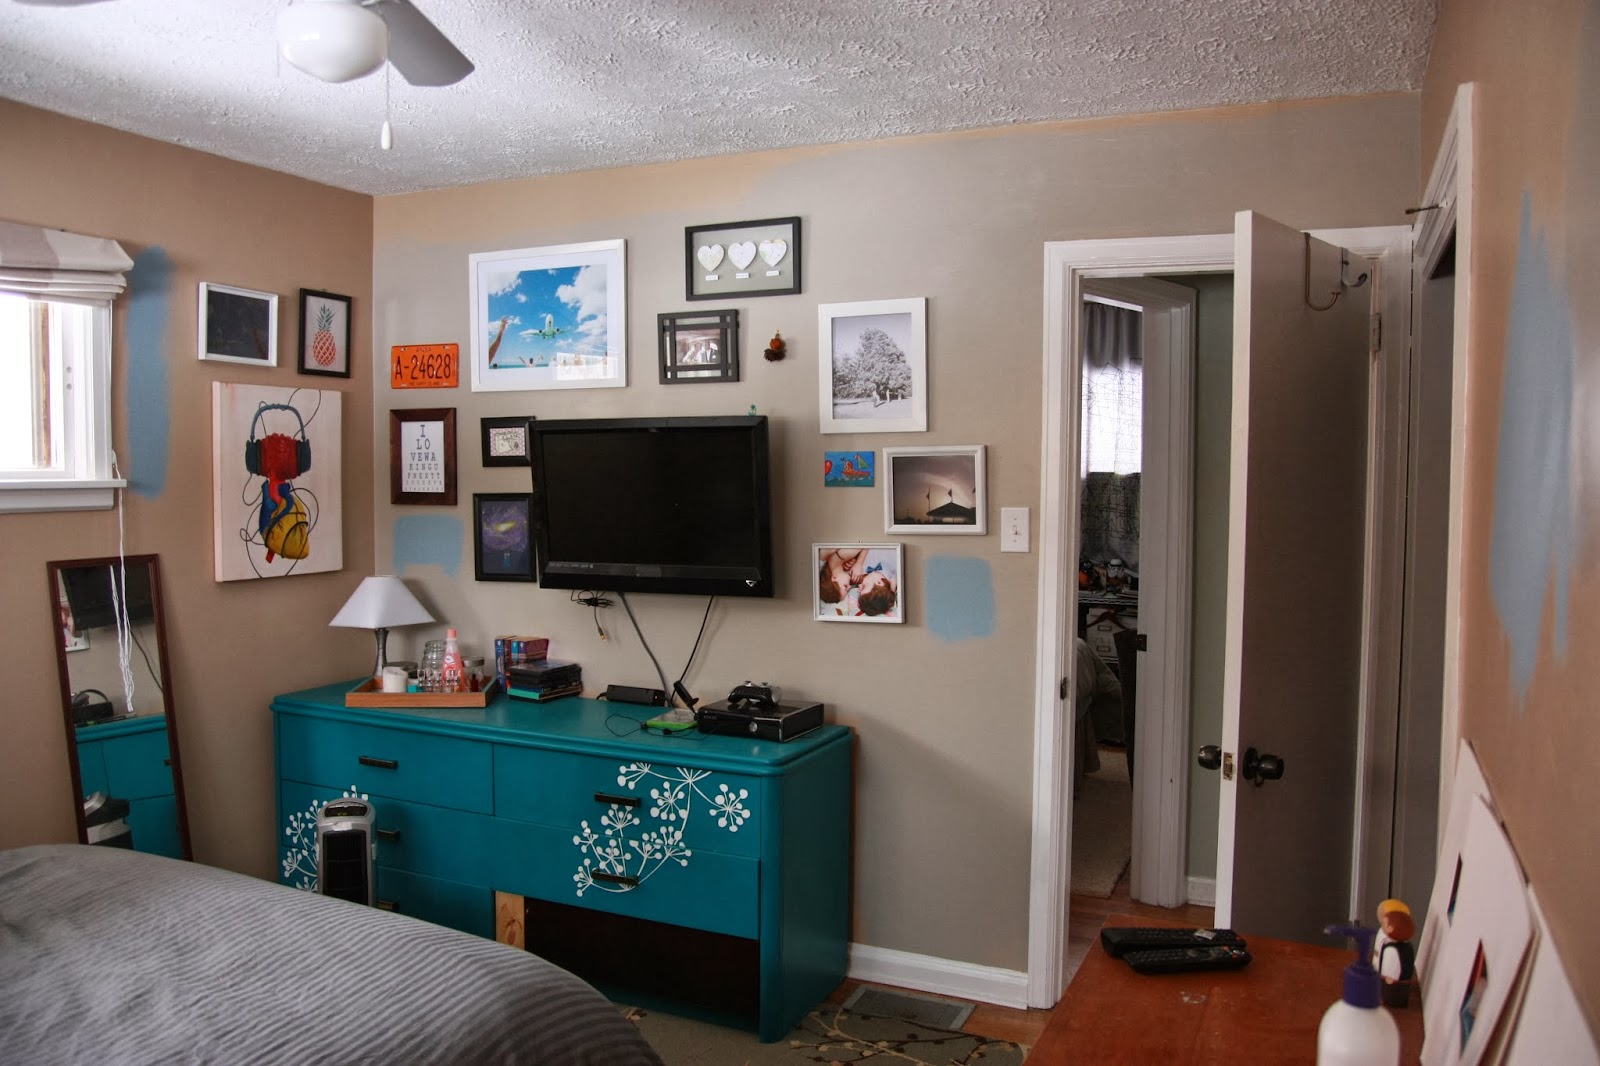
Along with the fact that our TV viewing is now way more comfortable than it was with the tan wall behind it, the nice contrast that the other white objects have on the wall really balance out the dark TV and media center. My little white whale even makes it into the mix somewhere so that he is usually silhouetted by the dark blue. And remember, this wall color cost less than $5 because it was in the 'oops bin' at Home Depot!


Filling the frames are just large scale images I found online (under the creative commons rule) that I had printed at Staples for around $2 (it was a while ago, so I don't remember the specific cost, but it was absolutely less than $5). I decided to try out the rumor on Pinterest about being able to get engineering prints and it was totally true! Worth it! They are black and white originally, so that helped, but the line quality is amazing. The paper is a little thin, but once it's behind a frame, you can't tell anyway. The frames, of course, were just refurbished Goodwill frames. You know I don't buy new! All of this framed art cost less than $15. Score.

You also may have noticed that the furniture has been rearranged a little. I decided to move Scott's leather chair and my over-sized chair together so that they could keep each other company on the other side of the room. The table they share was $10 at the ReStore.


(After I moved them, I realized how much this configuration reminds me of my Grandma and Grandpa O's House (except for the massive ceiling to floor bookshelves behind their chairs)!)

We really like how open the room feels with them over there. We moved the couch and end table right up against the wall on the other side and we might be getting a couch from Beth and David (who are replacing it with an amazing grown-up sectional from Macys), that will go on the opposite wall. We will have PLENTY of seating, which is something in short supply in a household where we frequently have from 5-12 people trying to watch a movie at one time. Remember, we don't even have kids yet!

All in all, I know the changes you've "missed" haven't been huge, but they have made a big impact on how we use the space. We recently acquired a Kinect from a generous Uncle and now are able to simply move the coffee table to get our Xbox skiing and bowling on. It's amazing how much just moving a couple of things around can really help the flow of a room.

Wednesday, February 26, 2014

Come to the Dark(er) Side of the Cabinet

I am discovering that the more that we do to the house, the more we are really honing in on our style. Unfortunately, because we were previously apartment-dwellers, we were unable to paint the walls of our rent-protected cage to begin the journey of throw pillows, curtains, and paint colors that we have been able to trek since buying a home. It's been a truly interesting experience, but unfortunately, sometimes our choices were just off the mark a bit.

The largest instance of this so far has been the kitchen. I know that avid readers will be sighing and trying to decide if they still want to read this post to the end, but I promise, this should be the last time you see these cabinets for a long while. As you may remember, one of the first things we did when we moved into the house was clean out and paint up the kitchen cabinets. They started like this.


I had decided a long time ago that I loved the modern look of white and gray kitchens, so I headed to the store, picked up a nice bright white and what I thought was a bold gray and started prepping and painting. When I had finished, I ended here.


I knew that it was better than they had been when we moved in, so I just left them. This was unfortunately followed by a nagging feeling that they just weren't quite what we had originally wanted, though. They were 'okay'. They were livable. We moved on to other rooms in the house and weren't bothered by the kitchen because it functioned just fine.

Then, I saw an article that brought the feelings of gray-cabinet-inadequacy to the forefront again. Better Homes and Gardens February 2014 issue had this full-page image on the last page. I almost missed it, but I'm glad I didn't because it motivated me to make the decision go back and fix that which had never been quite 'right'.


It was our kitchen! Well, if ours had the correct bottom cabinet color. Mom and I had briefly dabbled with a darker cabinet paint pot from Home Depot around Thanksgiving, it just needed to be applied. I got out my brush and started in with the rest of the sample. The it-was-meant-to-be part came from the fact that it was actually a custom color that a woman next to us was getting that Mom suggested might be what I was looking for.

It was. Mom's know best.

Here is the front cabinet half painted. You can clearly see the darker gray on the left. It is a much richer, more grounded color for the room and really makes it feel on purpose.


I know it might not seem like a huge jump, but the lighter gray was almost as light as the white upper cabinets, which made it look like we ran out of paint halfway through. This really gives it the higher contrast it needed.


When all of the bottom cabinets had been taken off of their hinges (again) and painted (again) and remounted (again), the whole repainting felt worth it. Two samples of paint later, I was finished. Here are some of the after shots.


And just because before and afters are so much fun


This whole cabinet debacle really helped me to come to grips with the fact that working on your house, whether it's decorating, gardening, or just building a table, might not go according to plan the first time through. I think that refinishing the cabinets in a color that I had always seen in my mind really helped me throw aside the indecision that I had been carrying with me since they had been first 'completed'. It's amazing how much better you feel in a room that fits you mental image of it rather than a 'meh, it's good enough' attitude.

Have you ever had a project that you just weren't pleased with for some reason? Did you take the time to fix it? Let me know in the comments!

Monday, February 24, 2014

Finally Hung Out to Dry

One of the many ongoing projects around here has been the Little Laundry Room that Could.  When we moved in, it was not a very welcoming space for doing an unpleasant task.


I was able to paint the walls (which I talked about in it's first appearance on this blog), but there were still a couple of other little things that I felt it needed to be considered 'done'.

I started with a cute sign.


These are just some letters I picked up from Hobby Lobby on sale %50 off. A couple of layers of yellow spray paint and they were really popping. Scott hung them up on the wall and I was on to the next task.

Also while I was at Hobby Lobby, I picked up two sheets of yellow duck tape. I took my hole punch (that you might remember from the shell light) and cut out a bunch of circles.


They helped turn this


Into this


I also used a 3/4 yard of fabric I used my 40% off mobile coupon for and made some cute curtains. These were just hemmed and held up by some clips on the back. The fabric was $3 b/c of the coupon and I had the hooks from another project that I didn't use them for.


Some laundry themed art was added to some Goodwill frames that I made over the same way as these. They were then added to the other wall.


I even put a little bird collage that I had made in the old apartment and hung it on the little handle to get to the fuse box just for added color. It just comes right off for accessibility, though.


I bought some baskets from Michaels for 50% off and they now hold all of our non-reusable dinnerware for entertaining.


Last but not least, I grabbed a giant canvas and made a PLAY DIRTY sign (har har! Get it? CAUSE IT'S A LAUNDRY ROOM!), and suspended it from the ceiling. I did this because something sitting on the ground would be both in the way and a fire hazard. This way, it only blocked the ugliness from the view that people would be looking from most (the kitchen). This is before.


And here is the after


We made sure to leave plenty of room between it and the water heater.


And that's it! The only other two things that we might touch on in here are:

-Replacing the door on the right (that goes to the backyard) with one that has a window for added light and openness. We've been mostly looking at the Restore to see if we get lucky, but nothing so far.

-Putting in some sort of new flooring. This probably won't happen for a long while, though, so covering the checkered patters with rugs works. It also keeps us off of the really cold floor that the room has, at least during the winter.


I'm so happy that it's done! I really don't mind people seeing my laundry room now, which is a big step up from when we moved in. What do you think, is redoing a laundry room worth the time and effort? Let me know in the comments!

Thursday, February 20, 2014

An Imagination Station

Our garage is a single car garage. It might not be huge, but it definitely acts as many different spaces for us. We build, paint, cut, and store our stuff there as well as our car (especially with the snowy winter we've been having). Unfortunately, we hadn't really had a chance to give it any love because we were so worried about the rest of the house. Yesterday, though, the weather was nice enough that I was able to spend 4 hours cleaning it up and out. Now it's much closer to a workable area.

I wish I had a good picture of the before. I kind of started working on it on a whim, so I was about halfway done when I realized I hadn't taken any pictures. Needless to say, though, it was a disaster. There was barely enough room to walk around the car when it was parked, and you couldn't find anything even with a map.

The end result of some rearranging, storing in the attic, and $6 worth of 'organization equipment' really made a huge difference. Here is the after.


I ended up moving everything into stations. Not only did I feel it would be easier for us to keep organized, but it also reminded me of one of the DVD extras from one of our favorite shows, the Venture Brothers. In it, they describe their drawing studio in different 'stations', such as the 'rejuvenation station' and the 'relaxation station'.

We start with the left wall.


Everything is on an old bookcase that we've had out there (in the way) for a while. It really helps because you can really see which bottles are which. The second shelf down is actually holding both of our drills and the teal bin holds ALL of our bits. We have a LOT of them, so keeping them all in one place is key.

Next to the Automotive Station, we have the Gardening Station.


Which includes all of our gardening and cleaning tools finally put in an area where they aren't leaned against a corner or falling behind the lawn mower. Making this little organizer is quick and cheap, too.


I bought a pre-cut 2 ft. piece of PVC pipe from Home Depot and chopped it down into two-three inch sections. Then I took a piece of scrap wood and drilled from wood-to-pipe from the back to create a mount for the PVC. To attach it to the wall, I just used four screws and screwed the wood itself to the wall to secure it. That's it. Everything fits real well and there are no moving parts, so it won't break like some of the other garage organizers I looked at. $6 win!

Next to the Gardening Station, we have the Recreation Station.


Mountain bike, both camp packs, and our tent are hung up (into studs) and out of the way. Getting things off the floor and onto the walls was key in getting such a small area organized. It really doubles your amount of space because you can't move outward, but you can move upward. I manged to not have to buy any hooks because we had a large pack we purchased when we had a storage space in the apartment. I found most of them and was able to use them again! Huzzah!

Moving along the garage door (which I suppose could be considered the 'Importation Station'), we get to the less consonance-appropriate title of ...


Not super interesting, but it does keep it from tripping us and splintering our feet. For some reason, this was laying down next to where the car pulls in before I moved it. There is no accounting for the stupidity of our past.

As you can see a glimpse of next to the Wood and Scrap Station, we have the


We only have one (1, uno, single, solo) outlet in our garage. That's right. One. Not only that, but it's not grounded. We have a solitary outlet that only holds two prongs in our garage (where, of course, most power tools are three). So far, this has not been fun. It's on our list of things to fix (along with the rest of the house which has the same issue (except for the kitchen)), but we were waiting until maybe this summer or fall to take care of it.

Till then, we can at least charge our equipment in style. I found a bunch of brackets and boards from Scott's old Pint Night shelves (which we weren't going to use for the same purpose in the house), so I grabbed some and set up this little guy right above the outlet. This way it's at eye level so it's easily accessible, but it's also a collection station for all of the batteries for our saws and drills.

Next to the charging station is the rest of the Recreation Station. We love to camp and hike and I looove to ride my bike, so having them in the garage is a must, but like his brethren across the garage, he must be off the floor and out of the way.

See the yellow frames? That's for another project that will be showing up here soon!

I am so pleased with the result of a couple of hours work. The only part that I'm not completely ready to tackle is the big shelving unit.


We have plans for it, but they will have to wait for warmer weather. Here is the ugliest Photoshop sketch I could ever reveal to you to give a rough idea as to what we would like to do.


Those blue cabinets were actually originally in the laundry room, but I had Scott take them out because they blocked a lot of light and made the space look smaller than it already looked. We kept them, though, and are hoping to mount them (maybe this weekend?) so we can use them for additional storage (the doors can't open because they are just sitting on the shelf right now).


Then, we want to take out about half of the shelving and just have an open space next to the door. We will either use that for larger tools (a bandsaw or table saw), or possible a deep freeze I've had my eye on. Possibly just a shoe rack. Who knows. Those are all a long way off from our minds at the moment.

Once we have the shelves cut down to create a workbench and the cabinets mounted, we would like to pegboard the reachable parts of the wall so we can put things like hammers, screwdrivers, and other small tools in an organized yet reachable space. All of this would really make our lives (especially our DIY lives) much easier.

For right now, though, we are just enjoying something that we haven't had since we moved all of our stuff in: space to walk around the car with ease.


And not just one path,


We even have a tiny path on the other side of the car that doesn't involve having to jump over boxes and boards!


Yesterday was a big success on the garage-front. We are really hoping that this will help us get done with more DIY projects quicker because we know where everything is! Have you ever organized something and it just made you love the space that much more? Let me know in the comments!

Tuesday, February 18, 2014

Done Except for the Bow

After painting our bedroom, the blank wall by my side of the bed really stuck out as a place that needed a little something. I ended up just taking the 'dorm' mirror that we had leaning against the wall, painting it white, and hanging it horizontally across the top of the dresser.

Then I remembered a really cute idea on Pinterest (of course) for a super cute jewelry holder on the blog Lemonade Makin' Mama that would fit the space perfectly.


I realized that I already had a dowel that was just hanging out in our garage, so I just grabbed a small wood sheet from Michaels (with coupon, of course) and a couple of hooks from Home Depot and made my own through trial and error rather than following the tutorial. The entire project cost less than $10!  Her tutorial is much more in depth, but if you just want a quick visual aid, here is what I did.


I really love the result, though.

I swear I just cleaned that mirror!

It fits perfectly right below the mirror, which is at my height so I can actually use it for getting ready (not that I really go places, lol).

I ended up using 10 hooks, plus the two hooks that hold the arrow itself (which you can also hang stuff on).


The cool thing about this to me, is that it not only shows me what jewelry I have (which is usually tucked away in a closet), but it also acts as a nice piece of unexpected art.


It does put the dresser to shame, though. Don't worry, he's on the list of furniture renovations I want to do this summer. I'm thinking a bright color like yellow or red would really make him stand out. What do you think? I would have to say NOT a cool color!


Let me know what you think in the comments! Happy Tuesday!

Monday, February 17, 2014

No Longer Mark Rothko's Bedroom

Scott and I have painted a lot of the rooms in our house, but had managed not to touch our own bedroom. We both knew that the oddly skin-colored walls were not what we wanted, but it took some hue searching to really find something that fit both us and the colors of the house so far.

Over the past couple of months, I've bought three or four difference wall color sample pots and tried them on various walls in our room. As of yesterday, we had different splotches of color everywhere. It really kept the room from being the relaxing retreat that the bedroom should be. For example, on the tv/photo wall, all of the sample areas have been marked in red.


I was getting a little desperate, lol.

The entire space just really felt lack luster. Due to the different light sources (hallway, bathroom, lamp, and window), we needed a color that looked great in all of them. We also really wanted to feel lightness during the day, but a cozier color transition at night. The current color just wasn't doing that for us.


So in my search, I started looking for pictures of rooms that really made us feel bright, yet cozy. I showed Scott this pictures from Pinterest and we were both sold.


Beth whipped out her Handy Dandy Giant Color Swatch Catalog and we were able to match it up with a color affectionately called "9075" (if I remember correctly).

The entire painting process only took a couple of hours because I was cutting in while Scott was on roller duty. We did one wall at a time because the room is small and doesn't have a lot of furniture moving space, but it really went quite smoothly. I began the entire process by taking this picture.


This was so I could use it for reference to remember how all of the frames were arranged on the wall after we had finished painting.

Then I started around the closet and bathroom doors to give Scott a nice pre-painted frame to roll inside of behind me. When I 'cut in', or 'edge', I like to use this brush. It is small, has a rubber handle (for long term comfort), and really gets the job done. If at all possible, I really try to avoid using blue painters tape for straight forward room painting (which I realize hasn't really happened that often in our house). For anyone scared of free handing around their molding, it just takes a little practice and some patience before it becomes second nature.


Before we knew it, we already had one wall done into the next corner. It was drying pretty quickly and we were really loving the result.


We were glad that the paint was drying darker than it applied, too. It went on a little light for our taste, but the worry was quickly set aside when we were able to see large sections completed.


Notice, above the window in on the right side of the picture above is ready to be painted. When Mom and Dad stayed with us last time, Mom brought us the awesome roman shades that she made (that actually work, unlike mine) and installed them. Since we didn't want to risk getting any paint on them, we cut down the sides of a large trash bag and taped it so that it worked as a kind of tarp over the blind. This worked really well and gave us the piece of mind to get done much quicker than we would have otherwise.


When the room was completely painted, we were super pleased with the result.


It feels very bright and grown up, but doesn't feel cold or distracting at night when you want to feel relaxed.


Because the wall color was so close to the color of the large rug we had in the room before, we switched around some of the rugs in the house and ended up with a slightly smaller (but fuzzier) one perpendicular at the foot of the bed. It's nice between the toes!

Another reason it took so long to find the right color for our room was because I was afraid of walking out of our newly painted bathroom into a dark cave. Before, it was kind of like this.


But now, it really reminds us of our honeymoon in Key West! A nice ocean blue room from the tropical green bath.

I don't know why the color is wonky here, sorry

We're so excited our bedroom doesn't look like a Rothko painting anymore! It's nice to be able to retire to a place that looks much more finished, especially when the rest of the house is really coming along.

Have you ever painted a room and it changed the entire mood of a space? Let me know in the comments!