Thursday, October 31, 2013

Haunted House

We're big fans of Halloween (if you hadn't figured it out already), so when we decided to have a party last weekend, we really wanted to trick out the house. Here are a couple of my favorite (spooky) things.


Two bags of spider web later, the ceiling of the living room was appropriately webbed. Though not pictured, we ended up throwing a bunch of little plastic spiders all around it and it really helped set the mood in the place. It was a really fun element, but kind of tricky with the fan. Be sure to secure the web tightly above so it doesn't get caught up in it!


In the family room, I found this window cling that really haunted the place. With the giant white shade behind it, our headless lady has been haunting our neighborhood for two weeks. The best part is that it works both ways. We walk through the room all the time and have to remind ourselves that no one is outside looking at us (without a head)!


This is actually something I picked up from Young House Love (one of my favorite home blogs). Just cut out the shape of the bats out of black craft paper and tape it inside the shade. We also switched out the light bulbs so that they were appropriately scary. This lamp ended up being blue.


In another recent post, I talked about putting together my centerpiece for the dining room. We also added a red light bulb to the drum light to really add a finishing touch to the creepiness. We eventually finished off the table by putting a spiderweb table cloth on it.


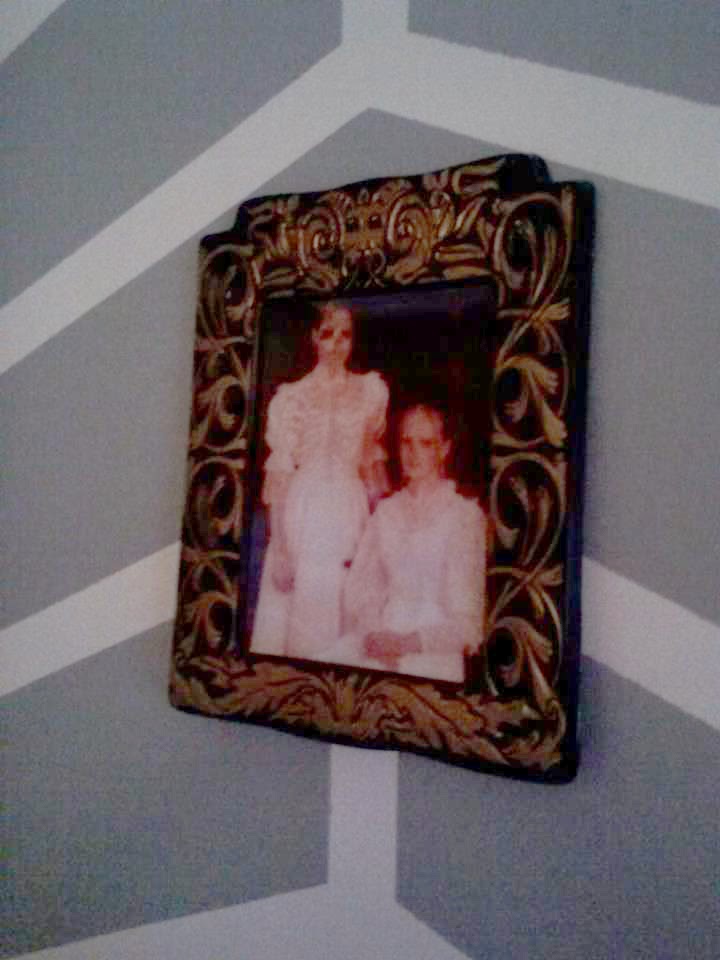
Also in the dining room, we took down our big pictures and put up these guys. As you walk from one side to the other, they change revealing ghoulish secrets in each photo. They were $1 each at Target.


Last but not least (We did decorate more, but these are just the highlights), I decided to make our guest bathroom super creepy. I took some red paint and wrote 'HELP' and put a couple of gross hand prints on the shower curtain liner that we had. Then, we put a some flickering tea lights behind it. We also took one of those fake arms and had it coming out of the floor vent, so when you turned the light on, it looked like it was trying to grab your ankles! ooOOOoooo! We only left the bathroom decor up for the party, though. It wasn't amazingly functional, but it did creep out people on the day of!

Happy Halloween! Did you decorate? Have fun partying or trick or treating tonight!

Tuesday, October 29, 2013

How Fancy!

Guess what's better than longingly staring at the dining room table online?


How about it getting delivered to your house? A DAY EARLY. How awesome is that?! It was scheduled to be brought to our abode Wednesday between 9-10am, so I didn't think that the phone call I received Tuesday would have anything to do with it. It went like this:

"Hi, I'm from the Pottery Barn delivery service. We are in your area and we were wondering if you would like to have your table delivered early"

"Um, yes."

It was pretty awesome.

So two guys showed up, muscled in three pieces, put the whole thing together, and left within a 20 minute span. It was seriously that quick. They were both really polite, chatted while they worked, and left without any boot prints or trash from the packaging left behind. The only thing missing from the 'white glove' service were the white gloves!


When they left, though, they left some awesomeness in their wake. What a cool table, eh?


I love the medium brown color and the way it fits in the room. It's only 30 inches wide, so it works well in our little space. The thin, diagonal legs are great and it keeps the room feeling really open. They are also really stylish and minimal, which is a plus.


The wood is also a nice contrast against the lighter colors on the walls from both sides.


When we want to entertain, it expands to 'comfortably seat 10', which is a super bonus.

I know it's not closed, but solid wood is heavy!

But for right now, we are keeping it set to the leafless setting of 6. Unfortunately, we don't have any chairs, so our seating currently looks like this.


Not great, right? It's okay, though. That just means we can take our time and find some really cool chairs (hopefully also at a cool price). I would love to stick with the mid century feel and find something that really goes well with the table. Overstock has these guys, but they are still a little pricey for the 6 we need.

How cool are they? The lines are great, but it has a woven seat, which I'm not necessarily sold on. One of the other options I found at Scandinavian.Modern were these guys with fun orange pads.


Yowza! But for now we're just really happy to have a nice wooden base to our dining area. What do you think? Know of any chairs?....

Some Timey Wimey Costumey Stuff

Hi, my name is Caitlin. I am a Whovian.

If you aren't familiar with the term, allow me to explain.


Scott and I are both huge fans of Doctor Who. Though I enjoy the older ones, the newer episodes are really where my heart lies. We thought that the 9th Doctor was 'Fantastic', the 10th made us say 'Allons-y!', and Matt Smith as the current Doctor made us take a leap of faith with 'Geronimo!'


We enjoy the goofy timey wimey time travel stuff, the different companions, and the possibility of owning a TARDIS (Time and Relative Dimension in Space).

We are Whovians. Hear us geek.

When the time came this year for us to pick costumes, we knew what direction we wanted to go. Scott threw around a couple of ideas, but he ended up on wanting to be Matt Smith's incarnation of the Doctor. When that was decided, I knew my only move was to be River Song, his walking talking spoiler alert (LOOOOONG story...).


Matt Smith's costume was pretty straight forward.


Tweed jacket, sonic screwdriver, red bow tie. Not to bad considering the fact that Scott already had a white shirt and khakis.

We headed to the Goodwill and searched through many a sport jacket till we found a couple we liked. The entire process took about 30 minutes because the one we found that had the right look also happened to be the correct size for the hubby, so we threw it in the cart. $5.99 later, one piece of his costume was complete.

I then headed to Handcock Fabrics and took a hot minute searching through the remnants bin until I found a quarter of a yard of red fabric for a quarter. That's right. I was making Scott a 25 cent bow tie.

I cut my shape and sewed it together, but for a much easier tutorial on how to create a quick bow tie, check out this link. When I had finished, I just put a backing pin on it like you'd use for a broach and pinned it directly to his shirt. So far, we were lookin' pretty good.


I started getting really excited even with it just hanging up together! It was all coming together!

Next, though, was the sonic screwdriver. This is the device the Doctor carries to solve pretty much all of his problems (except for wood....it doesn't work on wood).


It is pretty much the Doctor Who equivalent of a lightsaber, so it involved making something unique. I started by raiding the Home Depot for small copper pipe parts. My base was 1/4 in. diameter, and that seems to be a good size to fit in your pocket and not be too clunky. I had originally looked at some 3/8 pieces, but together they created what I would refer to as 'the Fisher Price version of a Sonic Screwdriver".


Once I had fit them together in a cool, kind of random way, I took them apart again and taped off all of the threads. This would keep off the paint and allow them to thread back together for final assembly. I then hung all of the pieces I wanted to be silver on a ribbon between two stools to paint. I did the same with the rest of the pieces so that I could paint them black (sorry I didn't get any pictures of this process). Hanging them made sure I could get them from all angles and that they would dry really well. Be sure to use spray paint that sticks to metal when doing this step.

Then, I just waited for them all to dry and put it back together.


Done! Sonic screwdriver completed. The funny part was that there are instructions on how to make it light up online, but I didn't have time to put that together. We ended up snaking a glow stick through the piping and it worked great through the whole party! It really helps finish the costume, even on the hook.


And Scott looked great in it!


The River Song costume on the other hand had more gadgets to fabricate.


There was her gun belt, blaster, and time jumping bracelet. I actually wore brown jeggings (the shame!) for the pants, a long sweater for the top, and got a wide brown belt from Target to hold it all together.

The vortex manipulator (time bracelet) was made with pleather, a couple of swipes with the sewing machine, some hot glue, some cog parts, and two wooden circles (from Michaels). I even used some magnet clasps to hold it shut when I wanted the flap closed.


To make the blaster, I ended up with this gun from the dollar store that I modified.


I painted the entire thing white, then went back in with different amounts of watered down black paint to add some detail and blaster marks. I finished it off by adding in just a little watered down brown paint to really give it some grit. I think it really makes it feel like it has some weight behind it.


Next, for the holster, I cut out a long swatch from my pleather and made two rungs for my belt at the top of it. I cut a piece of pleather to go around my leg to hold the holster itself in place. I then used the glue gun to make a separate pouch for the gun to fit inside of, added a strap at the top of it to keep the gun in place, then glued the whole thing to the holster itself.


Casey also put my hair up in some curlers to get the signature crazy River hair. I feel like it all came together really well!

 Thanks for the picture, Katrina!

All in all, I'd say our Halloween was pretty Who-tastic. I'd say what really punctuated our accidental theme was when two of our friends showed up as Who characters as well! Not even planned! Between The Doctor, River Song, Captain Jack Harkness, and Rose Tyler, we were truly stylin' and time profilin'. Of course Scott won an award for Geekiest Costume, too, but that's just because...


Hope all of your costumes are coming together!

Monday, October 28, 2013

And the Winner Is...

Every year, we like to try to give everyone an opportunity to dress up and have a good time around Halloween. As many of you know, after the trick or treating age has passed and you're not in college anymore, Halloween parties seem to be few and far between. We love the costumed tradition, though, so we set up this past Saturday as the day and started planning.

One thing I really enjoy doing is making each Halloween party into a costume contest. People seem to put more effort into what they wear if you show them that it was worth the effort. It also makes for a nice bragging memento of  'that night everyone liked me the best', and who doesn't like that?

Last year, I started with some skeletons and made some Emmy looking trophies. They were pretty cool and gave me a new appreciation for the covering power of gold spray paint. This is the one for the geekiest costume (which we still have because Scott won for his Dr. Venture costume).


This year, I wanted to do something a little different than just grabbing more skeletons and posing them. I ended up getting a couple of wooden plaques from Michaels (The same kind as I used for the skeletons, in case you're interested).


Then, I visited my local dollar store for the rest. I actually did this in the opposite order because I took one of the skulls into Michaels with me to make sure it fit well on the plaques. The skulls are the hollow plastic kind and don't have great paint jobs, but that doesn't really matter because they are going to be covered by new paint anyway.


I also picked up a couple of props while I was at the dollar store to really give these guys some personality. For instance, I found a little bag of party favor trophies, so I decided that they would work great on the Best Overall trophy. Before hot gluing the skulls to the plaques, I laid everything out and made sure I liked the spacing.


After I had everything even, I began using the hot glue to glue everything down. I was sure to only try to put glue on the parts of the props that actually touched the plaques. This helped decrease the amount of glue that spilled over or created those annoying hot glue strings. The best way to find these 'glue points' is to look at your set up from the side and just see where everything touches.


When gluing the skulls, I was sure to put a good squiggle (technical term) of glue on both the bottom of the back of the skull and where there were mold relief holes behind the jaw. This seemed to keep them secure the most successfully.


When all of the skulls were attached, it was looking like a pretty good group. I actually let them dry for about 15 minutes just to make sure that the glue had set. This also helps the glue that is showing take any paint that might fall on it to cover it up.

Something else to keep in mind: the benefits of the trophies I made this year is that anyone who wants to add a wire to the back can actually turn any of these into wall hangings. The angle of the skull on the plaque allows it to be seen both laying down or hung up with nice visibility, so it makes it very versatile.


I didn't attach the mustache or glasses to the Geekiest and Sexiest trophies yet because I didn't wish for them to be painted. Obviously if you happen to be putting something like this together yourself, it's up to you, but I liked the contrast.

When I was sure they were dry, I took them all out to the garage and whipped out the same can of spray paint that I used for the trophies last year. This can of Valspar seems to give good coverage and last a while, so I would recommend it.


As always, long sweeping motions make sure that the coverage doesn't drip. The nice thing is that even without a primer, this paint really pops. Here you can see the difference between the before and after. Isn't it amazing what a little gold paint can accomplish?

Be sure to paint the trophy from a couple of different angles as well. This will make sure that you paint under the jaw, under the back of the skull, and get all of the teeth covered.

Once they are finished getting glammed up, the skulls will look a lot more like trophies. It's time for finishing touches.


Attaching the extra props follows the same rules as attaching the skulls and original props to the plaque. Use small amounts and only where they touch the skull.


I only put two dabs of hot glue where the skulls ears would be to attach the glasses (which are also from the dollar store). This made sure that there wasn't a big glob of hot glue on the bridge of his would-be nose.


When they are finished, they look pretty spiffy. Allow me to introduce the trophy for the Sexiest Costume:


The Geekiest Costume:


The Best Couple's Costume:


And, last but not least, Best Overall Costume:


Pretty cool, eh?

(Oh, and in case you were wondering, a Medusa won Sexiest, Scott as Dr. Who (11th) won Geekiest, two Warblers from Glee won Best Couple, and female Indiana Jones won Best Overall!)

Do these inspire you to make some cool trophies of your own? I want there to be more contests to I can experiment with painting more things with gold paint!