Monday, August 26, 2013

Under Pressure

Nothing like a little Queen for your Monday!
This weekend, we used some pressure to our own advantage. Scott's parents came down with his brother and brought their pressure washer. You could say we had a....BLAST! (Get it?!)


Scott was able to pressure wash the front walkway back to it's original clean gray. It's amazing how dirty the outside of your house is, but it's difficult to notice until you actually start cleaning it.


When he finished, it made us want to pressure wash everything! We dragged out a project that we have been working on in the garage that is made of wood from the backyard. At first, the wood looked like this.

But after getting washed, it almost looked like new!


And then we decided to hit the deck. Well, more accurately, the back patio. It was amazing how it transformed in half an hour of time.

Left side: Not Washed, Right side: Cleeeeeeean!

We knew that the patio was dirty. We had tried sweeping it and spraying it down with just the regular hose, but after pressure washing, it really gave it a deep clean. We didn't realize how red the pavers were until we pulverized the dirt from a couple of them. Scott's dad shimmied our really heavy umbrella so I could get underneath it, and then we let it dry.

There was dirt flying everywhere! Pressure washing cleans surfaces with just water, but actually DOING the pressure washing is quite the dirty job in itself.


Now that the patio is dry, it's a much cleaner, more comfortable place to spend time, especially barefoot.

Or bare pawed.

We would probably never purchase a pressure washer, but the ability to use one every couple of months makes a huge difference. Is there anything you do to your house only a couple of times a year that makes all the difference to you?

Thursday, August 22, 2013

Good News, Everyone!

In case you actually enjoy reading about our little house, you can now be sure to get updated on Facebook about our latest progress. Like our Facebook page at https://www.facebook.com/MyOldKentuckyHouseBlog ! We would be stoked to have you follow us! It'd make us feel as happy as being covered in puppies!

Not me, but a true facsimile of what my reaction would be if I were covered in puppies.


Tuesday, August 20, 2013

Taking Care of Some Dirty Laundry

As much as we love our kitchen, there is still something haunting us from around the corner. The laundry room.


It peeks around the corner at us and taunts us with it's horrible tan/yellow walls and outdated teal cabinets. Thankfully, it does have a window, but it's obscured by all of our laundry detergent (which need to find a new home), so the only light in the room comes from a blob of unstylishness hanging from the ceiling.


Sunday afternoon I decided to tackle this as a quick project. Scott took down the metal cabinets on the far wall (which we are going to use in the garage as storage), and that already helped by 150%. I then found some white paint in the stockpile that the previous owner left behind and slapped it on the walls. It's amazing what a fresh coat of paint will do in a room that initially looked so dirty.


I then remembered seeing a light that I had pinned. I had been wanting to make it, but wasn't sure what room it would look best in. I realized that since it doesn't have a shade, it would be a nice addition to the dark laundry room. I followed the tutorial and had it done in about 20min. (It was so easy to make, I want to make another one for somewhere else in the house, or even the back porch!). I gave it a quick spray with some oil rubbed bronze that I had left over and we put it up. So far, the room was looking so much cleaner and a much better place to clean laundry in.


But the space needed something. I found a gallon of a nice dark gray/blue color at Lowes for $5.00 and decided to make a bold statement. Stripes. I measured 11" from the ceiling, marked out where I wanted them to go, then started taping. After one good coat of paint, I peeled the tape (while the paint was still wet for the best lines). Sooooo satisfying.


After making my two top stripes, I then decided on two slightly smaller ones for the bottom of the room, to add some interest. I really like how it turned out.


Eventually, that back wall is going to have open shelving for our laundry detergent, and I would love to find some cute art to go on the striped wall, but for now, it's just nice to have a room that isn't gross looking.

What makes it feel even better is that David and Scott put the pendants light up in the kitchen!


They are dimmable and woooooonderful! We love them. They make the room feel both cozy and functional!

Together, the rooms looks leaps and bounds better than the day we moved in.

Nothing like a short project to make you love your house more. Have you ever done a project in a day that makes you not dislike a room?


Some Home Toilet Humor

For some reason, the only thing both of the bathrooms in the house had in common was that their toilets positioned your knees awkwardly under their sinks. In the not-so-pepto-anymore bathroom there isn't much we can do about this without an extensive remodel.  That wasn't the case in the master bathroom, however. There was plenty of room for the toilet to be positioned properly, as long as it cleared the inward-opening door.  Needless to say this was high on Cait's and my list of priorities, so we got right to it soon after moving in.

Since I neglected to take any before pictures, here is one from the house listing showing the bathroom pre-rotation.


Not only is this awkward, but the toilet is a low flow and really didn't flush properly. The home inspector recommended we ask the seller to replace it, but we were informed that it was supposed to work like that. That became another motivation for this project - replacing the toilet with something less....giant and unflush-friendly.

Here is a better shot of the low-flow toilet.


I started with all the normal steps; shut off the water valve to the toilet and unhook the supply line from the toilet at the base of the tank. Next I flushed the toilet to remove as much water as possible and then removed the rest by hand with a small cup (gross! but better than sloshing it through the house on the way out). I then loosened the bolts holding the toilet to the flange and lifted it off.

After carrying it outside (with a lot of help, the permanently attached tank made it very heavy) and cleaning all the wax off the flange it was easy to see why it was positioned like this in the first place - the flange only had one set of receiver grooves for the bolts, which would prevent a toilet from being installed in any other position than this one was.  However, in this specific case we ended up getting a bit lucky in an odd way; the flange was broken, which meant we would have to take it off entirely and put a repair ring on.

The flange was completely cracked all the way around. The flange is a simple metal ring that would fit around the end of the standpipe with receiving grooves for the toilet bolts that could be screwed into the floor. It looked like this:


I could get my fingers under it and wiggle it and see the seam move, with the exception of about a quarter inch where the crack hadn't made it back to itself. It came off easily with a crowbar, and I headed off to the hardware store. We got a new toilet, a new wax seal, and brand new flange.

First I had to chip away some of the tile to make room for it. A real chisel is probably best, but I found a cheap flathead screwdriver worked very well. Then, I found some screws about an inch long and screwed the flange to the floor. These screws were much too short, though. I realized later that the tile is so thick, that the screws I had on hand probably didn't bite into any of the wood sub-floor at all.  When I set the toilet over the newly installed flange and tried to tighten it down, I heard wood cracking and the toilet simply never tightened. When I picked it back up I found this:


Had the screws been sunk solidly into wood this might have held, but in this case some pulled free of the wood and some pulled through the repair ring itself, badly deforming the ring. So I went back to the hardware store and talked to an associate who sold me some giant 3 inch brass screws (to avoid reacting with the lead) and a better flange repair. I didn't take a picture of it before installation, but I've gone on the internet, and found this:


He also mentioned that I might need to hammer the jagged end of the standpipe out a bit to flatten it against the floor so this would fit over it. After a bit of light tapping to fold the edges of the pipe outward until they were flush against the floor (this was much easier than expected, folding lead pipe really doesn't take much), I installed the flange and tried to screw it in. After breaking two screws I went back to the store for more and a masonry bit; the screws simply wouldn't go through the thick masonry underneath.  After pre-drilling through the masonry, the screws went easily into the wood planks in the floor. I did angle them outward some to ensure I would hit wood. I wasn't too concerned, but a quick foray into the crawlspace had revealed, as expected, that the wood wasn't quite flush against the pipe.

The angle here is weird, but you can see what I mean.

The installed flange repair, pre-screws.

Once I had all the screws in, I stuck the new wax seal to the bottom of the toilet.  A quick note here: the man helping me at the store admonished me when I reached for the large, "reinforced" wax seal. Those apparently have too much wax; so much wax that it can get squished into the path of the water and catch debris, causing flow problems. I instead got a basic one, and that seems to have worked well. So, I set the toilet over the flange and tightened it down.  When everything was secure I reconnected the water with an unusually large hose (since the valve was no longer under the tank), and flushed it. Huzzah, success!


Everything works and the toilet is secure. The flange I eventually got may have been a bit more than strictly necessary, but I think in this case, I'd rather err on the side of caution.  Also, the shutoff valve is located at the side of the toilet instead of at the back, but that just means it's easily accessible in the event of a problem. It's not a bug, its a feature.

Has anyone encountered a different toilet repair problem, or have a bathroom with an odd configuration? Tell us in the comments!

Friday, August 16, 2013

The Bucket List

Time for a quick project for your weekend!

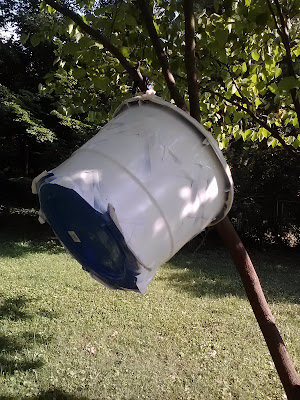
First, go to Target and purchase a giant tub. Ours only had blue, so that's what I got. Beth pointed them out to me at........$3.04! DONE!


Be sure to show off your awesomeness to your significant other.

Then, grab your tools. You'll need some painters tape, a magic marker, and a couple pieces of paper.


Fold the paper into the desires triangle size. Then hold it against the tub and mark with the marker. Because my pattern was made of straight lines, I just marked the corners and made the lines with the tape itself.


Then be sure to cover the top of the tub so you don't get it all misted with the extra paint. I would usually say use a trash bag, but since we didn't have any (Oops, need to go to the store!), I used some plastic wrap instead. Tape all around the top. Also be sure that you cover the stripes you want to stay blue with paper so that they don't get painted as well. Retreat outside.


Use some Rustoleum for Plastic (In whatever color you choose) to give the tub a light coat. Slowly build up the coats until you get some sweeeeet coverage over your pattern.

I then let mine dry for half an hour before pealing the paper. To get it to dry quicker, I hung it from my Drying Tree. It really is! It has the perfect branch to let things hang from so that they dry quickly. It's pretty swell.


After pealing the tape, I could see that my lines weren't perfect, but to be honest, who cares?! It's an outside tub that will hold sodas and beer! It absolutely helps brighten up our little outdoor space, though.


The entire project took me half of the movie Moby Dick: 2010 to complete (So less than 40 min. Thanks SyFy!). It's just one of those fun projects for when you're feeling antsy. I hope this inspires you to grab a bottle of spray paint and start making your outdoors yours!


This is a Story All About How Our Roof Got Flipped-Turned Upside Down

When we put our 'bid' into the sellers of the house for some work to be done, we pretty much gave two options. They could either fix a clogged toilet, some broken windows, and a couple of plumbing issues, or they could replace the roof. To our surprise, the sellers were super awesome and decided to replace the roof for us. Huzzah!

We had gotten a quote that seemed like a pretty good deal and went ahead and used a national box store to do the install. It was only later when we were told that the price of the quote was actually $2,600 higher than originally stated, due to our oddly shallow addition roof. An even later phone call revealed that some people are just not great at math, and our rep had just tagged the extra money for the cost of the specialized materials onto the overall cost rather than taking the cost of the addition materials off and adding the correct ones on.

Eventually, we got everything straightened out. The date was set for August 5. Everything looked good.

Then, on August 2nd, a giant truck rolls up to our house (which was currently housing a couple worse-for-wear bachelorette partiers) and delivers the materials for the roof. Scott and I had figured that the materials would just be brought with the installers on the agreed upon start date, but apparently not. Unfortunately, we were not told or warned about this delivery, so I drearily drug myself outside with as much of a smile as I could muster and greeted the Duck Dynasty shirt wearing delivery man the best I could.


The install itself was to start a couple of days later. The first portion went pretty smoothly. The installers were running late, but when they got here, they really got a lot done.


They had to tackle the house in two stages because the addition roof needed a little extra love, so the main part of the house was completely finished that night with a promise that they would return the next day (weather permitting) to finish the addition. That meant that they tore up and reshingled the entire older portion of the house in about 4 hours. Leela, of course, wasn't a fan of this part.

Yeah, she hides in the bathtub when she gets scared. We call it the "Puppy Bomb Shelter"
When they left, we were looking pretty good, though. We chose Owens Corning Oakridge Brownwood AR Laminate Shingles. We didn't want to go with black because the house is a tan, so the browns really play off the stone in the house already.

We also chose a dimensional shingle, which gives your roof a little more texture. The shingles don't lay completely flat, so it is a little more decorative than the alternative.

So much dimension!


So we were really pleased with the roof so far. We liked the look, but mostly, the peace of mind that came with the guarantee of no leaks for the next 25 years.

Living in Kentucky means that the weather changes at the drop of a derby hat. It can be a perfect 75 degrees and sunny, but then in 30 minutes time, turn into a massive storm with high winds and severe weather warnings. You learn to get used to it. Rain also means that the roofers can't do their job, though, so we knew that we would be gambling with the KY weather in order to get this project done. Unfortunately, it didn't cooperate.

Brown=Finished. Black=Not Started (Yet. Not referring to the Sam in the corner.)

Seven days after they had put the new roof on the main part of the house, the roofers returned on an overcast Monday to finish the addition. They arrived, started tearing up the old roof, then stopped, and covered it with tarps just in time for the rain to start. They were working for all of 3 hours. Why did they start on what was obviously a rain day? We will never know.

What we did find out (and was expected), was that the roof that had been on the addition was wrong. Really wrong. Scott said that he got to feel the material that had been taken off and it wasn't plywood, but some fuzzy, super absorbent material that was obviously incorrect. The roofers had to purchase new plywood to replace the entire addition roof in order to set things right, which of course added to the cost. The day had not gotten off to a great start.


What made it worse is that tarps do not protect against rain as well as the roof that they had just torn off did.  We had leaks. Three by 10pm, and they were all right over our TV and other electronics in the living room.

We grabbed bowls and towels, trying to catch as much of the dirty roof water as we could. The rest of the night was spent listening for more leaks and running to the store for plumbers putty and silicone (Which, as any good DIY-er knows, doesn't set in the wet, so we had to wait for a lull in the rain to even apply it).

Needless to say, we were not happy campers at this point. We didn't understand why they would tear up our roof when there was no need to if there was impending rain. We let them know that night, and they promised to be back the next day to fix it. No shows. The day after? I left the house around 2, tired of waiting for them to show up.

Around 7pm, Scott gets a phone call. They are at the house and working on the roof. At 7pm. We appreciated their dedication to finishing at any time, but at this point, just wanted the job done. We were tired of cringing at the forecast and checking our roof for more leaks. We just wanted our roof, finished, on our house.

The next day, 11 days after they began, the roof was finally completed.

And a little uglier than we thought it would be. At least it's done right!

This job, which was initially promised as being "two to three days at the most" somehow turned into televen days of frustration and an emotional roller coaster for both us and our terrified canine companions. I know that this seems over dramatic, and maybe it is, but you don't have to be a home owner to want to get a job done quickly and painlessly, whether it be a roof or just getting your laptop fixed.

Getting a contractor to do a job is supposed to get the job done quickly and correctly. Unfortunately, it doesn't mean it completely takes the worry out of the project, either. Sometimes things are just going to be complicated, no matter what you do to avoid it.

TEASER:

We have been able to work on our back yard! Here is a sneak peek at what we've accomplished so far!


Wednesday, August 14, 2013

It's Kind of Like The Teselecta

Which, if you don't watch Dr. Who, is a human sized robot with little people in it that can shapeshift. It essentially puts up a false front, which is kind of what our kitchen is doing right now.

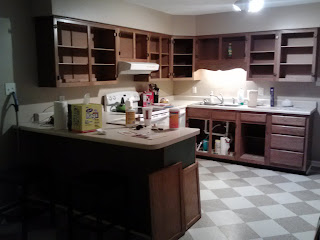
After starting with something like this:


We are now living with something a little more like this:


Which is certainly an upgrade if I've ever seen one! We loved being able to paint it and make it our own. The only issue came with actually using our kitchen. With the cabinet doors off and everything exposed, it was more difficult to use the kitchen to actually cook in, so I decided to jump the gun a bit and put the doors back on. The problem?


The insides of our cabinet doors aren't done! Oops! Honestly, you can only tell if you, ya know, open them, so it's not that bothersome. We are planning on finishing them, too. I've needed a break from painting lately though (I'm having some pain in my wrist. Wonder if that has ANYTHING  to do with all the painting I've been doing?!), so we just moved on to another step.

You'll notice that the outside slat of each door HAS been painted. Well, knowing what a pain it is to paint around details, I put down a coat quickly before we added some much needed accessories. First, we put all of our door handles on! I went to the Target in Hamburg Pavilion (Woo, Lexington! Two Targets!) and they had exactly three boxes left of our handles! Score!


Beth and I took an hour to install them and boy, do they really make the place feel fancy. Since there were no door handles at all on the cabinet fronts before, we didn't need to fill any holes before painting, too, which made the process that much better. I like how they look on the top cabinets, but I looove how they look on the bottoms even better.


I think it's also because those were the trickiest to open without handles anyway.

We also realized how loud our cabinets closed. It then occurred to us that we had to take off all of the door bumpers to paint them, so we found some cork replacements at Home Depot and now closing a door doesn't mean echoing a slam through the house each time.


So we're looking pretty good (aside from our hidden, unfinished shame). We even painted the walls the same color as the front room. I discovered that since the light in the kitchen was different from the front room (Tungsten vs. Natural light), that it came off much more green than grey in the kitchen. I got bored, grab a brush, and just started painting. Scott even said that he liked it because it just looks like it was, "always supposed to have been that color", which I'll take as a positive!


Unfortunately, the nice looking cabinets have brought to our attention the rest of our list of things we would like to do to the room.

Counter tops- We would love to replace them with something nicer, especially since ours are worn, tarnished, and stained (And don't go with the new do, yo).


Floor- We currently have the tile-by-tile type vinyl flooring, which wears well, but isn't the most attractive. I don't want to say it's ugly, but I will say that it matches the counter tops! We have found a different type of affordable vinyl flooring that is a little nicer that fits with both the style of the kitchen and our budget. It comes in individual planks and is supposed to wear almost as well as laminate flooring. It also comes in a nice dark wood finish which will really make the rest of the kitchen pop!


Don't even get me started on the corner next to the fridge. We are currently using some old wire shelves that we had at the apartment to hold our microwave and some of the other larger and more awkward kitchen supplies, but I would love to replace it with this.

So that it no longer looks like this.


So much to do, so little time.

Speaking of time, we are still having our roof put on. The roof over the main house is finished (Huzzah!), but the addition is causing some additional problems. Har har. When it's finished, you'll have to come back, gawk at pics of our new beautiful roof, and hear my tale of woe, weather, and water leaks.

Till then, have a great week!