
We have people over a lot. As in, at least once a week there are up to 15 people making themselves at home, eating delicious food, and spending time with friends. With those people come coats, purses, and shoes that so far have been randomly scattered around the house. To this I say, "No more!"
This is the area that we had to work with.

Ever since I had seen the space, I had visions of putting in some fake board and batten. It just seemed like a nice architectural element that would add interest to the room. It would also make the entire house seem more inviting and organized.
We were hoping for something like this.

But wouldn't be too upset if we didn't like the wall coloring showing. If all else failed, we still really liked this option as well.

Yes, Pinterest...don't judge me..
First, we measured and drew up some plans. We made our measurements with the understanding that we wanted the top board to align with the bottom of the window on the front door. We also kept in mind that when the front door was open, it cut into the space. Knowing that putting hooks behind the door wasn't the best idea, we kept the actual storage portion of the plan to the open part of the wall.
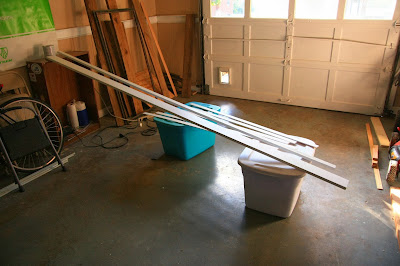
Luckily, the vertical slats were pretty easy to find. We purchased three 12' lattice pieces and had them cut in half in the store so they would fit in the car. Once we had everything, we headed home and started measuring.

Scott cut the two top pieces to size and then we started to mark the wall. We first made a line across the entire wall that showed where the board would be level. After
finding the center of the wall, we marked out equally for where the
vertical slats would go. Scott then held everything up so we could see if we liked the set up so far.


Lookin' good!
We then found all of the studs in the wall and marked them. We used the same technique that I used to
measure the lines for the dining room wall.

The "x" marks where the vertical slat will go, the two marks to the right are where the stud is.
Then, after everything was marked and cut, I gave all the wood a good sanding with 120 grit sandpaper (using my new little $13 sander from Harbor Freight, yay!). This was followed by three good coats of white trim paint in eggshell finish.

This set up is very technical. You probably don't have anything this fancy at your house.
Then we finally got to my favorite part: assembly! We had borrowed David's air compressor and finish nailer to hopefully make our lives easier during this part of the process. Both of us promptly fell in love with it and wanted to steal it realized that we would have been there for days with finishing nails had we not been fortunate enough to use it.

What makes our board and batten fake is that, simply, there are no boards involved. The slats are all being directly attached to the wall, so the wall itself acts as the board. This makes this a very cost effective and much easier way of achieving a high end finish.
Because we didn't have the boards to worry about, we were able to skip the first step (which would be to attach the boards to the wall). This let us move on to step #2: Placing our main horizontal board. All of the nails that we placed into the board in this step were inserted so that they went through the wall and into a stud. This gives the entire setup more strength.

Let's get a close up of that sweet auto-nailin'-attachin' action.


An issue we ran into was that we were not using a traditional method for attaching our vertical slats. Usually, you would attach them directly to where there are studs so that the nails aren't just trying to stay grounded in flat drywall.

We really liked the spacing and number that we had originally sketched and measured out, so we added some strength to their bond with a little builders grade adhesive on the back of each slat.

Then the slats were positioned and attached to to the wall with more nails to hold them in place while the glue dried. When we had finished mounting all of the pieces, we were looking at one fine wall.


Oh, hello there...
What makes our board and batten fake is that, simply, there are no boards involved. The slats are all being directly attached to the wall, so the wall itself acts as the board. This makes this a very cost effective and much easier way of achieving a high end finish.
Because we didn't have the boards to worry about, we were able to skip the first step (which would be to attach the boards to the wall). This let us move on to step #2: Placing our main horizontal board. All of the nails that we placed into the board in this step were inserted so that they went through the wall and into a stud. This gives the entire setup more strength.

Let's get a close up of that sweet auto-nailin'-attachin' action.

BAM!
Next up was our small lip that goes on the top. It acts as a sort of shelf, but is normally used in this circumstance as a place to rest art or just give the wall a more finished look. This was attached by shooting downward into the horizontal board.

An issue we ran into was that we were not using a traditional method for attaching our vertical slats. Usually, you would attach them directly to where there are studs so that the nails aren't just trying to stay grounded in flat drywall.


Well, sort of.
We had a couple of issues. First, we weren't really digging the fact that the wall color was showing through. After taking a couple more ganders as some other people's reference photos, we discovered that our vertical slats weren't wide enough to satisfy dividing such a span of wall appropriately. Second, there were a lot of patches that still needed to be applied to the nail holes in the boards and the wall itself. This included the giant patch you see next to the outlet. That is where we used to have an antenna attachment (super old school, yo!) that the boys took out soon after we moved in.
A patch kit (for the big hole) and some spackle (hehe, fun word) later, our holes went from looking like this

To looking like this.

Somewhere between the first and second coat/sanding of spackle we decided that it was time to go big or stay home (because we were already home. Yeah.), so we started painting the entire space below the horizontal board white. This took...a couple of coats. I also repainted the patches on the top portion of the wall so that they would blend back in with the upper wall color.

Ew, not that picture. Let's fast forward half an hour.

Ahhh. Better. When we reached this step, we knew we'd made the right decision to go all white. It really helped the entire room feel more cohesive and less awkward. We had grabbed four hat/coat hooks from Home Depot in oil rubbed bronze for some nice contrast.

Once those bad boys were up, it was like signing our names to a masterpiece.

I had grabbed a little rug from another part of the house for shoes right before Beth and David arrived. It was so wonderful having a place for their things when they entered the house!

A patch kit (for the big hole) and some spackle (hehe, fun word) later, our holes went from looking like this

To looking like this.


Ahhh. Better. When we reached this step, we knew we'd made the right decision to go all white. It really helped the entire room feel more cohesive and less awkward. We had grabbed four hat/coat hooks from Home Depot in oil rubbed bronze for some nice contrast.


This is pretty much what it looks like when you walk in our home, pup and all.
One more shot. I think I could sleep in the front room now, I love it so much.

What do you think? Our 6 hours of total work paid off? Personally, we love it. I still can't believe how straightforward the entire project was! Does this inspire you to add a little boardand batten to your living space?

What do you think? Our 6 hours of total work paid off? Personally, we love it. I still can't believe how straightforward the entire project was! Does this inspire you to add a little board
how about we build a bench/shoe shelf to go there when i get there for Thanksgiving?
ReplyDeleteya, with a padded seat.... you definitely need something to do over Thanksgiving Bro.
DeleteSounds like a plan!
ReplyDelete