Friday, September 27, 2013

Frame of Mind

So since things exist like "college" and "Wal-Mart", we have all ended up with those over the door mirrors. You know the ones.


Yeah, we have a couple as well. There are two that I know of, floating around the house, loiterin'. One of them has been sitting near the bar in the living room for a while, but has been a bit lack-luster, so say the least.


I've seen floor mirrors everywhere that would be a good fit for the space, but they are all expensive. The cheapest I've seen have been in the $80-$120 range. This one is from Pottery Barn and it makes me drool a little.


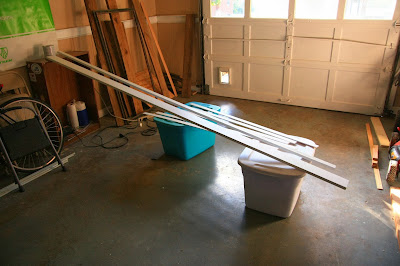
Instead, I decided to use one of the mirrors I already had and use some of our "salvaged" wood from the wood pile and chunk out the frame of one of them myself. I started by cutting my wood to size.


I didn't give it any fancy angled joints because I wanted to keep it simple and a bit rustic. I just measured the sides of the mirror and cut those pieces, then I measured the entire width of what would be the finished mirror and cut the top and bottom pieces.


I then laid all of the pieces down on the floor without the mirror to attach them.


I used some 3in. mending plates that I got from Home Depot and attached them so that the joints would be aligned. After screwing them together, I placed the mirror on the frame (while it was still upside-down) and used some scrap wood to help brace it and keep it in place.


I would recommend predrilling the holes in the scrap wood, just so they don't split. Then butt them against the mirror (once it's aligned to the hole in the frame) and screw them in. Once this is done, double check that they are holding the mirror straight.


This was when I started to get excited. It's working! It's working! One more assembly step, though. Place the entire thing face down one more time. Take ribbon and staple it so that it braces the mirror to the frame. I think I am actually going to replace the ribbon with some screws and washers (that will actually hold the weight of the mirror) in the future, but for right now, this actually works really well.

Then, I used 80 grit sandpaper and gave the whole thing a good once over. This wood has been well weathered, so this step was mostly just to get the burs and loose pieces off of the frame. I didn't want to make it completely smooth, though, because I liked the texture.

I set the whole thing against the garage door and then got ready to stain. We used the same Dark Walnut stain that we used for the house numbers. It's a little tiny pot of it that I got years ago from Lowes on the cheap. It seems to last for-ev-er!


I used a cloth and a paint brush for application. Usually, you're supposed to use a cloth and a foam brush, but I didn't have one on hand. I did have an old paint brush, though, and it really helped get it in the cracks and crevasses. The clothe helps work the stain in evenly so you don't have some oddly darker regions than others on your surface. When I have halfway through, it looked like this.


It's amazing how much more finished it looks with the darker color. I really love how it brings out the character in the wood as well. I finished the entire frame (remembering to get inside the edge, the tops, bottoms, and sides) and let it dry really well. I then took some mineral spirits and a paper towel and cleaned off any of the stain that got on the mirror itself.

When all was said and done, it was super spiffy. The bees knees. Super duper. The cat's pajamas. Much better than the one we had in the space before.


It was really easy! I would recommend anyone who wants a look like this, has a saw, and two hours on their hands to knock this one out. It really helps anchor a space, especially since it doesn't even hang. It's a LEAN mean mirrorin' machine! Oh, and did I mention that the entire project cost me $6? WHAT WHAT?!

So that's the story on how to go from this to this.


Tuesday, September 24, 2013

What an Entrance

When we moved into the house, we knew that we were going to be getting a lot more space and a much more appropriate place to host friends and family. Along with the gains, though, came a couple of losses. We had a coat closet in the apartment that we had to give up when we moved into the house.

We have people over a lot. As in, at least once a week there are up to 15 people making themselves at home, eating delicious food, and spending time with friends. With those people come coats, purses, and shoes that so far have been randomly scattered around the house. To this I say, "No more!"

This is the area that we had to work with.


Ever since I had seen the space, I had visions of putting in some fake board and batten. It just seemed like a nice architectural element that would add interest to the room. It would also make the entire house seem more inviting and organized.

We were hoping for something like this.


But wouldn't be too upset if we didn't like the wall coloring showing. If all else failed, we still really liked this option as well.

Yes, Pinterest...don't judge me..
First, we measured and drew up some plans. We made our measurements with the understanding that we wanted the top board to align with the bottom of the window on the front door. We also kept in mind that when the front door was open, it cut into the space. Knowing that putting hooks behind the door wasn't the best idea, we kept the actual storage portion of the plan to the open part of the wall.


We headed to Lowes and immediately ran into an issue. The measure for the top board had to be 1"x4"x10' so that it gave a nice presence and stretched the entire wall. Apparently this is not a very popular size for wood to be cut in, so we ended up getting slightly more expensive wood. The same can be said of the top bar, which measured 1"x2"x10'.

Luckily, the vertical slats were pretty easy to find. We purchased three 12' lattice pieces and had them cut in half in the store so they would fit in the car. Once we had everything, we headed home and started measuring.


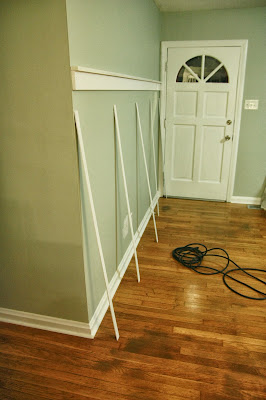
Scott cut the two top pieces to size and then we started to mark the wall. We first made a line across the entire wall that showed where the board would be level. After finding the center of the wall, we marked out equally for where the vertical slats would go. Scott then held everything up so we could see if we liked the set up so far.


Lookin' good!

We then found all of the studs in the wall and marked them. We used the same technique that I used to measure the lines for the dining room wall.


The "x" marks where the vertical slat will go, the two marks to the right are where the stud is.

Then, after everything was marked and cut, I gave all the wood a good sanding with 120 grit sandpaper (using my new little $13 sander from Harbor Freight, yay!). This was followed by three good coats of white trim paint in eggshell finish.
This set up is very technical. You probably don't have anything this fancy at your house.

Then we finally got to my favorite part: assembly! We had borrowed David's air compressor and finish nailer to hopefully make our lives easier during this part of the process. Both of us promptly fell in love with it and wanted to steal it realized that we would have been there for days with finishing nails had we not been fortunate enough to use it.
Oh, hello there...

What makes our board and batten fake is that, simply, there are no boards involved. The slats are all being directly attached to the wall, so the wall itself acts as the board. This makes this a very cost effective and much easier way of achieving a high end finish.

Because we didn't have the boards to worry about, we were able to skip the first step (which would be to attach the boards to the wall). This let us move on to step #2: Placing our main horizontal board. All of the nails that we placed into the board in this step were inserted so that they went through the wall and into a stud. This gives the entire setup more strength.


Let's get a close up of that sweet auto-nailin'-attachin' action.

BAM!

Next up was our small lip that goes on the top. It acts as a sort of shelf, but is normally used in this circumstance as a place to rest art or just give the wall a more finished look. This was attached by shooting downward into the horizontal board.


An issue we ran into was that we were not using a traditional method for attaching our vertical slats. Usually, you would attach them directly to where there are studs so that the nails aren't just trying to stay grounded in flat drywall.


We really liked the spacing and number that we had originally sketched and measured out, so we added some strength to their bond with a little builders grade adhesive on the back of each slat.


Then the slats were positioned and attached to to the wall with more nails to hold them in place while the glue dried. When we had finished mounting all of the pieces, we were looking at one fine wall.

Well, sort of.

We had a couple of issues. First, we weren't really digging the fact that the wall color was showing through. After taking a couple more ganders as some other people's reference photos, we discovered that our vertical slats weren't wide enough to satisfy dividing such a span of wall appropriately. Second, there were a lot of patches that still needed to be applied to the nail holes in the boards and the wall itself. This included the giant patch you see next to the outlet. That is where we used to have an antenna attachment (super old school, yo!) that the boys took out soon after we moved in.

A patch kit (for the big hole) and some spackle (hehe, fun word) later, our holes went from looking like this


To looking like this.


Somewhere between the first and second coat/sanding of spackle we decided that it was time to go big or stay home (because we were already home. Yeah.), so we started painting the entire space below the horizontal board white. This took...a couple of coats. I also repainted the patches on the top portion of the wall so that they would blend back in with the upper wall color.


Ew, not that picture. Let's fast forward half an hour.


Ahhh. Better. When we reached this step, we knew we'd made the right decision to go all white. It really helped the entire room feel more cohesive and less awkward. We had grabbed four hat/coat hooks from Home Depot in oil rubbed bronze for some nice contrast.


Once those bad boys were up, it was like signing our names to a masterpiece.


I had grabbed a little rug from another part of the house for shoes right before Beth and David arrived. It was so wonderful having a place for their things when they entered the house!

This is pretty much what it looks like when you walk in our home, pup and all.

One more shot. I think I could sleep in the front room now, I love it so much.


What do you think? Our 6 hours of total work paid off? Personally, we love it. I still can't believe how straightforward the entire project was! Does this inspire you to add a little board and batten to your living space?

Monday, September 23, 2013

"Board"

Chalkboard, that is. Unlike Sherlock, though, I don't go shooting walls.

Love him.

Instead, I decided to try out yet another pin that I had seen on The Pinterest that had caught my eye and immediately clicked with me. It involved turning the door that accesses your garage from your house into a chalkboard. This made sense on a lot of levels:

-The black paint won't show the dirty hand prints that usually adorn a white garage access door.
-The chalkboard material is easy to clean
-It's a great place to leave lists, especially for the budding DIYer

So I grabbed my can of chalkboard paint that was left over from the wedding. You don't HAVE to use pre-mixed paint, but I just happened to have it on hand.


If you don't happen to have any left over from your own bunch of previous DIY projects, you can always use this Martha Stewart recipe to create your own (in any color you wish!):

  • Flat-finish latex paint (any color)
  • Mixing container
  • Unsanded tile grout

Pretty simple, eh? Just mix them together until you get the consistency of semi-thick paint and boom....chalkboard paint.

After I had gathered my paint, paint brush, and painter's tape, I approached my victim canvas.

Yes, our garage is a mess. Also, points for you if you noticed the X-Wing Fighter street sign before I mentioned it...

Nothing special, but it did have traces of the grimy hands that had been opening it over and over for the past (almost) two months.

Gross.

I was sure to tape off the door knob and dead bolt before starting just to make clean up easier. I also taped off the sides of the door so that I could avoid those awkward over-reaching brush strokes. After the first coat, it was obvious this was going to need more that one good slathering of paint, so I let the first coat dry to this result. Note: I used the same door painting technique outlined in my previous post.


A couple more coats, though, and we were looking good. In all, I'd say there were three coats with about 30 minutes in between. The entire project probably took me about an hour and a half.

For better lighting, I opened the outside door. Here, Sam is modeling it's low windows and abundance of squirrel interest.

This is the next day. The door was looking much better with all of the well-dried coats of paint. There was something missing, though.....chalk writing!

I decided to use this tutorial to do some fun chalkboard lettering for the eye-level portion of the door. It didn't turn out too bad (better than it would have been free handed), but I definitely need some practice.


Overall, the project was a fun way to add a little written organization to our garage, but it's also a nice surprise design element that I haven't seen on a lot of garage doors. I really like it! It helps, of course, that the first item on our list makes me think of Peter Gabriel.


Happy Monday!

Tuesday, September 17, 2013

Our Number Is Up!

Our house numbers, that is!

For a long time, Scott and I had our eyes on these very specific house numbers that we had seen on a lot of homes that we really liked. They seemed to fit our style, but not necessarily our budget. Rejuvenation had exactly what we wanted, but for $120 dollars. We found them on a boutique site as well, but as it sometimes is with boutiques, their prices were a little....steep.


$21 each! No way! So the search continued. I had seen them in many Pinterest posts (you can tell I'm an obsessed pinner, eh?) and had fallen in love. The different variant applications of them to their various homes also gave us tons of ideas, which made swoon for them that much more.

At the blog Freckles Chick, the numbers were placed above the garage door in front of the wonderful dark color they had just painted their home. Together, it felt chic and modern.

Photo care of Freckles Chick Blog.

I had also fallen in love with a specific pin that had stuck out in my mind earlier in the year. 4 Men 1 Lady had posted an image to Pinterest featuring a wonderful wooden backdrop to their numbers. It gave a great texture behind the brushed, modern numbers.

Photo care of 4 Men 1 Lady Blog.

What I especially loved about this example was that having the numbers attached to a solid background meant mounting it would be that much easier. When we finally found a house we loved and it ended up with a Bedford stone exterior (yes, we loved the numbers before we even had the house), it became clear that the stone being uneven would add some extra headache. If the numbers were attached to a board and then the board was attached to the house, it would make installation way simpler.

So after finally searching the interwebs and many a magazine, I discovered that the answer to the question of expense was right in front of me. Well, actually it was 1.8 miles down the road. Even though I had checked at other stores, it turns out that Home Depot had had them all along. To really top it off, they weren't $21 each, but $5.99. What a difference!

So the day finally came. I had purchased my Saffron red paint for the front door, and in an effort to add a real impact to our curb appeal, I also picked up our house numbers. I then brought them home and sketched up my vision for Scott to put together while I worked on painting the front door.

This may not be the original sketch, but an approximate re-enactment

To build the base, we would take three equally sized pieces of scrap wood that we cut and attach them to two vertical wood slats (also made from scrap wood) using screws. From the front, it would then give a look much akin to that of the numbers on the board that I'd fallen for on Pinterest, except that we were mounting our numbers horizontally. We also used some of our left over Dark Walnut stain that we had to give a rich, dark finish.

From the front, would would use the included templates that came with the numbers and align them, being sure to tape them to the wood once they were in place. We then marked the holes with a pencil and pre-drilled for the included screws to sink into.

Then, using a mallet so we didn't scratch up the numbers, we proceeded to gently knock them into the pre-drilled holes. This was easier said than done since the included screws were kind of cheap and liked to break, but eventually, Scott got the hang of it and in the end, we were left with something pretty awesome.

I'm not showing you our whole address. The internet is a crazy place, silly!

It's difficult to tell, but the numbers aren't flush mounted, they are actually floating, which gives it a more dimensional feel. It's a nice touch you can really see when you walk by it in real life.

We ended up mounting it near our garage so it would be easier to see from the road. The tree in front of the front door really would have hidden it from view otherwise and it's WAY too awesome to hide. With the new red front door, though, it helps balance out the fancy.


So now, we only have about 10 million things to do, but we're running out of summer, so we're glad to have at least gotten the two main front projects done. Some other things we would like to add to the front is:

-New front window (Our current one is single pane and doesn't open. It's not great on energy costs, nor particulary attractive close up)
-New landscaping
-New sconce lights to flank the front door and the garage door
-Possibly creating a knee-high raised bed under the big window to add some height, since we're on a hill and those plants are difficult enough to see as it is.
-Maybe some shudders around the windows, to really establish the look. We've seen them on some other BStones (Bedford stone homes), and we're torn on how we feel yet.

Besides that and the list of other things that need to happen on the inside of the house, there is plenty left to do (and write about!) over the next couple of years. For only being in the house a month a half, though, we're actually doing pretty well! Go us!

Like Moth to the Flame

If you'll recall our post about a door color (from before we even got the house!), it was always our intention to paint the front door. The original color kind of blended in with the house itself and wasn't really the BAM that I was looking for.


So after looking at a couple of color samples, checking out some paint chips, and paying attention to other Bedford stone homes in the area, we decided on a nice red. Not a pink red or a really dark classic red, but a pop-bam-wow-burnt-orange-tinge red. Some people would call it a 'terracotta red', but that doesn't seem like as much fun.

To start the process, I picked up a quart of Martha Stewart's color Saffron in the Glidden exterior semi-gloss from Home Depot. I then took the door knobs and dead bolt off the door so it was looking something like this,


You'll also notice that the windows on the door are blue. That is painters tape that I covered them in, making sure to really push it into the corners of the windows. I then took a razor and cut the excess off to give a really crisp line. I wouldn't recommend using the Home Depot brand tape for this step. Buying the real Blue Painter's Tape will save you a bit of hassle, but I'll go into that later.

Next, I took a sanding sponge and really gave the entire door a good rub down. This resulted in a very odd color change that made the door look a little radioactive. This step was just to rough up the door and give the new paint something to adhere to, so be sure that you wipe down the entire door with a damp cloth when you've finished sanding.


Then, following the 10,000 tutorials on Pinterest, I then proceeded putting on the first coat. As always, begin with an even, thin coat. I would also recommend using an edging brush for painting doors because it will allow you to get into the nooks. It also addresses the crannies pretty well, too.

1. Paint the frames of the door panels,


2. Paint inside the frames


3. Paint the rest of the flat-panel portion of the door.


4. Repeat.

I would give at least two coats, but that depends on the color you're applying and what color you're trying to cover. Since I was going from a lighter color to a darker one, it was a little easier to cover, but sometimes the worst case scenario can leave you with ten coats to complete. If you are a little worried, I would recommend a good primer to bring you back to neutral, then applying your selected door color over that.

After my second coat, I was then able to pull my tape and let it dry. I had allowed an hour between coats, so I gave the door a good 3-4 hours to dry after the final one, just to be sure that it wouldn't stick to the door frame once it was closed.

When I pulled off the tape, I discovered that the paint had run underneath it onto the window panels. Once again, I have to admit that the Home Depot painters tape isn't the best, but at least with the bleeding on the window, I was able to take a scraper to it to clean it up.

When the door was back together, scraped, and ready to close, it really made a huge impact on our curb appeal.


I think it really pops against the orange-tan colors of the house itself.

While I was painting the house, Scott was putting together our new house numbers (that post will be coming up soon!). Together, they really help bring the front of the house to life!


Loooooooove it! What do you think? Does this make you want to turn your front door into a beacon of welcome?