Showing posts with label family room. Show all posts

Thursday, October 31, 2013

Haunted House

We're big fans of Halloween (if you hadn't figured it out already), so when we decided to have a party last weekend, we really wanted to trick out the house. Here are a couple of my favorite (spooky) things.


Two bags of spider web later, the ceiling of the living room was appropriately webbed. Though not pictured, we ended up throwing a bunch of little plastic spiders all around it and it really helped set the mood in the place. It was a really fun element, but kind of tricky with the fan. Be sure to secure the web tightly above so it doesn't get caught up in it!


In the family room, I found this window cling that really haunted the place. With the giant white shade behind it, our headless lady has been haunting our neighborhood for two weeks. The best part is that it works both ways. We walk through the room all the time and have to remind ourselves that no one is outside looking at us (without a head)!


This is actually something I picked up from Young House Love (one of my favorite home blogs). Just cut out the shape of the bats out of black craft paper and tape it inside the shade. We also switched out the light bulbs so that they were appropriately scary. This lamp ended up being blue.


In another recent post, I talked about putting together my centerpiece for the dining room. We also added a red light bulb to the drum light to really add a finishing touch to the creepiness. We eventually finished off the table by putting a spiderweb table cloth on it.


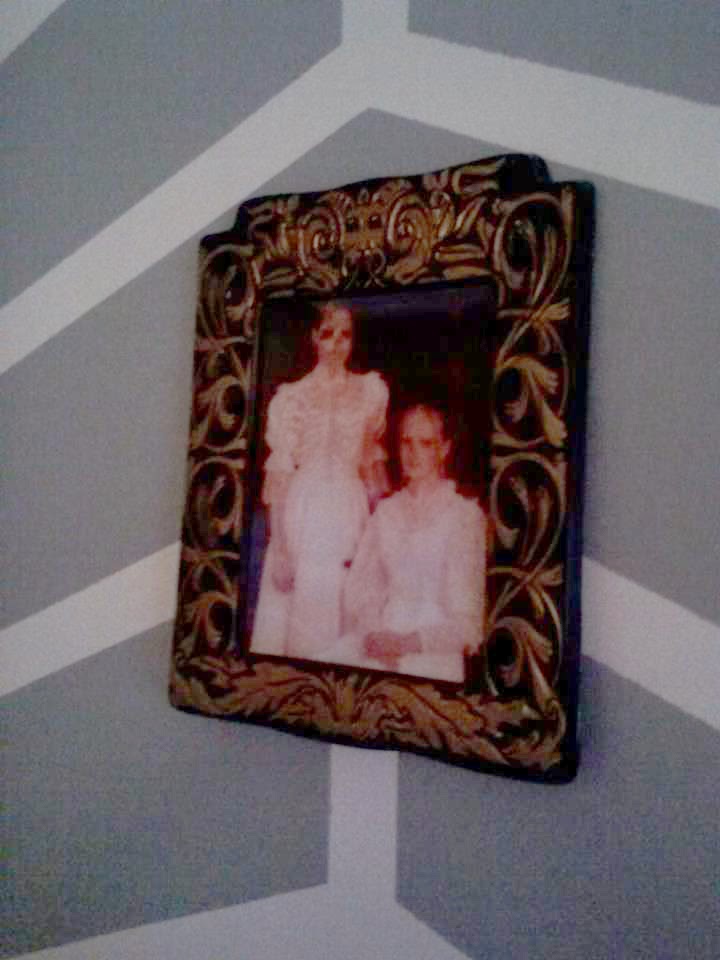
Also in the dining room, we took down our big pictures and put up these guys. As you walk from one side to the other, they change revealing ghoulish secrets in each photo. They were $1 each at Target.


Last but not least (We did decorate more, but these are just the highlights), I decided to make our guest bathroom super creepy. I took some red paint and wrote 'HELP' and put a couple of gross hand prints on the shower curtain liner that we had. Then, we put a some flickering tea lights behind it. We also took one of those fake arms and had it coming out of the floor vent, so when you turned the light on, it looked like it was trying to grab your ankles! ooOOOoooo! We only left the bathroom decor up for the party, though. It wasn't amazingly functional, but it did creep out people on the day of!

Happy Halloween! Did you decorate? Have fun partying or trick or treating tonight!

Monday, October 7, 2013

Waxing Poetic

So I haven't updated in a while because I got it in my head to make another light fixture. This one, unlike the one I made for the laundry room, took a little longer than expected. About a week to be exact.

I'm sure you've seen the capiz shell chandeliers in decor magazines and websites. They have a wonderful texture and soft presence that makes it feel as though there is a fancy hovering jellyfish of light in the room.

Unfortunately, those lamps come with a cost. A $$$ cost. This guy is at Pottery Barn and he's way beyond what I would ever pay for a shade, stunning or not.


Bleh. You kidding me!? No way!

After some online research, I found a tutorial on how to make one at a fraction of the cost. Due to material availability, I knew I would need to change a couple of things, but otherwise, I felt that this was the way to go.

My goal was to cover the dome light that we had in our front room. I was hoping to make the shade so that I could flush mount it against the light that was already there, thus saving money on materials and labor.


I was hoping it would add just a touch of drama to an otherwise (currently) bland room. We only have a couple pieces of furniture in there so far, so it just needed something to dress it up.


I began by grabbing two rolls of wax paper from Kroger. I then ran over to Michaels were I used a coupon and brought home a couple of spools of ribbon, some hot glue sticks (we already have a glue gun at home), and two different sized wreath frames.


These would make up the two tiers of the chandelier. The reason I didn't use the original tutorial's recommendation of a hanging planter basket is because I couldn't find one that had two horizontal bands. I only found baskets that were made up of the main horizontal band (the rim of the basket) connected to the wire that made up the basket itself. Because I knew I wanted my light to be tiered, I figured that if I used the wreath frames instead, I could also control how far down to mount the second tier of the light.

I ended up with an 18 in. and 12 in. wire wreath frames. I had previously measured the dome light to make sure that the larger of the wreath frames would be large enough to go completely around the outside of it.


I then used some Rustoleum white spray paint that I had in the garage to paint them both white to better blend in with the ceiling.


While those were drying, the real working for what felt like forever fun began. I set myself up in the living room in front of the TV with a Netflix marathon of Grey's Anatomy and began to iron my wax paper.

When the wax paper is ironed and cut, it really does give the same affect as the real capiz shell. The tutorial I was using said that three layers was enough for the texture to be correct, but I chose to do 4 layers because I felt that it also made each 'shell' thicker and stiffer than with just the three layers.

I started by cutting two pieces of wax paper about the same size. It doesn't need to be exact because you're going to be trimming it anyway.


Line them up with each other as best you can.


Then, fold them in half so that there are four layers of wax paper lined up.


Now, be sure your iron is set to a middle temperature and that you are using an old ironing board. If you don't have an old one, be sure to put an old pillow case or fabric over it because it will absorb the extra wax that comes off the bottom of the paper as you iron. Begin ironing at the crease and work your way out, being sure not to stop and let the iron rest on the wax paper so it doesn't melt.

When you have ironed it so it feels stiff when cooled, like a piece of craft paper from Michaels, be sure to square off the sheet by cutting off the uneven excess on the outside edge.


I then used my 2 in hole punch and began trying to cut out my 'shells'. Unfortunately, wax paper isn't as stiff as real paper, so it takes some wiggling to get it to cut sometimes, but I can't imagine having cut out all of the circles without a circle cutter of some sort.

Then, I re-ironed my circles. I felt like it made each 'shell' more cohesive and realistic. The two on the left haven't been ironed and the one on the right has. See how much nicer it looks?


After I couldn't stand ironing and cutting wax paper anymore a good batch of these had been completed (probably close to 50 for my first go around, though throughout the process I had to sit down multiple times and make more), I grabbed my newly whitened wreath frames from the garage and hung the larger of the two from the ceiling. We happened to have a hook there from the woman that lived here before, so I grabbed some yard that I had and hung it at sitting-on-the-ground-eye-level-working-height to make the assembly part easier on myself.


I had figured out how long I wanted each hanging portion to be and cut the ribbon accordingly earlier. I simply looped it around the wreath and let it keep itself in place. No real reason to hot glue it in place because it makes hanging the whole thing easier in the long run.


Then I was ready to put the thing together. I put the tiniest dab of hot glue at the top of a shell, then worked from the bottom of the ribbon upwards to give it a layered effect.


When you get going with it, it really starts to come together pretty quickly. It does take some time, but the overall look makes it worth it.


I kept getting caught up in how cool the textures were and how they were coming together. The photographer side of me had a field day.


And I really liked how you could see the ribbon through the shells. I know that seems odd, but it adds some shape to an otherwise soft cloud.


One of my biggest concerns was the way that it would filter the light. I was afraid that it would be a little too much or too little, but to be honest, it ended up being just right.


A couple of hour later, I finally finished the larger part of the overall chandelier.


I decided to go ahead and mount the larger portion of it to the ceiling so that I could see how big to make my second tier ribbons accordingly. I held it up to the light and......oh no! It doesn't fit! All that work for nothing! I had gotten an 18 in. wreath frame, yes, but the 18 in. accounted for the outer-most wire circle, not the inner circle.

My solution was to cut out that which I didn't need. I hung it up on a hook and used wire cutters to cut out the inner rings of the frame. Afterwards, wouldn't cha know it? It fit perfectly!

See? Only two of the four original rings left. Win!

I then pre-drilled and screwed in hooks around the dome light itself. The hooks were pretty small, so I used five of them to hold up my shade. If you are making a larger shade or want to hang it a different way, check the tutorial cited earlier for more information. My flush mount worked really well for the hide-the-ugly-dome-light effect I was going for, though.

Then, just hang it up! Twisting the hooks to get them to catch the shade is probably the easiest technique for this. Then stand back and bask. Doing so may show you that you may want to make adjustments or move around some of your ribbons to cover the sides better. I was pretty pleased with mine so far.


And, of course, I had to see what it looked like with the light on. It did make me realize that we need to replace the 'brilliant white' bulbs in the dome.


Happily reinvigorated for the remainder of the project, I quickly repeated the creation and assembly instructions and put together the 12 in. second tier of the light with little effort.


Then, using the same ribbon that is holding the 'shells', I tied it to the upper tier that was already hung. I did it this way because it allows easier access to the dome light if we need to change a bulb or replace it for any reason. Using the same ribbon also camouflages the hanging apparatus.


When it was all together, I was super excited to not have to cut out any more wax paper circles! It looked great and Scott even likes it a lot. So far it's been hearing such rave reviews as, "Oh, when did that get there?" and "How long as this been up?". Love my friends.


It's just one more step towards having a more usable front room. Right now, it's just nice knowing that when people enter our home, they have something nice to be greeted by.


Does this inspire you to make a wax paper capiz shell chandelier? I can see this in a lot of different configurations in a lot of rooms. You could even replace the wax paper with interesting scrapbook paper circles instead! With an entire project that costs around $25 and a couple of hours, there are so many possibilities!

Tuesday, September 24, 2013

What an Entrance

When we moved into the house, we knew that we were going to be getting a lot more space and a much more appropriate place to host friends and family. Along with the gains, though, came a couple of losses. We had a coat closet in the apartment that we had to give up when we moved into the house.

We have people over a lot. As in, at least once a week there are up to 15 people making themselves at home, eating delicious food, and spending time with friends. With those people come coats, purses, and shoes that so far have been randomly scattered around the house. To this I say, "No more!"

This is the area that we had to work with.


Ever since I had seen the space, I had visions of putting in some fake board and batten. It just seemed like a nice architectural element that would add interest to the room. It would also make the entire house seem more inviting and organized.

We were hoping for something like this.


But wouldn't be too upset if we didn't like the wall coloring showing. If all else failed, we still really liked this option as well.

Yes, Pinterest...don't judge me..
First, we measured and drew up some plans. We made our measurements with the understanding that we wanted the top board to align with the bottom of the window on the front door. We also kept in mind that when the front door was open, it cut into the space. Knowing that putting hooks behind the door wasn't the best idea, we kept the actual storage portion of the plan to the open part of the wall.


We headed to Lowes and immediately ran into an issue. The measure for the top board had to be 1"x4"x10' so that it gave a nice presence and stretched the entire wall. Apparently this is not a very popular size for wood to be cut in, so we ended up getting slightly more expensive wood. The same can be said of the top bar, which measured 1"x2"x10'.

Luckily, the vertical slats were pretty easy to find. We purchased three 12' lattice pieces and had them cut in half in the store so they would fit in the car. Once we had everything, we headed home and started measuring.


Scott cut the two top pieces to size and then we started to mark the wall. We first made a line across the entire wall that showed where the board would be level. After finding the center of the wall, we marked out equally for where the vertical slats would go. Scott then held everything up so we could see if we liked the set up so far.


Lookin' good!

We then found all of the studs in the wall and marked them. We used the same technique that I used to measure the lines for the dining room wall.


The "x" marks where the vertical slat will go, the two marks to the right are where the stud is.

Then, after everything was marked and cut, I gave all the wood a good sanding with 120 grit sandpaper (using my new little $13 sander from Harbor Freight, yay!). This was followed by three good coats of white trim paint in eggshell finish.
This set up is very technical. You probably don't have anything this fancy at your house.

Then we finally got to my favorite part: assembly! We had borrowed David's air compressor and finish nailer to hopefully make our lives easier during this part of the process. Both of us promptly fell in love with it and wanted to steal it realized that we would have been there for days with finishing nails had we not been fortunate enough to use it.
Oh, hello there...

What makes our board and batten fake is that, simply, there are no boards involved. The slats are all being directly attached to the wall, so the wall itself acts as the board. This makes this a very cost effective and much easier way of achieving a high end finish.

Because we didn't have the boards to worry about, we were able to skip the first step (which would be to attach the boards to the wall). This let us move on to step #2: Placing our main horizontal board. All of the nails that we placed into the board in this step were inserted so that they went through the wall and into a stud. This gives the entire setup more strength.


Let's get a close up of that sweet auto-nailin'-attachin' action.

BAM!

Next up was our small lip that goes on the top. It acts as a sort of shelf, but is normally used in this circumstance as a place to rest art or just give the wall a more finished look. This was attached by shooting downward into the horizontal board.


An issue we ran into was that we were not using a traditional method for attaching our vertical slats. Usually, you would attach them directly to where there are studs so that the nails aren't just trying to stay grounded in flat drywall.


We really liked the spacing and number that we had originally sketched and measured out, so we added some strength to their bond with a little builders grade adhesive on the back of each slat.


Then the slats were positioned and attached to to the wall with more nails to hold them in place while the glue dried. When we had finished mounting all of the pieces, we were looking at one fine wall.

Well, sort of.

We had a couple of issues. First, we weren't really digging the fact that the wall color was showing through. After taking a couple more ganders as some other people's reference photos, we discovered that our vertical slats weren't wide enough to satisfy dividing such a span of wall appropriately. Second, there were a lot of patches that still needed to be applied to the nail holes in the boards and the wall itself. This included the giant patch you see next to the outlet. That is where we used to have an antenna attachment (super old school, yo!) that the boys took out soon after we moved in.

A patch kit (for the big hole) and some spackle (hehe, fun word) later, our holes went from looking like this


To looking like this.


Somewhere between the first and second coat/sanding of spackle we decided that it was time to go big or stay home (because we were already home. Yeah.), so we started painting the entire space below the horizontal board white. This took...a couple of coats. I also repainted the patches on the top portion of the wall so that they would blend back in with the upper wall color.


Ew, not that picture. Let's fast forward half an hour.


Ahhh. Better. When we reached this step, we knew we'd made the right decision to go all white. It really helped the entire room feel more cohesive and less awkward. We had grabbed four hat/coat hooks from Home Depot in oil rubbed bronze for some nice contrast.


Once those bad boys were up, it was like signing our names to a masterpiece.


I had grabbed a little rug from another part of the house for shoes right before Beth and David arrived. It was so wonderful having a place for their things when they entered the house!

This is pretty much what it looks like when you walk in our home, pup and all.

One more shot. I think I could sleep in the front room now, I love it so much.


What do you think? Our 6 hours of total work paid off? Personally, we love it. I still can't believe how straightforward the entire project was! Does this inspire you to add a little board and batten to your living space?