Showing posts with label living room. Show all posts

Friday, December 18, 2015

Christmas House Tour, 2015

It's that wonderful time of year when you can't get enough of the smell of cinnamon and pine, when you wonder if you've forgotten anyone on your shopping list, and, of course, when you consider how to decorate your home to really put you in the spirit. As possibly our last post of 2015, we will show you around our abode so you can pick up some tips (and we would love some in return!).

Let's start out front. It's the first thing people see when they arrive, and I have always been a fan of Christmas lights.


On our front door we have our live pine wreath. It's one of my favorite things because it smells so good when you enter the house.


Not to mention an adorable "habitat" for our bunny door knocker.


Our dining room is the first thing you see when you walk in. This year has been so much fun because we have the mantle to decorate as well as the Geek Tree. The mantle is always a decorative work in progress, but I think it's pretty spiffy right now.


I found a moose head model at Marshall's for $10, so I grabbed it and an $8 wreath from Home Depot. I think it turned out really adorable.


One of the big things going around this year are the dimensional stars. I found some at Target and thought they'd be perfect for the big front window. They also help hide the back of the outside wreath, so that's a nice bonus.


My table runner is actually brand new this year thanks to my Mom. We found these awesome mid-century-sort-of fabrics and she quilted a clean-lined runner from a pattern we found on Pinterest. I love how bright and cheery it is.


From the dining room, you can see right through to the back of the house where we have our big tree in the living room.


Every kitchen needs a little Christmas cheer, so we have a small tree set up that has bottle tops and coasters on it. It's our little beer tree and it's one of my favorite decorations.


Our "Salon" is now really cozy with the introduction of our new Ikea chairs. They are wonderfully bright, but very inviting for anyone who wants to hang out while we cook. They look great against the pattern on the wall, too! (Thanks for the Christmas presents Mom and Dad!) I recently grabbed the little rattan basket to hold our winter accessories so they are easy to grab and it ended up being a perfect ottoman. I think the textures work well together.


Also while at Marshall's, Laurie and I happened across the cutest Christmas bag ever for $1.95. I bought it and framed it. It makes me smile every time I see it.


Entering into the living room, you are flanked by a wreath on each french door.


Which looks super festive when both doors are closed from the other side.

To the right: Scott's Christmas stocking. 

Of course, we have the main tree.


The presents are wrapped with plaid paper from the Target dollar area. I have really been on a plaid kick lately and they really all look cute together. The larger present was a little too big, so it got the mid-century paper treatment.

The couch area has been made really cozy this year. I carried the plaid through to some pillow covers I made with flannel. They just cover the original pillows, but they change the whole feel of the room.


The large floor pillow and one of throw pillows were recently re-covered by my mom and I as well. I love the arrows and I think they'll be great year round.


Under the TV, I have my chalkboard sign and reindeer "topiaries". These are from my childhood and have held up surprisingly well, though next year they might get new ribbons.


Last but not least, the holidays can officially begin because the deer head is ready for winter.


Merry Christmas from the Sturdivants (and our tiny reindeer)!


I am so glad I was able to share our home with you! I would love to hear about your decorations and how you've managed to make your house feel cozy for the holidays! Have a wonderful rest of 2015!

Tuesday, December 8, 2015

Boos and Booze 2015 (A Retrospective)

Halloween has quickly come and gone, but the memories of this years party shall live forever! (At least it will now. Sorry this post is so late, but I had to gather everyone else's pictures of the night since I didn't have time to take any. I hope this spooky beginning to your December holiday sparks ideas for next years Halloween!)

This year, we really focused on integrating some gags into our party. I really wanted the house to feel a little more spooky than usual, and I think that we accomplished just that.

The front of the house was adorned with our Dead & Breakfast Inn sign as well as our zombie hands and beheaded caretaker silhouette, but I wanted to add a couple of tombstones to give a little more dimension to our so-far 2D exterior. I grabbed some foam ones from the dollar store and Scott mounted them at the end of the walkway. His technique makes them reusable and less likely to fly away in high winds. It worked really well.


On the inside, I decided to break the house up into different areas and haunt each one accordingly. I started with the hallway. I borrowed some field dressing plastic from our friend Daniel and it stretched the entire length of the hallway, plus enough for a closure.


I then hung a clear packing tape ghost that Scott and I had made at the end of the hallway from the BASE of the smoke detector (not the mechanism itself. Don't do that!). Floating candles, made from toilet paper and paper towel tubes, hot glue, and white paint, were then hung with fishing wire sewn through the black plastic ceiling.


Each tube had a place for a tea light in the top so that it would safely glow while it "hovered". A doorway was created with draped black plastic to keep the hallway dark and a glow stick was attached to the "spine" of the ghost to add extra illumination. The end result was pretty awesome, but obviously, better in person.


We used the dining room table to serve food. I layered a spider web table cloth over a white table cloth to add a nice texture. Each dish was accompanied by a pair of fangs (spray painted silver) and a printed "scary" food name for each item.


The skeleton cheese plate was probably my favorite part of this table. It was super creepy, but still managed to be completely cleaned out by the end of the night! It's just a testament to people's love for cheese and crackers...


Above, you'll notice the TV bar is strung with KEEP OUT tape. This is where we put any bar ware that we didn't want people using throughout the night. It worked quite well, and all of our breakable/expensive alcohol and glasses were safe.

For a little added atmosphere, I hung the "scary" torn cheese cloth over the entry from the dining room into the kitchen.


In the "Salon", guests were greeted by my indoor Halloween "tree". I made it by spray painting branches from outside. It was leaned against the wall and the crows have wire in their feet that help them stand up (or fall over, depending on if someone bumps it). It was a very simple, cost effective piece of decor that everyone loved.


The pictures that normally hang on the wall were replaced with face-changing images that I found at the Dollar Store. (Honestly the Dollar Store is where I get 80% of my Halloween supplies. They sell everything from cheesecloth to crows, cemetery fencing to wall hangings, and it all costs $1!)

The table between our chairs was turned into a fortune teller's table. I used the bulb cover from one of our old ceiling fans and a glow stick for the "crystal ball", with wadded up spider webbing under it to hide the flat bottom. The Tarot cards are actually just printed off from a website online (for free!), and the book I made myself. The table cloth was a piece of scrap from Hancock Fabric for about $2, but a cool scarf would also be perfect.


The kitchen was a great space for taking pictures, so I grabbed some backdrop wall hangings from the Dollar Store and we used Command Strips to hold them up. Everyone seemed to have a great time getting pictures together with their costumes, so I know I'll be doing that again next year.


The living room had the bar, so I made sure to add a jack-o-lantern, small skeleton, and some bugs to keep it themed but not overwhelming. I also found some great signs to hang right under our shelf. In previous years, I've covered the bar top in spider webbing, but it always just gets gross and needs to be thrown away afterwards. This way, I was able to cut down on the mess and just let the blacklight overhead speak for itself.


I wanted to make another scary-ish gag for the living room. I wanted it to glow in the blacklight and really help set the atmosphere. I found some inspiration online from someone who had made a man eating plant out of a Styrofoam pumpkin. I used that as a base idea and ran with it. I couldn't be more pleased with how he turned out!


In the living room, we set up Scott's projector and showed old horror films on the screen, which was hung from the ceiling. I used two of our battery operated candles and placed them in some lanterns that I hung on either side of the screen with fishing wire. It gave a really cool old creepy drive in feel (but unfortunately, there were no pictures taken of it. Sorry!).

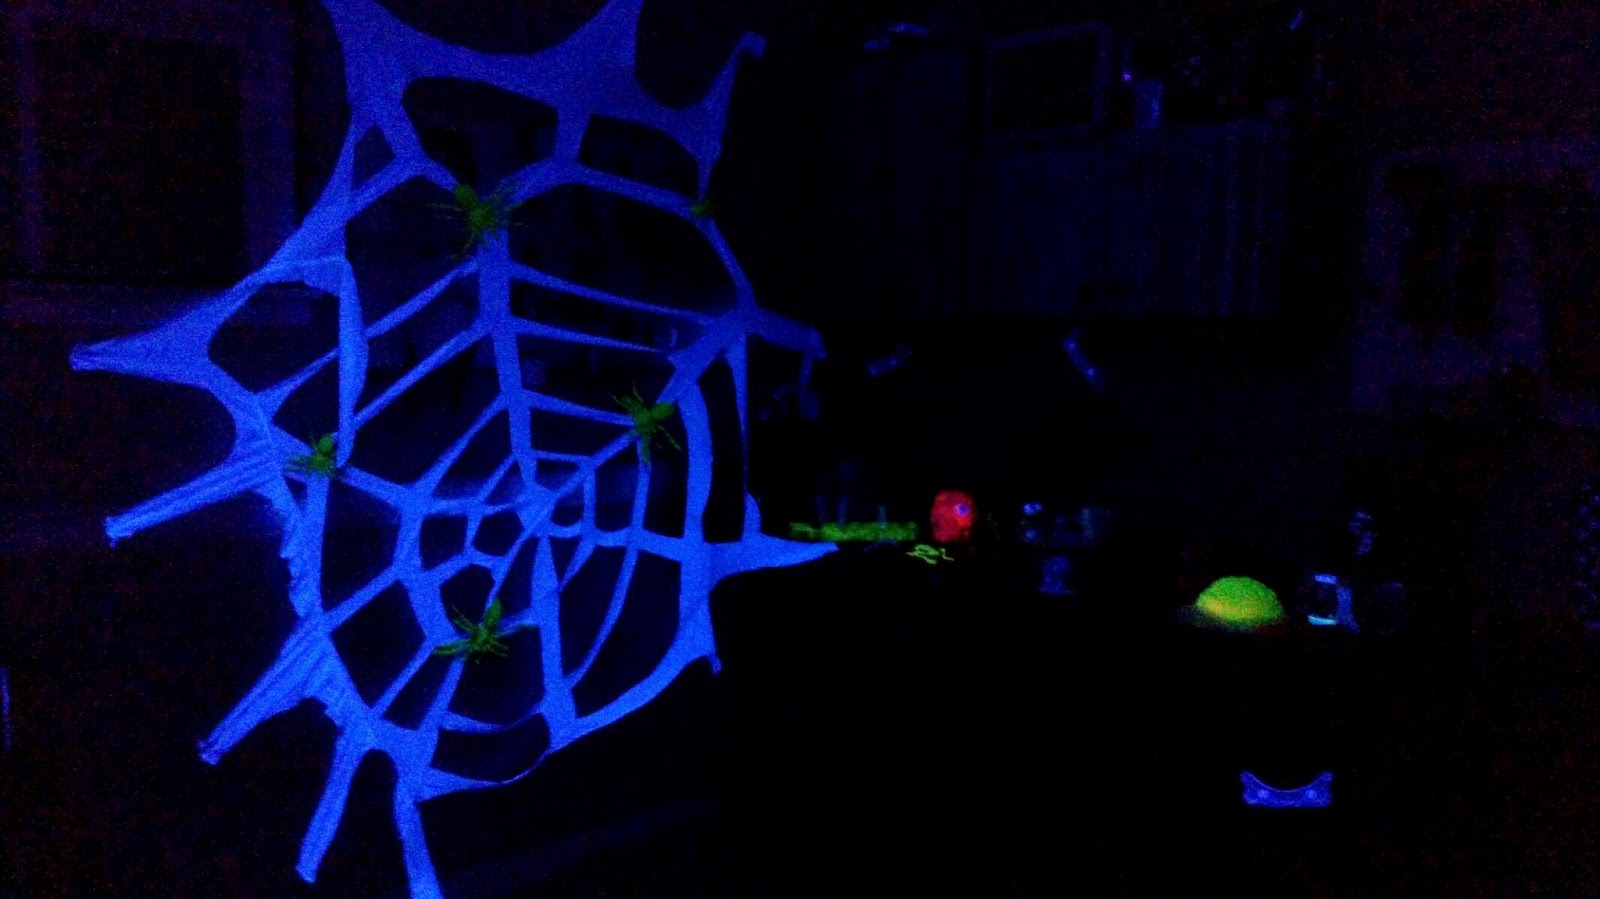
The garage was the last area. I thought that our work bench might be a great place for a mad scientist lab, so I started with some genetically altered giant spiders. I grabbed a bunch from the Dollar Store and spray painted them with florescent spray paint so they would glow in the black light.


I then grabbed a white sheet from Goodwill and cut a giant spiderweb out of it. This was stapled up around the workbench.


We put blacklight bulbs in our overhead work light, so the whole room was rigged to glow. I was then able to find things to populate the lab table, including vials and specimens.


Sorry for the fuzz. It was a little dark!

To finish it off, I made a simple structure with wood and covered it in towels to make the shape of a body. This was then wrapped in a white shower curtain and held together with twine. I covered the table with aluminum foil to give the "morgue" an extra touch.


This guy hung out next to the beer pong table and under a flock of glow-in-the-dark bats from the Dollar Store that "flew" around the ceiling.


Also hanging around the house were some cool origami bats that I made using this tutorial.


Last but not least were the trophies for the costume contest. I am usually known for making the trophies myself, but this year, I felt a bit overwhelmed with the rest of the decorations. My dad helped me out by creating some cool custom Zombie Snowmen as trophies and everyone loved them!


From left to right:
-Geekiest Costume
-Best Couples Costume
-Best Female Costume
-Best Male Costume

All of the guests were so excited about them that I kept having to check to make sure none had mysteriously disappeared before all the votes were in!

The night was great and I was so excited to share the house with our friends. Thanks to the Morri and Farrars for helping with all of the set up and keeping me sane!  I am also thankful to Jori and John for taking pictures while I hosted all over the place!

What's the greatest Halloween gag you've ever seen in someone's house? Let me know below!

Saturday, January 24, 2015

Theater Seating

We have always had an issue with seating in our living room. Even with two full sized couches and two chairs, we always still end up with people sitting on the floor. As comfortable as the floor is, I have always had it in my mind that a sofa table with some bar stools would solve this issue swimmingly. I had been looking around online when I found this inspiration picture on Pinterest.


I liked how it had an interesting yet clean bar top and fit at least two people. I looked around and most of the tables were the wrong size for our space or they were really expensive. Most of the time, they were both. I decided to take it on as a project and just build one myself. How hard could it be?

I kept looking around Pinterest till I found this post by (a fellow) Caitlin over at Desert Domicile. She had built a console table for $18 and I liked the look as well as the cost.

http://www.desertdomicile.com/2012/10/diy-18-console-table.html


 I used this as a rough guide, then drew out my plans.


I just used a tape measure and stood behind the couch and...measured. I figured that I didn't want it to go all the way to the ends of the couch because people walk around the corners a lot and that would make for smacked elbows. I also measured that a width of around 14 inches would be wide enough for people to lean on and place their beverage or food, but not stick out into the room too much. I used the same height as my kitchen counters for my vertical measure.

Next, I ran to the Depot and grabbed 8 of the $1.95 2x2x6s. I ended up going through all of them to get the straightest ones possible, but I only used 6 for this project, so I returned the other two and got my $4 back.


I started my cuts by cutting my four 3ft pieces.  I stood up my two saw horses and set up a makeshift work table. I then measured and marked my cut. I attached The wood I was cutting to the table with a clamp to keep it still. It makes a huge difference.


After I cut all four 3 ft pieces (which would be the legs), I then proceeded to cut the 5 ft pieces (the long cross supports).

When I had by four 3ft and four 5ft cuts made, I was then able to begin assembly. I used my same clamp system to pre-drill my holes. I absolutely recommend pre drilling, especially using the 2x2 pieces. This will help prevent splitting and splintering. It takes a little longer, but honestly, it makes the whole table go together like it was from Ikea if you do it right.

I lined up my first attachment point as the top of one of the 3ft pieces. They were going to be the legs, and screwing it to a 5ft piece at the very end would help create the base for the table top.


See the pencil lines? That's how I marked the area I had available to attach to. I just took a scrap piece, lined it up, and marked it. the image above shows how I used my cutting rig to hold the wood still to predrill holes.


For the bottom of the legs, I wanted to allow for some feet. I measured two inches from the bottom of the 3ft piece and predrilled my holes. Once everything was attached, I had half of my table base finished.


Before I built the other side (which is built exactly the same way), I wanted to make sure to catch any measurement mistakes. I took my half-a-table-base and brought it into the living room to see how it fit against the couch.


Since we seemed to have a winner, I returned it to the garage and assembled the other side.


Once you get to this point, you can make it as wide or skinny as you would like. Keep in mind that this is pine, though, and it doesn't weigh much. This base can easily fall over if you make the table too thin. I ended up using 11in. horizontal supports to finish my base. This seems like a good go-to size for our living room, so you may have to change that number if you build this yourself.


It fit really well, so I was pretty pleased with it so far. The optimum table top size was going to be 64"x15", so I wasn't able to grab a single board from the Depot for my top. Fortunately, they had two pieces of pine that were 6ftx7in that worked well when placed on the top together.


Here the boards are just placed on top of the base. I kept them separate so that it would be easier to finish them and so that it would be easier to replace later. Dad and I might have some ideas for a table top that will really pop and make for a more interesting piece of furniture, but that's not going to happen till later (maybe when there isn't 4 inches of snow on the ground).


For finishing, I pulled everything back out to the garage and took them apart again. I screwed a couple of shallow scrap piece of wood in to hold the table top boards together and flipped it over.


The base is meant to look slightly metallic, so it has three coats of the Rustoleum Oil Rubbed Bronze. I thought that it would be better than black because the added metallic adds a little depth to the paint. For the top, I used one of my favorite go-to stains because it both

1. Makes cheap wood look much nicer and
2. Was already in my house so I didn't need to buy it

These are factors that I like to live my life by.

The trick to the 'burled and intense woodgrain' look with pine is to paint the stain on, then immediately wipe it off. This keeps the lighter areas light while highlighting the woodgrain. Some people will add stain and then just leave the entirety of the stain on the wood. This works okay, but it will take forever to dry and won't show as much dimension on the boards. I personally like the swipe and wipe look.


It really gives it that pub feel that I was looking for in my temporary top. When the new top is built, I'll probably turn this guy into a couple of end tables.

For wear and tear, I added two coats of Poly to the whole thing. The top could probably stand to have another coat, but with temps dropping outside, I'm putting that off for a sunnier day. I also ended up using a high gloss because it will more than likely see its share of spills. Hopefully this will make it easier to just wipe off and not worry about.

Once everything was dry, it was time to bring it inside. It looks really good in place, now it just needs its own stools.


I love the way the wood contrasts with the base.


But I especially love the view. I can see playing video games up there while drinking something from the bar. Or playing some of our party games like You Don't Know Jack with teams Couch1, CouchA, Chairs, and Sofa Table.


Most of all, I am glad to have it in place before the Superbowl next weekend. Having space for people to sit and eat comfortably has always been on of my greatest goals with this living room.

I can see someone using this basic table design in an entry or even as a bar in of itself. It's simple to build, inexpensive (ours cost around $30), and is an awesome beginner build for anyone wanting to give furniture a try. This is the first thing I've built on my own and I am pretty pleased.

We know that we need to buy barstools next, but those aren't as cheap. I am thinking that since this is going to be an area that people will be seated in long term (a couple of hours at a time, to watch movies or TV), they should be upholstered chairs, like these. I'm not in love with anything yet, but I am liking the grey already.


Let me know in the comments if you're considering this project and I'll try to answer any questions I can!