Showing posts with label bedroom. Show all posts

Monday, December 7, 2015

More Welcoming, Much Wow

Before we moved in, our house had some very interesting color choices on the walls. From the horrendous yellow in the (now) dining room to the hunter green of the addition, this place was a mismatched combination of gloss paint that needed to be harmonized and matted. The worst offender of all was a color that gave me the heebie-jeebies. It adorned the walls of our kitchen as well as all the bedrooms. It was, essentially, skin color.


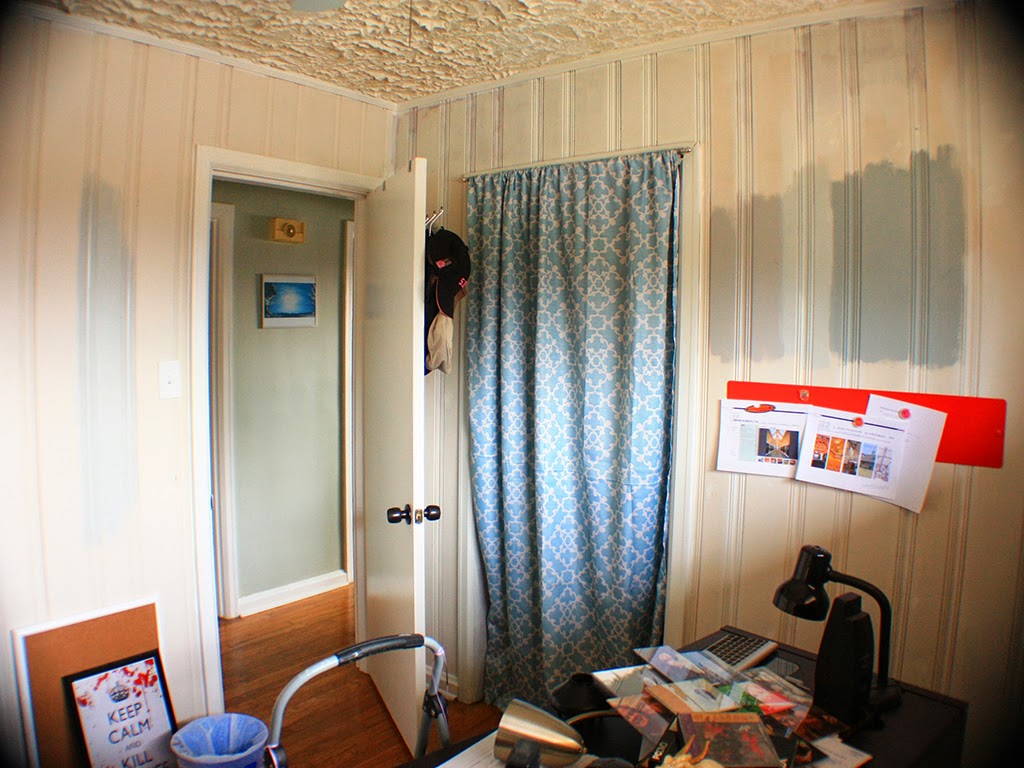
The slightly-pinkish-glossed tone of the paint really gave it a "wax figure museum" effect. It was a little unsettling to me, so I tried to cover it as quickly as I could in most of the rooms. The only one that hadn't really been touched yet was the guest room.


The curtains were grabbed quickly when we first moved in and have probably been around every window of the house for some amount of time. The horrible tan was still on the walls along with the almost-never-used chalkboard wall that I painted during a bored spell in this post. It was time to give this room some real attention. It needed some love.

Wanting a room to look nice and not wanting to spend much money on a transformation can really get in the way of a quick project, though. I refused to buy a $25 gallon of paint for this room. Instead, I would just check out the "Oops Paint" area at our local Lowes and Home Depots to see if they had any gallons that I liked. I've been looking for about 6 months, so I was super excited when my leisurely search paid off.


That's right: $9! For an entire gallon that was similar to the colors in the rest of the house. Huzzah! I only needed to buy some roller brushes, so this entire makeover cost less than $15. Pretty good, eh?

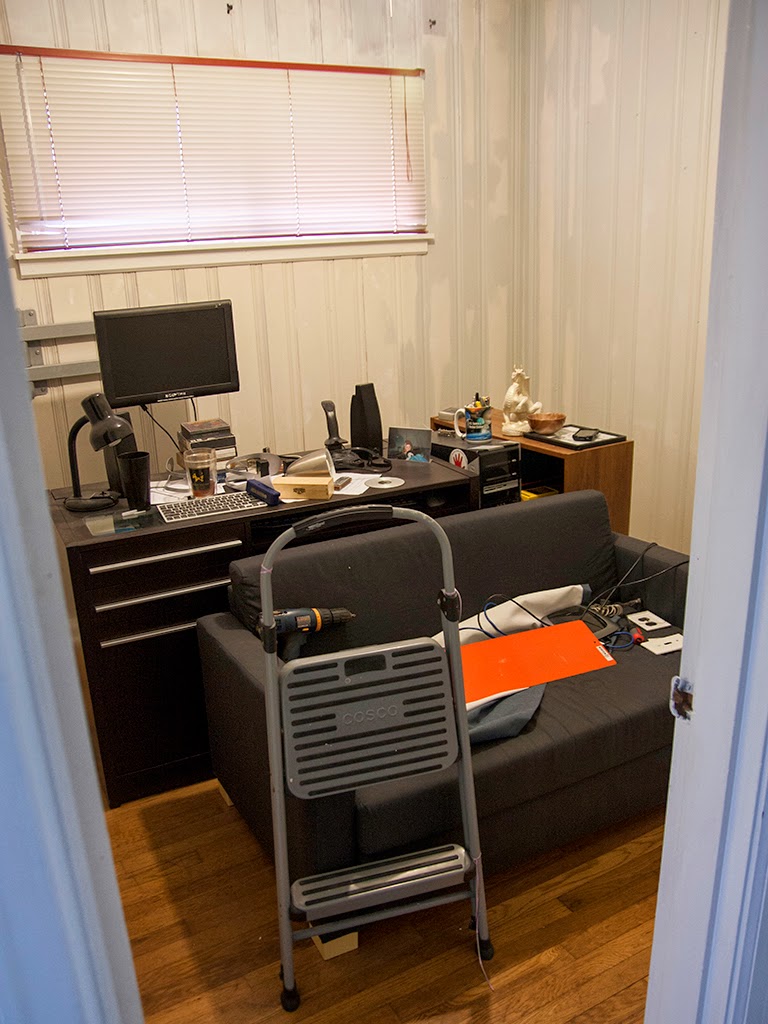
I was also excited to realize that we wouldn't have guests staying in our guest room for two weeks (which is quite the span for us). This gave me plenty of time to work around all the furniture in the room and put two coats on the walls.

I started with the chalkboard wall. I painted right over it. I know, chalkboard is really big right now, but it ended up making the room feel smaller and darker, which was an accomplishment for a room that has two large windows. I never really used the chalkboard wall, either, so it had to go.

Fresh!

It was also the easiest wall to paint because it is the most exposed to the room. The other walls would end up testing my gymnastics skills (of which I have zero). First, I took down the newest quilt my mom gave me. I didn't want to get paint on it, so I stored it in another room. I did behind the door and behind the quilt, then moved on to the next two walls.


When all was said and done, a day and a half later, it felt like a whole new room.


Things I need to complete the project:
-Fun duvet cover
-New curtains
-Clean out the guest room closet
-A millions dollars (not necessary, just appreciated)

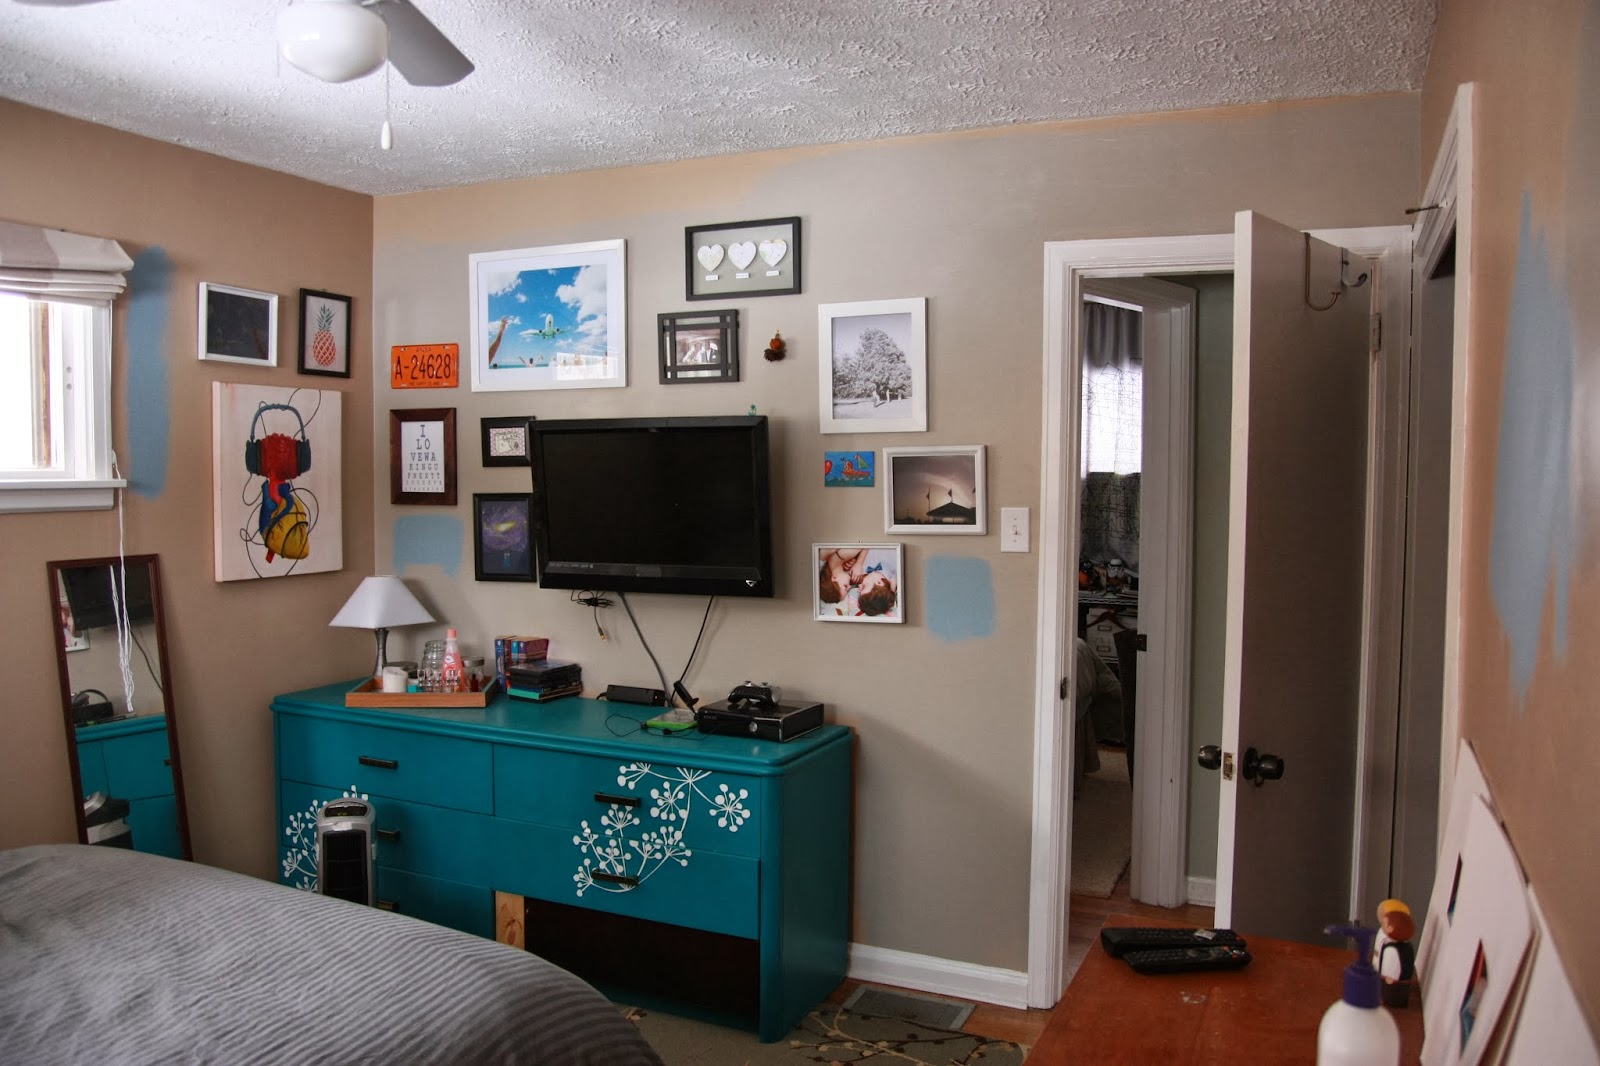
The room actually feels bigger. The bright color really helps expand the space, which is nice with all the furniture in it. I really love how it turned out.

Have you ever moved into a house with horrible paint that you just had to cover? Let me know in the comments!

Also, stay tuned for a much anticipated review of our Halloween party (I know, a little late, sorry) and our Christmas house tour!

Wednesday, April 2, 2014

Step Into My Office

Well, it's actually Scott's office/second guest room, but you get the idea. It's come a long way since it's humble beginnings as the terrifying bat cave that almost kept us from purchasing the house. This wood-laden 9 ft by 8.5 ft room is the smallest bedroom I've ever been in, but over the last couple of months, it has really opened up and become more inviting.

There aren't any really good pictures of the before. The documentation of this dungeon/humidor only truly began when I realized that painting the wood paneling was going to be much trickier than initially anticipated. Here is an example of where I started (Just as a warning, this process has been going on since we moved in, so some of the pictures are better than others. There was a lot of phone photography going on.)


As you can see by the wood paneling on my left, it didn't want to go down without a fight. The primer was oil based to properly cover and adhere to the shiny wood. It worked really well, but was exhausting to apply because it was mostly done with a brush. I didn't use a roller with the primer because my previous oil-based primer shenanigans had resulted in splatter that I didn't want to get on the wood floor. Remember, too, that the top and bottom trim, back of the door, closet, window, and window trim were all the same un-painted wood as the walls. That means that they were also on the list to be primed and painted.

To walk you through the entire process, I figured I'd pick up after all of the priming took place. After two coats of primer, the walls were manageable.


The left only has one coat, the right has two. After I had mostly finished the priming, I took a break on the room.

So for the past 5 months, the room has been left looking like this.


Until now.

I ended up using a light color because going too dark would really make the room feel cave-like. I picked a light gray/blue and grabbed a gallon from Home Depot (after appropriate sampling, of course. It's the middle one on the right hand side of the picture below).


Unfortunately, before I could even open my paint, a lot needed to happen to prep the walls. Most of that prep was spackling, and most of that spackling involved tiny holes. Once the primer had been applied, the walls certainly looked better, it's true, but this


actually looked pretty ratty because of these


I just took my time (3 hours, to be exact) and applied my spackle to all of the holes I could see. I had to step around the room and look at the walls from different angles because of the divots in the panels, but it was worth it. Painting the wood without doing this would have left it looking like someone just slapped a lot layers of paint on particle board and that was not the look I was going for.

When I was finally able to grab a brush and open my gallon of paint, I started at the bottom trim and worked my way up. I had to make sure to work the paint into each of the slats because the roller wouldn't be able to reach in the routered sections.


One issue that I had was that the paint went on practically white, so seeing where I had and hadn't already painted was a bit tricky. Thankfully, it dried a little darker and I could go back later and touch up. This was all made that much more perilous by the fact that we couldn't move all of the furniture out of the room, so we were working around this.


Once all the walls had been edged (the trim has been completely painted since I primed the walls), I was then able to come back with a roller and roll the color onto the flatter portions of the paneling. It was so satisfying, but my wrist was pretty sore from brushing all day so I had Scott finish it when he got home. It was nice because he is tall and able to use the roller without a stool.


We let the first coat dry and came back with a second after seeing some spots that we had initially missed. After the second coat dried, we moved everything back in.

It's difficult to describe how much better the rooms feels to someone who wasn't able to bask in it's horriblness before, but let me tell you, it's pretty awesome in there now.


So much less embarrassing for people to see (except for maybe that Ikea couch)! The room just feels like it's really a part of the house now, unlike before when we tried to keep the door shut as much as possible. There is still one issue that lurks in there that we won't be tackling for a while, though.


Yeah, that's three different types of ceiling finish. There is a different type in each part of the house, but only Scott's office has two inch peaks hanging from above. Why? We don't know. We haven't met one person who has ever seen anything like it before. We have tried wetting it down and scraping it, but it didn't do a lot of good. I ended up going at it with a hammer and chisel and made a bit of a dent a couple of months ago, but it's a very messy process and I haven't tried again since.


We aren't sure if we are going to try to sand it down, recover it, pull the whole thing out and replace it, or just keep chiseling yet, but I'm sure when we do, you guys will get the whole story!

What do you think of the office now? Do you have any room changes that took forever but made a huge difference? Hopefully this will make you feel more comfortable about painting paneling you might encounter in the future!

Monday, March 31, 2014

On Permanent File

So this week has been designated Scott's Office Week. It's going to be all about the projects that we are doing in there to get ready for Saturday when someone will be using it as a second guest room. I started out by rectifying a wrong (looking) piece of furniture that has been sitting around for a while. Our file cabinet came from a garage sale for $5 when Scott moved into his first apartment, so it's been around for a couple of years. Since then, it hadn't been touched.


We like having it in there because it acts as both storage and as a side table for our small couch/guest bed. It's a really small space, so there aren't a lot of options.


I dragged it out to the garage and took a scrapper to it's many flaws.


I then roughed it up with just a regular sanding block so the paint would stick better. This also included removing the handles by prying them out of the holes in the aluminum.


My tools of choice


Primer


Done with the drawers open so I could get all sides. If you really cared, you could tape it off for crisper lines, but I didn't mind because I knew that the drawers would be close 90% of the time.


I threw some of the gray that I used from the coffee table on the handles in one coat.


Then started in with the fire engine red. Two coats in all.


I put some poly on it to protect it and then placed it back inside next to the couch (after letting it dry, of course).


I liked it, but I felt like it needed something. I ended up getting some of the cork self adhesive shelf liner you can buy anywhere.


Flipping it over, and marking it after measuring the top of the cabinet.


Then it just cuts with scissors.


After lining it up, I slowly pulled off the paper backing as I went and applied it to the top of the cabinet.


I actually coated the cork in poly, too, just to help keep it together since cork isn't known as a strong material. After letting it dry, we placed it back in the office.


The cork ads a nice texture to the room. I really like the fact that you can set anything down on it and it won't scratch. The best thing is that after it wears down or starts to look ratty, I can always just peel it off and replace it. It's a much cooler way for us to store our files, now!

Tuesday, February 18, 2014

Done Except for the Bow

After painting our bedroom, the blank wall by my side of the bed really stuck out as a place that needed a little something. I ended up just taking the 'dorm' mirror that we had leaning against the wall, painting it white, and hanging it horizontally across the top of the dresser.

Then I remembered a really cute idea on Pinterest (of course) for a super cute jewelry holder on the blog Lemonade Makin' Mama that would fit the space perfectly.


I realized that I already had a dowel that was just hanging out in our garage, so I just grabbed a small wood sheet from Michaels (with coupon, of course) and a couple of hooks from Home Depot and made my own through trial and error rather than following the tutorial. The entire project cost less than $10!  Her tutorial is much more in depth, but if you just want a quick visual aid, here is what I did.


I really love the result, though.

I swear I just cleaned that mirror!

It fits perfectly right below the mirror, which is at my height so I can actually use it for getting ready (not that I really go places, lol).

I ended up using 10 hooks, plus the two hooks that hold the arrow itself (which you can also hang stuff on).


The cool thing about this to me, is that it not only shows me what jewelry I have (which is usually tucked away in a closet), but it also acts as a nice piece of unexpected art.


It does put the dresser to shame, though. Don't worry, he's on the list of furniture renovations I want to do this summer. I'm thinking a bright color like yellow or red would really make him stand out. What do you think? I would have to say NOT a cool color!


Let me know what you think in the comments! Happy Tuesday!

Monday, February 17, 2014

No Longer Mark Rothko's Bedroom

Scott and I have painted a lot of the rooms in our house, but had managed not to touch our own bedroom. We both knew that the oddly skin-colored walls were not what we wanted, but it took some hue searching to really find something that fit both us and the colors of the house so far.

Over the past couple of months, I've bought three or four difference wall color sample pots and tried them on various walls in our room. As of yesterday, we had different splotches of color everywhere. It really kept the room from being the relaxing retreat that the bedroom should be. For example, on the tv/photo wall, all of the sample areas have been marked in red.


I was getting a little desperate, lol.

The entire space just really felt lack luster. Due to the different light sources (hallway, bathroom, lamp, and window), we needed a color that looked great in all of them. We also really wanted to feel lightness during the day, but a cozier color transition at night. The current color just wasn't doing that for us.


So in my search, I started looking for pictures of rooms that really made us feel bright, yet cozy. I showed Scott this pictures from Pinterest and we were both sold.


Beth whipped out her Handy Dandy Giant Color Swatch Catalog and we were able to match it up with a color affectionately called "9075" (if I remember correctly).

The entire painting process only took a couple of hours because I was cutting in while Scott was on roller duty. We did one wall at a time because the room is small and doesn't have a lot of furniture moving space, but it really went quite smoothly. I began the entire process by taking this picture.


This was so I could use it for reference to remember how all of the frames were arranged on the wall after we had finished painting.

Then I started around the closet and bathroom doors to give Scott a nice pre-painted frame to roll inside of behind me. When I 'cut in', or 'edge', I like to use this brush. It is small, has a rubber handle (for long term comfort), and really gets the job done. If at all possible, I really try to avoid using blue painters tape for straight forward room painting (which I realize hasn't really happened that often in our house). For anyone scared of free handing around their molding, it just takes a little practice and some patience before it becomes second nature.


Before we knew it, we already had one wall done into the next corner. It was drying pretty quickly and we were really loving the result.


We were glad that the paint was drying darker than it applied, too. It went on a little light for our taste, but the worry was quickly set aside when we were able to see large sections completed.


Notice, above the window in on the right side of the picture above is ready to be painted. When Mom and Dad stayed with us last time, Mom brought us the awesome roman shades that she made (that actually work, unlike mine) and installed them. Since we didn't want to risk getting any paint on them, we cut down the sides of a large trash bag and taped it so that it worked as a kind of tarp over the blind. This worked really well and gave us the piece of mind to get done much quicker than we would have otherwise.


When the room was completely painted, we were super pleased with the result.


It feels very bright and grown up, but doesn't feel cold or distracting at night when you want to feel relaxed.


Because the wall color was so close to the color of the large rug we had in the room before, we switched around some of the rugs in the house and ended up with a slightly smaller (but fuzzier) one perpendicular at the foot of the bed. It's nice between the toes!

Another reason it took so long to find the right color for our room was because I was afraid of walking out of our newly painted bathroom into a dark cave. Before, it was kind of like this.


But now, it really reminds us of our honeymoon in Key West! A nice ocean blue room from the tropical green bath.

I don't know why the color is wonky here, sorry

We're so excited our bedroom doesn't look like a Rothko painting anymore! It's nice to be able to retire to a place that looks much more finished, especially when the rest of the house is really coming along.

Have you ever painted a room and it changed the entire mood of a space? Let me know in the comments!