
As a warning, this is a loooooooong and very image heavy post, so thanks for bearing with me.
First, I gathered some wood from our scrap pile and dragged it into the garage. I just scoured for pieces that were in pretty good condition (not a lot of rot or holes) and that were the same width.

The wood needed some conditioning, so I set up my saw horses and began by using a wire brush on them. You wouldn't have to do this if you bought new wood, but since this had been sitting outside, it was covered in leaves and mud that needed to be scraped off. I used a wire brush and brushed with the grain.

Here is an example of how much this will effect your surface if you are using old wood. I don't mind that the grain was prominent because I was going for a slightly rustic feel. This step is also just to get out the crud, so don't expect it to come out smooth. Sanding will do that later on.

Once I had my wood conditioned (on all sides), I decided on a width that I wanted my 'wooden canvas' to be. I then marked it and made the first cut. Always remember to wear close toed shoes, eye, and ear protection when cutting anything. This might seem like overkill, but one good flying splinter can cause a lot of damage. I wrapped the wood in tape because I was afraid of said splintering and the tape decreases that possibility, but discovered that the wood was more hearty than I gave it credit, so I didn't continue taping for the rest of the cuts.

Make sure your cuts are at 90 degree angles by using a square. They are really cheap and very handy. Set up your tape measure to the length you need and just line up the square so that you can mark a perfect 90 by butting up one edge of the wood with the lip of the square. I wanted my boards to all be 31 inches, so I measured out the 31 inches and then put my square to work.

To make my cuts, I used a jigsaw. A circular saw can also be used, but to tell the truth, the battery wasn't charged for ours at the time.

Make sure your cuts are at 90 degree angles by using a square. They are really cheap and very handy. Set up your tape measure to the length you need and just line up the square so that you can mark a perfect 90 by butting up one edge of the wood with the lip of the square. I wanted my boards to all be 31 inches, so I measured out the 31 inches and then put my square to work.
To make my cuts, I used a jigsaw. A circular saw can also be used, but to tell the truth, the battery wasn't charged for ours at the time.
I like jigsaws because they are pretty light weight and maneuverable. This one runs on a rechargable battery, but they can be corded as well. Most will have a little indention that you line up with the mark on the wood so you can make sure that you are cutting straight. Some even have laser guidance.

It will look like this when actually making the cut.

What scares a lot of people about power tools is the word 'power'. They think that as soon as the tool is on, it will kick or do something unexpected. There are a couple of rules to remember when cutting to help you avoid any incident:
-Make sure that the wood you are cutting is either on saw horses (or at least above the ground in some stable way), or, if it's too short, braced with clamps so that it doesn't move. The wood is more likely to move than the saw.
-When actually sawing, never place the hand not holding the tool near the blade or in front of the saw itself. Ever.
-Many saws (such as jigaws or circular saws) have little feet (above it's that big metal part that touches the wood directly) that help you keep it stable. Be sure that this is flat against the wood through the entire cut to avoid kick back from either the wood or the saw itself.
-Don't force the blade through the wood. Let the power in the power tool do all the work for you. When you try to work against it, that's when people get hurt.
Once you keep these in mind, it's smooth sailing. A couple of cuts in, you'll feel like a pro.
Once I had all of my cuts completed, I laid the pieces out on the floor to make sure they lined up.

I then measured the height so I could make bracers for the back.

Out of some scrap wood, I cut three 16 inch spacers and lined them up on the back.

If you don't get a clean cut, you can always take a sanding block (which is like a sponge that acts like sand paper) and rub the edges off on it to de-bur it.

I then found some screws that I thought might work to attach everything. I made sure by holding it up against the side of the piece. They shouldn't go all the way through, so these would work perfectly.

I then chose a drill bit that was slightly smaller than the screws that I had chosen and pre-drilled my holes for the supports. Pre-drilling just makes it easier to attach the screws because the material that was in the way is already cleared. This is also a method I recommend for extremely long screws or very thin wood (because it will keep the wood from splitting).

Attach the supports with screws in the pre-drilled holes.

The finished support attachment should look something like this.

Next, I moved the whole thing over to the saw horses so I could give it a good sanding all around.

This is a hand sander. This specific one cost about $13 from Harbor Freight (great place for inexpensive tools) and has done a pretty good job of keeping up with me so far.

There is only one button on the entire thing, so it's a lot less intimidating than some of the other tools you might encounter. The sandpaper is actually pre-cut and just velcros to the bottom, making for easy changing. Make sure that you get the edges, top, and bottoms of the boards as well as the face so that everything is as smooth.
I decided that I was going to make a state map out of my wooden canvas, but I wasn't sure which one. I had seen these and liked them all.

-Make sure that the wood you are cutting is either on saw horses (or at least above the ground in some stable way), or, if it's too short, braced with clamps so that it doesn't move. The wood is more likely to move than the saw.
-When actually sawing, never place the hand not holding the tool near the blade or in front of the saw itself. Ever.
-Many saws (such as jigaws or circular saws) have little feet (above it's that big metal part that touches the wood directly) that help you keep it stable. Be sure that this is flat against the wood through the entire cut to avoid kick back from either the wood or the saw itself.
-Don't force the blade through the wood. Let the power in the power tool do all the work for you. When you try to work against it, that's when people get hurt.
Once you keep these in mind, it's smooth sailing. A couple of cuts in, you'll feel like a pro.
Once I had all of my cuts completed, I laid the pieces out on the floor to make sure they lined up.
Out of some scrap wood, I cut three 16 inch spacers and lined them up on the back.
If you don't get a clean cut, you can always take a sanding block (which is like a sponge that acts like sand paper) and rub the edges off on it to de-bur it.
I decided that I was going to make a state map out of my wooden canvas, but I wasn't sure which one. I had seen these and liked them all.
As attractive as the idea of the bottle caps was to me, I decided I really liked the textures that were going on in the string art version. I began the process by finding a large image of the state of Kentucky. This is the one I used, so if you are looking for a free outline of the Bluegrass State, feel free to use it as well.

I then printed it out on multiple pieces of paper.

Lined it up and taped it together. To add a little extra strength, I taped all of the lines I would be cutting as well. I would recommend this if you want to keep it and use it again because it worked really well.

Lined up on the boards, it looked like the right size, so I proceeded in sealing the wood.

I used Jacobean stain from Minwax with a foam brush and wiping cloth. Just brush it on with the foam brush, then wipe the whole thing down to get rid of the excess just like I did here with our headboard.

Give it a while to dry, then apply a second coat for a darker look. When you have the hue you want, give the entire piece a good coat or two of poly to seal everything in. I used gloss which is why it is so shiny, but there are a couple of different finishes to choose from.

Now is the tedious part. I recommend pulling up a piece of ground near a TV, because it'll make it go by quicker.

Grab your nails and a hammer, I recommend nails with some sort of head to keep the string from sliding off. Align the stencil on the board where you want it to be. Then place nails along the outside most points just outside the paper. This will help hold it in place.

I decided to get the worst part over with first by doing our northern border. It truly made me envy states like Oregon, Wyoming, Colorado, Utah, and Montana. Good luck if you live in Maryland, though. You're on your own.

I just kept putting them in so that they seemed appropriately even all around. When I had finished, it looked like this.

I even added a little heart over our town so that it would be a nice focal point.

Then I just began stringing it. I used some craft twine that I had because I liked how it looked with the dark wood. I started in the lower left of the state and worked my way up and over the heart, then back around.
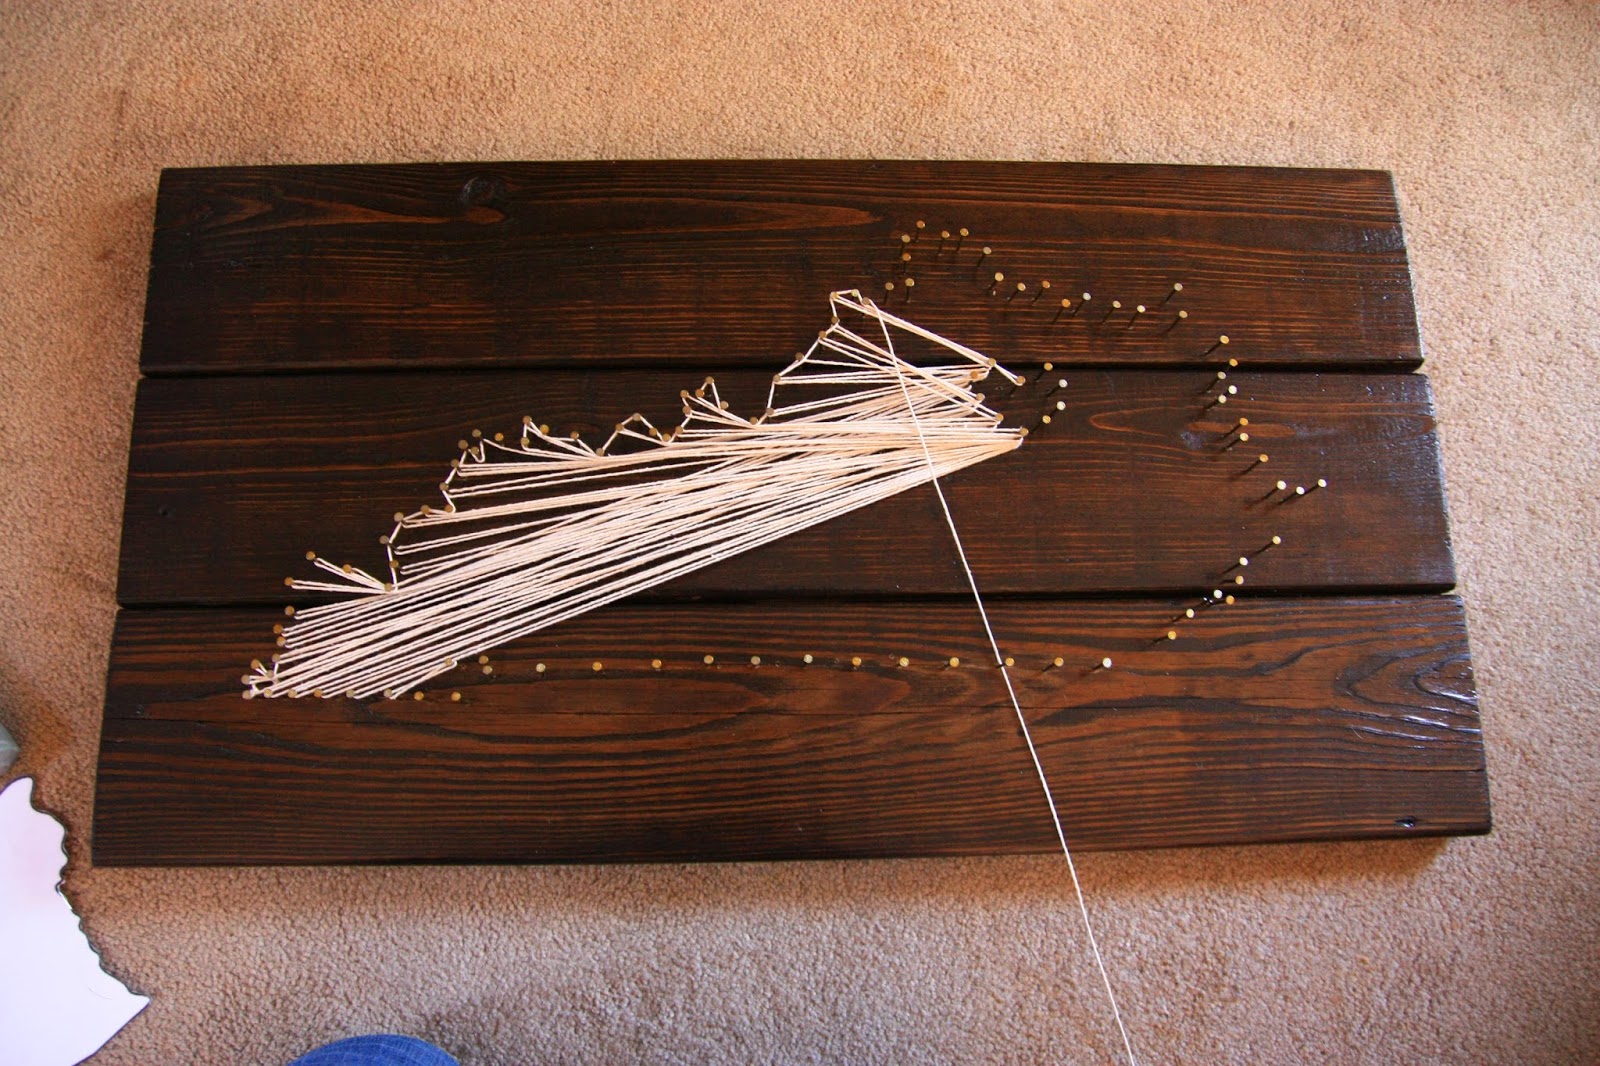
This part actually went pretty quickly, so in no time, I had this guy done.

We decided to put it up in the dining room. I attached some D-hooks to the back and we hung it with some anchors. I always recommend hanging something big or heavy like this with anchors. It's just safer, even if it does take 5 minutes more to install.

It's nice to have something else filling out the wall in there. We want to get a couple of cool record covers and hang them underneath (right above the record player) to really pull it all together.

As it is, this side of the room is still more finished than the other side. Sam doesn't seem to mind, though.

I really hope that this has put your mind at ease about using power tools. If you have any questions about them, though, you can always ask us here at My Old Kentucky House! If we don't know the answer, we will find out for you!
I love the fact that I have readers like you who have been checking up on the blog's new posts, but people don't tend to comment, so it's very difficult to see how many people are actually paying attention to us out there. If you are a frequent reader, please show us some love in the comment section with either a comment or a 'hello!' just so we can feel the love. Thanks!
I then printed it out on multiple pieces of paper.
Lined it up and taped it together. To add a little extra strength, I taped all of the lines I would be cutting as well. I would recommend this if you want to keep it and use it again because it worked really well.
I decided to get the worst part over with first by doing our northern border. It truly made me envy states like Oregon, Wyoming, Colorado, Utah, and Montana. Good luck if you live in Maryland, though. You're on your own.
As it is, this side of the room is still more finished than the other side. Sam doesn't seem to mind, though.
I love the fact that I have readers like you who have been checking up on the blog's new posts, but people don't tend to comment, so it's very difficult to see how many people are actually paying attention to us out there. If you are a frequent reader, please show us some love in the comment section with either a comment or a 'hello!' just so we can feel the love. Thanks!
Hello. I'm Michelle's friend Rita and I always enjoy reading your blog. This one was very informative. I don't have a lot of experience with power tools. I would love to make one of these of Florida! You are very creative.
ReplyDeleteI subscribe to the blog via RSS and enjoy every post! One of my dad's saying about woodworking is worth mentioning..."Measure twice, cut once!"
ReplyDeleteYou were very lucky to have a good background in power tools and wood work. Remember, you can't cut wood longer! -Dad
ReplyDeleteI love love love this! Every time I see this on Pinterest, I'm like, I need to see if I can make that!
ReplyDeleteI used to be scared of power tools, but go slow, double check what size you need and don't be afraid, and it'll be fine!
PS I don't comment if I'm reading on my phone because you have Captcha turned on and it's a pain on the phone.