There's a little Full House to really punctuate your Friday. Also, Happy Friday!
This is a really simple tutorial with a pretty awesome result that I felt a lot of people could have some fun with. I have seen these in a couple of magazines, design sites, and Pinterest (of course) and thought, "Pshshshsh, I could totally do that". Stencil cut canvases ended up being a super easy one-evening project that really dressed up our hallway.
I grabbed three canvases that I had laying around. You can use any size you want, but the ones I used were 8x10 inches. I might recommend slightly larger ones to make the cutting easier, but these weren't too bad.I then went online and found some stencils that I liked to use on them.
(To be fair, I actually couldn't find stencils I liked, so I actually just found a couple pictures of rooms with wallpaper that caught my eye and then photoshopped them into stencils that I just printed on regular paper. Here are the three I used so that you can use them, too!)
Once I had gathered my supplies, I laid them all out in the kitchen so I could get started.
You will need:
-Canvas(es)
-A stencil for each canvas. They can be the same or different. Dealer's choice.
-Scissors
-White glue/spray adhesive/stencil adhesive. Any one of these will work.
-X-acto knife
-Cutting board
First, measure the inside portion of the back of the canvas. Trim your stencil down so that it fits and set it inside to make sure.
Once you have them all cut, grab your glue. I used Archival Quality Neutral pH Adhesive. It's really expensive (Left over from a photography class I took), but white glue would also work. Stencil adhesive would probably be the best because it can be sprayed on, though. This needed to be brushed on, which made it a little more difficult.
Take one of your canvas and the stencil for it. Spray or brush (watered down glue) on the canvas surface, then place on the stencil.
I quickly used a square to make sure that it was at least close to straight. Then cover the whole stencil in the glue to really get it to stick and harden.
Allow for it to dry or use a hair dryer if you are impatient (like me). I would do all of your canvases at the same time rather than immediately cutting on the one you've completed. If it doesn't stick down all the way, that's not a huge deal. As long as it's held in place well enough for you to cut through it, you're golden.
Next, throw one of your dry canvas on a cutting board (preferably a plastic one because it's better for the X-acto blade).
Start in the center of your design and work your way out. This will keep the canvas from stretching while you cut and also keep it from moving around a lot.
A little ways into the cutting, you'll probably want to flip it over and see how you are looking. Just remember that no one will see the side with the paper on it, so if the paper starts to tear or come up, you can just gently pull it off.
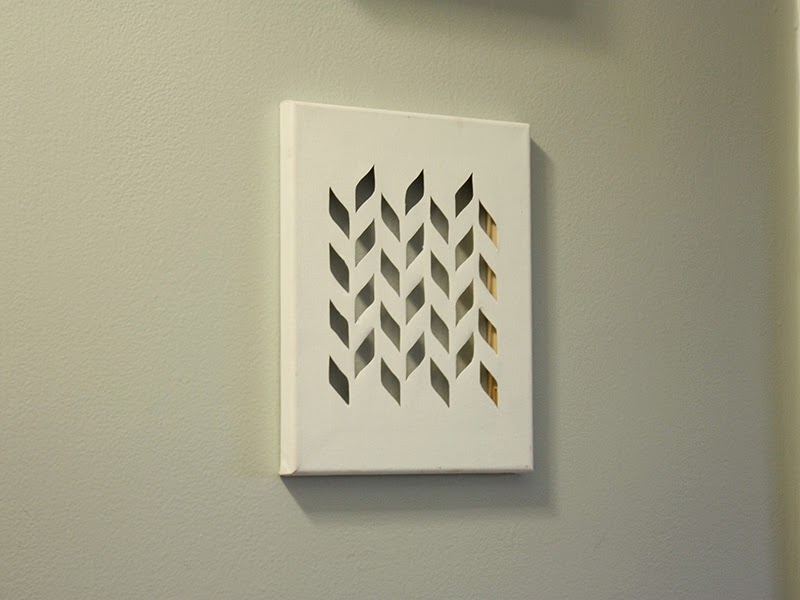
Find a comedy you've seen a thousand times and make yourself comfortable. This is the most time consuming part of the process because it involves you just...cutting. Scott pulled up a cutting board when he got home from work and finished quite a bit of one of them himself, but even with two people, it took a good two hours to finish. I had this canvas finished before he came home, but that's because it is the most simple of the designs I chose.
I enjoyed holding them up to the wall as I was working on them to really get a sense as to how they would look when they were done.
When you finish all of your canvases, I recommend laying them out and seeing what order you want them in. Flip them around and see if maybe they look better in landscape rather than portrait. Just play with them. They are so simple that they can be used in so many different ways!
We put them in our hallway because we wanted art there, but nothing too big. It's kind of a narrow, dark space, so a lot of large, framed art felt too busy and intrusive. These are so light and airy, they make nothing but a positive dent in the hallway-walking experience.
It's also nice because we can see them from the kitchen, so it adds just a little extra somethin' somethin' to that area as well.
Has this inspired you to go take advantage of some negative space? If you make some of these, I would love to see them!
Keep checking back here for more updates coming very soon! We are currently working on painting Scott's office, and I just refinished a filing cabinet with some interesting finishing touches. See you guys next week!


Really like. Lots of possibilities.
ReplyDeleteI have never seen this! Great idea and it looks really good!
ReplyDelete