Tuesday, September 9, 2014

...and the kitchen sink

A month ago when I was in Tennessee helping Mom out around their new house, we took a trip to their local ReStore.

It was amazing. In some ways, life changing. They had all kinds of wonderful things from their area (which is surrounded by younger neighborhoods) that were barely used if not new. They also had a familiar Time And Relative Dimension In Space ship towards the back of the store that made me "SQUEEEE" for the rest of the visit.


As part of their inventory from this planet and time period, though, they had some impressive pieces. Large new windows, lots of window inserts for garage doors, and sinks. The sinks were all in pretty good shape and high in variety. They had some cast iron and white porcelain ones that were priced right. I managed to talk myself out of the purchase, though, and left empty handed (I did leave with my geeky heart was full).

Since my parents recently made another trip up to work on their future abode, they swung by the ReStore again and sent me a couple of pictures of any sinks that might interest me. One in particular was in great condition, the right size, and was only $45. Three days later, they pulled up in the driveway with a car full of everything...and the kitchen sink.

Scott and Dad decided to start installing it while Mom and I were running errands, so the pictures are kind of jumbled. I'll relay the play by play as it was described to me:

The old sink was not a looker. It was stainless steal, but very difficult to keep clean and always covered in water spots.


They began by turning off the water and dismantling the faucet.


Scott then played plumber underneath the sink and disconnected all of the hoses and pipes so that they old sink could come free of the counter without those hang ups.


When they tried to pull the old sink away from the hole, there was a bit of an issue. Not only was our old sink barely held in place, but there were rusted clips underneath that were more than happy to stubbornly stay put. Thank goodness we have tools like the Dremel to literally cut through those issues.


Once those were removed, so was the old sink. It had certainly seen better days.

Imagine food prep in this. Tasty.

Honestly, the kitchen already looked better with the old sink gone. (For anyone interested, this handsome disaster is on sale at our local ReStore for all of $10. Yikes!)


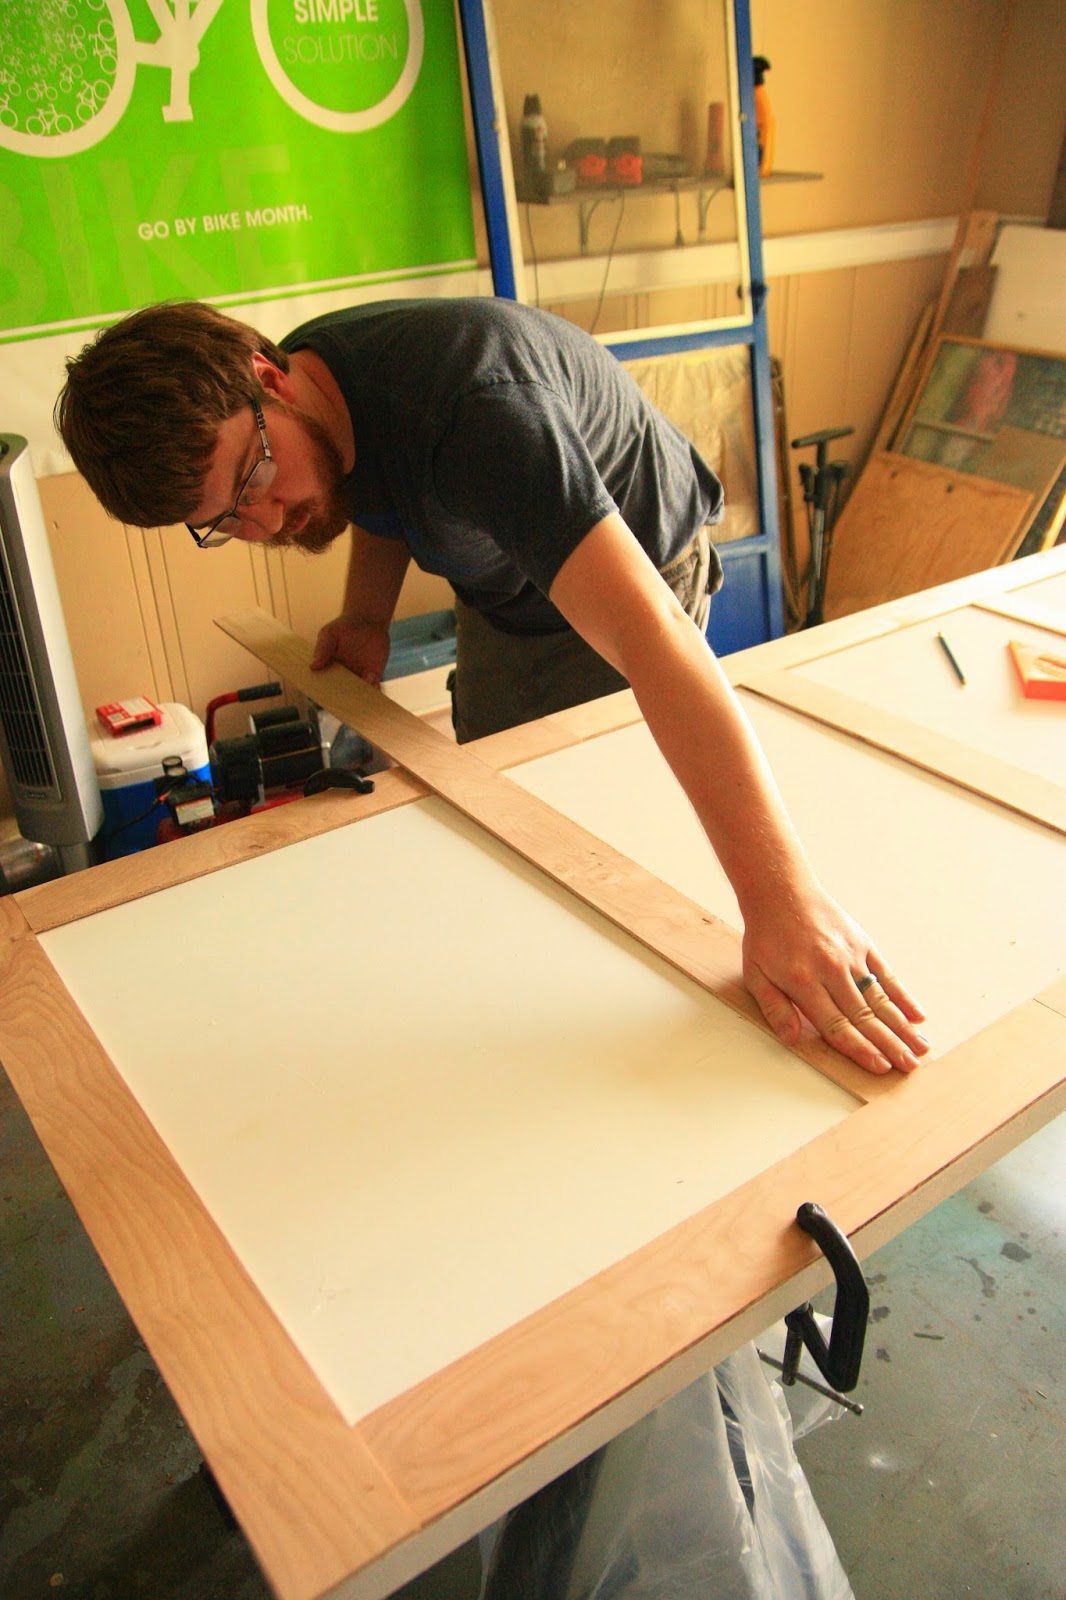
Once everything was kind of cleaned up, the new sink was brought in. We had measured it previously to make sure we wouldn't have to widen the hole in the counter, so we didn't really need to dry fit before installing.


The faucet base parts were attached to the new sink, and once the plumbers putty had been used around the hole, the it could be lowered in. The boys were glad to have it immediately off to the side because cast iron weighs a ton.


They managed to get it in without incident or smashed fingers.


After grabbing a couple of pieces of new PVC (so they would be easier to fit together), Scott crawled back into the cabinet to hook everything back up.


The rest of the faucet was reattached and we checked for leaks. After some minor adjustments, it was done!


Well...sort of...

It was still a used sink. It needed a little polishing.


Thankfully some Barkeeper's Friend cut right through the gross and we were set up to cook and clean in no time. I replaced the water filter, put the drying rack in the second basin, and we called it a day.


What a great find for $45! It is so nice to use because it just feeeeeeels clean.


(Thanks to Dad, Mom, and Scott aside from the normal DSLR for all the pictures in this post. Everyone had camera phones out for this one!)

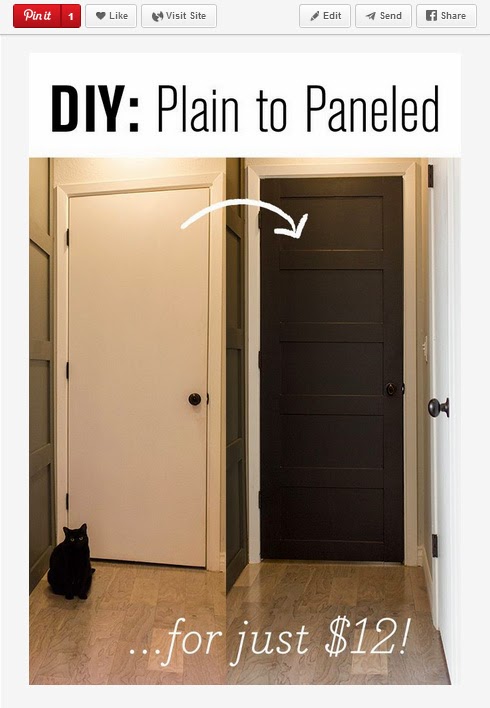
Update: I have also managed to add two more finished doors to our hallway! It's hard to get a good picture of all three of them, so I'll just show you the cute half door that goes into the linen closet.

Aww.


The other door completed is to our bedroom. I'm thinking the master bath and the office doors will probably be next.

If you don't follow us on Facebook, you might not have seen the quick project I completed yesterday!


Pssst, it's made of straws, wire, and spray paint! You can find the tutorial to make one yourself here.

 http://www.vintagerevivals.com/2014/01/geometric-himmeli-wreath-2-0.html


And be sure to like us on Facebook!

Tuesday, August 26, 2014

From "Hollow" to "Hello"

Our hallway doesn't have much wall space. It houses 6 doors and not much else. To make it worse, the doors that were in the house when we purchased it were plain, hollow core doors with gold door knobs. We've managed to take care of the knobs here, but the doors were still a little lack-luster.


While on Pinterest the other day, I found just what our humble little doors needed. Over on Jenna Sue's blog, she showed how she pumped up her frumpy plain doors with a little trim and paint for $12. I showed Scott and he was just as sold as I was.


We started by grabbing our materials. Most of it we already had, but we needed to buy the wood for the trim. If you are thinking of doing this yourself, I would recommend making sure that you have everything before beginning:

-Air compressor/nail gun with brads or nails
-4ft x 4ft piece of 1/4 in thick plywood (This ran us about $14.95 at Lowes. I think the original blog must have gotten their for $12. Oh well)
-Spackle, sanding sponge, putty knife
-Paint, paint brush, small roller
-2in hole drill bit for the knob
-Saw (We used a miter saw, but you could probably do some of this with a miter box and a hand saw if you don't have many power tools.)
-Wood glue

We purchased our plywood and immediately ran into an issue. It wouldn't fit in the Rogue. Uh Oh.

Scott wandered back inside the store while I stayed in the car. To my surprise and delight, he exited Lowes with a stack of pre-cut 3in. slices of our previously single 4 ft. square board. I would recommend having them cut it in store. This made assembly soooooooooo much easier. Waaaay easier. As in, a lot easier.

Easier.

You get the idea.

Scott took the door off of the hinge and placed it on saw horses. This made measuring and attaching our plywood pieces much easier.


After the door knob had been removed, we began laying out the pieces to get an idea as to how they would fit and how much scrap we would have left over.


Starting at the top of the door, we cut our first piece (I'll go through an exact step-by-step here a little later). We decided to cut the footer and header as the capping pieces and then align the sides to those. This is definitely the way I would recommend doing it.


We then used clamps as we went to hold down the pieces we had previously cut so they wouldn't move. Scott then measured and cut the struts for the middle of the door.


Once again, we laid it out and made sure it all looked correct.


Using some Gorilla Wood Glue, I slowly worked in the same order that the strips had been cut. I placed a line of glue, lined up the piece with the door, then used the nail gun to nail it into place.

Once it was together, we hung it up. Usually you would wait to spackle and paint it outside, but we needed a door on the room. We were doing the Ice Bucket Challenge that night and needed an extra room for people to change out of their cold and wet clothes. (For more on that, check out the bottom of this blog post.)


This is when we ran into a problem we didn't really consider. The new door was thicker than the old one.


It didn't close! Thankfully it was closed enough for people to change behind, but we knew that we would need to move the hinges for any future guests that might be staying with us. (For anyone wondering, we started with the guest door because it's the only door you really see at a casual glance down the hall. We are going to finish them all like this over time, though.)

After the hinge had been moved out a little, we were in business.


As you can see, there is a little bit of paint on there, too. I decided that doing all this work just to paint the doors white again might be a bit of a waste. I chose (of course) a neutral grey/blue called "Sanctuary Blue" in Behr semi-gloss because I liked the look of the space in this Pinterest pin.


And it seemed to go well in the hallway as well as the guest room when the door was open.


After spackling the holes left by the gaps and nails, sanding them all, and wiping away the dust, I gave the door a good coat of the new grey color. I painted the whole front except for around the door knob. Here, I placed a scrap piece of wood (also glued and nailed in place) to help add a nice base for the knob to attach to. Here you can kind of see what I mean.


I used the 2" drill bit to re-drill the hole for the mechanism, then painted over it all to make it look like one piece.


So far, so good.


The door knob had a few scratches, so I gave it a quick touch up with the Oil Rubbed Bronze and some poly and let it dry before attaching it again. Check out that hallway now!


Instead of taking the whole door down to do the back side, I just put it together while it was still on the hinges. This wasn't too difficult, but I would recommend taking it down for both sides. Here is the progression for what to cut and attach in what order. I am a very visual person, so if you want to use this as a tutorial, the images might help! (Read in order from top left to right)


Finished off by a final coat of paint and the door knob.


How about that? Not too shabby (anymore), eh?


Only 5 more doors to go. For now, at least, our guests will have a much fancier-feeling room. I'll also add that the weight of the wood trim to the door gives it a nice heft. Oh, and I wanted to clarify: The $15 sheet of plywood was enough to do BOTH sides of this 30 in x 79 in door, so you can easily estimate about $15 per door. I was also sure to use some of the scrap for the back side pieced together. Once it was spackled and sanded, though, it made it much less noticeable.

See the three pieces? My pride says you don't! 

So what do you think? Is it worth it? I'd say so. And so much cheaper than buying "nice" newer doors. I'm really hoping they help our resale, too.


PS- For anyone wanting to check out our Ice Bucket Challenge video and possibly donate, you can watch it below. We really appreciate any views we can get and awareness is key. We are also participating in a walk at the end of September and donations can be made to Team Anita here. It's a very personal cause to many of our friends and we would like to do all we can to support them and anyone else who has been touched by this disease.


Monday, August 25, 2014

Ain't No Sunshine

Kentucky lately has had a little bit of rain. By "a little", I mean a lot. By "a lot", I mean every day we are getting a thunderstorm that lasts at least an hour and has taken out power in parts of the city every single time. Most of the time, the power goes out at Beth and David's house. Almost like clockwork (Fayette County, you should probably fix that), but we had managed to avoid it thus far.

Until the other day.

Three of the main roads surrounding us, UK campus, and most of downtown were out of power at 5 in the afternoon. No stop lights worked, there was a lot of confusion as to whether to stay in our hot muggy homes or go out somewhere that might have air conditioning, during rush hour, and the 3G was so jammed up that getting updates on when the power might return was almost impossible. (On the up side, this was the only day so far that Beth and David DID have power. Figures.)

I was out of the house when the power went out, so I returned to a dark home. I tried my garage door opener the allotted 'duh' amount of times before realizing that I wasn't going to be able to get into the house.

See, when we purchased our house, we weren't given a key to the front door. The only keys we were given were to a dead bolt, the garage-to-laundry door, and another random key that we still aren't sure of. This meant that we weren't getting inside till the power was back on. This also meant that we had to stare at this face through the window till we found a way in.


We had put off replacing our front door lock due to a false sense of security. Suddenly that security was gone and the four legged guilt trips stuck in our air conditioned home were sadly reminding us of our puppy-parent failure.

Once Scott got home, we grabbed some dinner (thankfully Bourbon and Toulouse was open, had power, and wasn't busy), then ran over to Home Depot. The nice thing about home improvement stores during power outages is that they can still run on generators, which is exactly what Home Depot was doing.

We chose our new front door lock. It is a little fancy because if we were going to spend the money, we wanted it done right the first time. We also liked the fact that it had a bit of a skirting around the dead bolt to cover an issue we had with our previous dead bolt.

Sorry about the picture quality. I ended up using my phone for this post. You'll get the idea, though.

We had a gap. We have no idea why we had a gap. We are figuring that whoever drilled the hole didn't drill it correctly, so it was more of an oval than a circle. I really didn't care how it got there, just that we would be able to cover it up.

Through some blog magic, I will tell you that we managed to get into the house. We are lucky enough that we taught the girls to open doors. That might not sound true, but that's my story and I'm sticking to it.

Scott started assembling the new door fixture right away. He quickly took off the old door knob and dead bolt. He then attached the new deadbolt. That part was easy.

Since we bought a fancy handle that needed to be attached at the bottom and the top, we had to drill a new hole. Scott made a template to lined it up. This showed him where to drill so that both sides of the door would fit together.


We were then able to mount the bottom of the handle.


For reference, here is the front.


And here is the back. That dark washer with a gold screw head is the screw that holds the bottom of the handle in place. It has a cover that just pops on to help it blend with the rest of the assembly, but we just hadn't gotten to that yet.


Next, we had to make sure that it actually closed. We lined it up with the previously drilled holes in the door frame and they didn't line up. (Of course they didn't.)

Scott took a chisel and took out some of the material so that the latches would catch. This wasn't a very difficult part, but it made all the difference. Closing our door now is much easier than it was with the old locks.


Now our door is finished and we are so excited to be able to get into our house "just in case". I know a lot of you are probably thinking that we are crazy for not fixing this issue a year ago when we first moved in, but live and learn. We figured that if we couldn't get in, no one else would be able to, either! That theory worked up till now! Honestly, we didn't use our front door that much anyway, so on a regular basis, it was dead bolted about 90% of the time. Now we use it much more often.


The door looks really swank now, too. I love how the oil rubbed bronze matches my rabbit so well and really ties it all together. I just wish you could see it when our glass door is closed.


Oh well. It does add curb appeal (it's just to bad you can't see it from the curb).

Have you ever had any emergency DIY you HAD to accomplish? Let me know in the comments!