Monday, April 14, 2014

The Hammock Hookup (PT.1)

First things first. We are not done with this project yet by any means, but since it's taking a while, I figured I would just write out the whole thing in parts. A couple people who have been able to see this have asked that I do at least a small write up of it so far, so I am breaking it up into three posts.

Welcome to post #1!

We have known that we wanted to install some sort of hammock hangers in the backyard for a while. We both have light weight camping hammocks that we love to use, but there are no trees close enough to actually hook them up. We decided that some supports that could triple as hammock hooks, torch holders, and architectural interest would be a nice additional surround for the fire pit. Since we each had a hammock and many of our friends had their own, for both entertaining and symmetry, having three places to hook up would be best. That means two bolts for each of three hammocks to hook into.

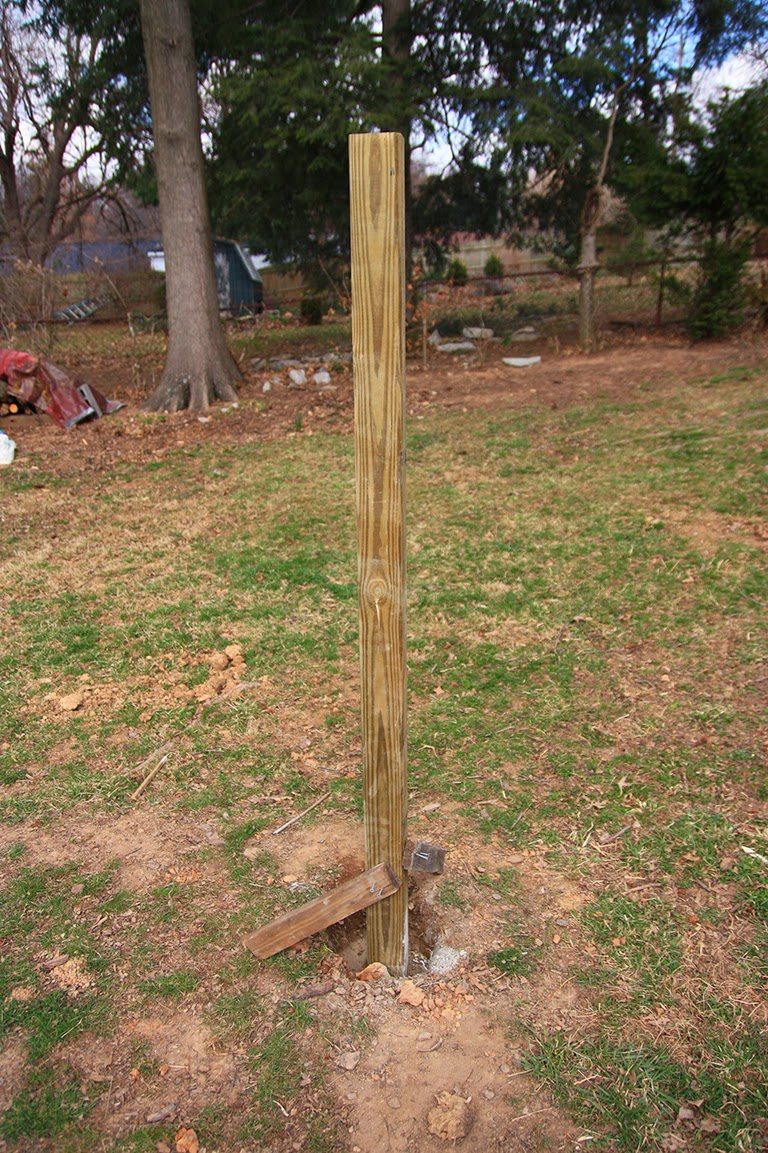
We grabbed four pressure treated 4x4s, a post hole digger, and one of our hammocks, and started measuring.


All of the tutorials we read said to measure your hammock and then add a foot onto the length. We laid out the hammock and added our foot, marking it with some green spray paint.


For us, these measurements were 132" from the center of one post to the center of another.


Then we started to dig. We were only really able to work on one at a time because we only had one post hole digger. This process was made even slower by the fact that our yard is full of rocks. Not small, gravelly rocks, but large ones that have to be broken up to be moved. Scott ended up having to use a spud bar (ha!) that he borrowed from our friend David to make any headway.


It's essentially a giant iron bar that you ram into the ground and it exhausts you. I think it's supposed to be an efficient way of breaking up rock so you can move it, but it still takes a ton of work to use. It did allow us to finish two holes in one day, though, so I would still totally recommend using one if you have any rock issues like this in your own yard.

As usual, the girls were of no help. Especially Sam who taunted her laziness at every turn.


When we believed that the holes were deep enough, we took some dry cement and added it to the bottom of a post we had already set into the hole. Scott added temporary supports to the bottom of the post while I leveled each side so that it wouldn't move while setting. We then added the appropriate gallon of water to the hole and worked on the other post.

Since we wanted all of our posts to be the same height, but our yard slopes, we had to use the string method to make sure that everything was lined up. This meant that he dry set the other post in the hole he had dug and held a string at the top. I held the other end of the string at the top of the post we had just set in cement and then we pulled just tight enough that the string was taught. We set our level against the string to get an idea as to how much dirt we needed to add or take out of the hole for the new post and worked from there.


We managed to get the other support level and set in cement before we went in for the day. That was on a Saturday, so we had planned on working on it on Sunday, but God had different plans. Kentucky weather is a little weird. For instance, our last two days have been in the 70s, sunny, and perfect. It's supposed to snow tomorrow. Same thing happened that Sunday.

Sunday mid day.


Less than 3 hours later.


We weren't able to work on it again until the next Saturday. Our first order of business was to repeat what we had already done so we could get the other posts in the ground. Thankfully this didn't take very long. We just made sure they were level and added our supports.


Then put in our dry cement and added our water.


After the cement had set for all four posts, we were able to add hardware to attach our hammocks to. We ended up using large stainless steel screw eye bolts that were long enough to feed all the way through the 4x4s. I just measured 42 inches from the ground (a number which we got from setting up our hammock awkwardly in the corner of the yard and measuring the height of the clasps) and drilled through the supports. Then it was just a matter of screwing in the bolt all the way and securing it with a large washer and bolt.


We hooked up our first hammock and....almost disaster! The supports by themselves weren't going to be able to hold a human's body weight over time, especially after being weathered, so we had to change our strategy slightly. We grabbed some pressure treated 2x4s that we used as cross support beams and tried the hammock again. Success! There is even a plan to make it look like a mini pergola so that it doesn't stand out so much (that'll probably be the third post in this series).

I also tried out some paint colors to brighten up the whole facade, but quickly decided that wasn't the way to go (so ignore any bright orange you might see!). We were able to assemble and mount our cool new DIY torches we have been wanting to use for a couple of years, too, though, so we accomplished quite a bit. (How to make some DIY tiki torches is going to be post #2 in this series. I'm hoping to have that one up by this week!)

So far, our backyard is looking like this.

(Keep in mind that it's still spring. Our yard will look more lush in a month or so!)
Which is a far cry from where we started.


Now we just need to:

-Strip off the orange paint (ugh)
-Finish the pergola support beams
-Stain entire structure dark
-Move the dirt in the flowerbed to the dirt pile
-Reseed the entire backyard
-Redo our temp walkway into a permanent one with stone
-Landscape and mulch
-Start our garden against the back fence
-Create a bird feeder area on the other side of the house

It's quite a list, and not all things that we want to accomplish this year necessarily, but at least it's a place to start. For right now, we have really enjoyed the use we have gotten out of our new outdoor entertaining area. We had some friends over a couple of weeks ago that really helped us break it in! We have discovered it's also the place to be when UK wins basketball games and you want to listen to the police scanner all night!


Do you have any plans for your backyard this year? Sam wants to know, so leave it in the comments and we'll read her your answers! (She can totally probably read, she is just lazy)


Wednesday, April 2, 2014

Step Into My Office

Well, it's actually Scott's office/second guest room, but you get the idea. It's come a long way since it's humble beginnings as the terrifying bat cave that almost kept us from purchasing the house. This wood-laden 9 ft by 8.5 ft room is the smallest bedroom I've ever been in, but over the last couple of months, it has really opened up and become more inviting.

There aren't any really good pictures of the before. The documentation of this dungeon/humidor only truly began when I realized that painting the wood paneling was going to be much trickier than initially anticipated. Here is an example of where I started (Just as a warning, this process has been going on since we moved in, so some of the pictures are better than others. There was a lot of phone photography going on.)


As you can see by the wood paneling on my left, it didn't want to go down without a fight. The primer was oil based to properly cover and adhere to the shiny wood. It worked really well, but was exhausting to apply because it was mostly done with a brush. I didn't use a roller with the primer because my previous oil-based primer shenanigans had resulted in splatter that I didn't want to get on the wood floor. Remember, too, that the top and bottom trim, back of the door, closet, window, and window trim were all the same un-painted wood as the walls. That means that they were also on the list to be primed and painted.

To walk you through the entire process, I figured I'd pick up after all of the priming took place. After two coats of primer, the walls were manageable.


The left only has one coat, the right has two. After I had mostly finished the priming, I took a break on the room.

So for the past 5 months, the room has been left looking like this.


Until now.

I ended up using a light color because going too dark would really make the room feel cave-like. I picked a light gray/blue and grabbed a gallon from Home Depot (after appropriate sampling, of course. It's the middle one on the right hand side of the picture below).


Unfortunately, before I could even open my paint, a lot needed to happen to prep the walls. Most of that prep was spackling, and most of that spackling involved tiny holes. Once the primer had been applied, the walls certainly looked better, it's true, but this


actually looked pretty ratty because of these


I just took my time (3 hours, to be exact) and applied my spackle to all of the holes I could see. I had to step around the room and look at the walls from different angles because of the divots in the panels, but it was worth it. Painting the wood without doing this would have left it looking like someone just slapped a lot layers of paint on particle board and that was not the look I was going for.

When I was finally able to grab a brush and open my gallon of paint, I started at the bottom trim and worked my way up. I had to make sure to work the paint into each of the slats because the roller wouldn't be able to reach in the routered sections.


One issue that I had was that the paint went on practically white, so seeing where I had and hadn't already painted was a bit tricky. Thankfully, it dried a little darker and I could go back later and touch up. This was all made that much more perilous by the fact that we couldn't move all of the furniture out of the room, so we were working around this.


Once all the walls had been edged (the trim has been completely painted since I primed the walls), I was then able to come back with a roller and roll the color onto the flatter portions of the paneling. It was so satisfying, but my wrist was pretty sore from brushing all day so I had Scott finish it when he got home. It was nice because he is tall and able to use the roller without a stool.


We let the first coat dry and came back with a second after seeing some spots that we had initially missed. After the second coat dried, we moved everything back in.

It's difficult to describe how much better the rooms feels to someone who wasn't able to bask in it's horriblness before, but let me tell you, it's pretty awesome in there now.


So much less embarrassing for people to see (except for maybe that Ikea couch)! The room just feels like it's really a part of the house now, unlike before when we tried to keep the door shut as much as possible. There is still one issue that lurks in there that we won't be tackling for a while, though.


Yeah, that's three different types of ceiling finish. There is a different type in each part of the house, but only Scott's office has two inch peaks hanging from above. Why? We don't know. We haven't met one person who has ever seen anything like it before. We have tried wetting it down and scraping it, but it didn't do a lot of good. I ended up going at it with a hammer and chisel and made a bit of a dent a couple of months ago, but it's a very messy process and I haven't tried again since.


We aren't sure if we are going to try to sand it down, recover it, pull the whole thing out and replace it, or just keep chiseling yet, but I'm sure when we do, you guys will get the whole story!

What do you think of the office now? Do you have any room changes that took forever but made a huge difference? Hopefully this will make you feel more comfortable about painting paneling you might encounter in the future!

Tuesday, April 1, 2014

Tide is High

You know what I'm getting at...


It's a nice tropical song to match the amazing weather we've been having here lately! Which is great, because work on Scott's Office is still going on. In fact, this week I felt like adding a little art to the space.

I had wanted to do a layered paper artwork for a while, but finally found some inspiration in a color scheme I found on Pinterest. I grabbed one piece of scrapbook paper in each of the colors I liked and grabbed a piece of foam board. in all (aside from the frame, this entire project costs less than $10 to do).

I ended up with 8 different pieces of paper/colors. I decided to make a wave pattern that would allow them to all overlap. I used my 2 inch hole punch flipped upside down to make the cuts.


Just line up the top of the paper about to the diameter mark and cut a hole. The pattern should start like this.


Continue this till you reach the other side. I did it on all of my pieces of paper, making sure to try to not line up each wave so that there was some random overlap. I didn't really care that mine weren't level across the paper, but you can always draw a level line and then line your hole punch up with that.


Once they were all cut, they looked like this. I lined them up so that they were stacked with each one being lower just to make sure that they looked correct.


Then I trimmed each piece of paper to make it shorter. You don't have to measure this part until you are cutting the wave that is in the front. I just kind of cut each piece of paper in half.


After lining them back up, I took some tape and taped them together to hold them in place. This can also be accomplished with glue, just don't use too much because you don't want the paper to pucker.


I made some lines to cut the whole thing down a little bit because I was trying to even out the sides. This was done by leveling the sides with the top-most wave and them drawing them parallel. Then I trimmed them with a straight edge and x-acto knife.


Once it had been trimmed, I made a 90 degree cut along the bottom to square it off a bit. Once again, I didn't measure  the height of the piece to each wave because I wanted this to look slightly hand made, but you can if that's the look you are going for. Once it was all trimmed, I flipped it back over.


I then centered it on the piece of foam board that I had already cut to fit into a frame I had laying around (Michael's has BOGO sales on their nicer poster frames all the time. The other frame I had gotten as part of the deal is holding an awesome Fifth Element poster from Etsy).


After popping it back in the frame, I hung it up in the office.


It's super simple and adds a nice happy touch of color to the room. The space is small, so this fits really well. Now if only the space was a little nicer looking. Notice the primed-but-not-painted corners of the wall.


At least we are still looking much better than we started! There aren't any good "before" pictures of it (and it's terrifyingness), but imagine a 8.5 ft by 9 ft room completely made out of wood, rim and all.


Don't even get us started on that ceiling! The ceiling might not be something we can work on at the moment, but the walls are.Yeah, don't worry, that's the next thing we're tackling as part of Scott's Office Week! Happy April everyone!