Monday, October 21, 2013

Halloween Romance

Halloween is probably my favorite holiday. It's dark, spooky, and can be goofy all at the same time. I remember putting together a haunted house with my youth group in London, KY and giving people spooky tours. I loved the Fall Festival with the silly prizes we could win, like witch fingers and wax lips. What I loved most, though, was decorating the yard with gravestones and lights that really made the lawn haunted.

This year, we really haven't done much to the outside of the house. We feel like outdoor decorations are things that are built up over time, not all purchased or made at once, so we aren't as focused on them right now. For the inside, though, I felt that I needed to make something to set the spooky mood that our new table (which will be delivered next Wednesday, yay!) needs for the holiday season.

Here is what you need for a centerpiece that has both an impact and gives your wallet a break. Notice that all the images in this post are in CREEP-O-VISION!


I started with a $2 charger from WalMart, some spider webbing, some creepy critters, and the two candle sticks. I began by spray painting my charger black. If you can find just a black charger or a black plate that you wish to use that makes it a little easier, but I liked the idea of a charger because I knew I can dedicate it to this every year and it wouldn't cost very much.

The candle sticks I actually picked up for $1.50 each from Goodwill. The best part is that they are actually from the Target Home collection, so I can use them year round and stay stylish, even after the trick-or-treaters have gone to bed. Goodwill actually might have a couple of the items you need for this project (the charger, the candlesticks, maybe even the candles!), so check them out.

The critters I picked up were two crows and two giant spiders from the dollars store. They also had bugs and mice, so you can really play around with your props when you are putting it together.

Begin by setting your candlesticks on the charger. They don't have to fit perfectly. Things that are a little wobbly or a little off make it just a little creepier, so I didn't mind that the bases for the candlesticks didn't fit perfectly inside the lip of the charger. Then, take some of the spider web and wrap it around everything. Keep it pretty thin so you don't overdo it. It's okay if the candle sticks poke through it a bit, but I liked having it catch some to add depth.

I would also recommend not gluing anything in place. This allows you to change it up every year and move things around easily. As long as you remember to keep the spider webbing under the fire sources (i.e. candles), you'll be okay. DO NOT spread the web OVER any candles. That's how you end up with a fire hazard.


Next, I added in a skull candle that I actually picked up last year on sale at Kroger. It promises to 'ooze' when it's lit, so I'm liking the effect that it ads to the piece. I have him looking off to the side so it fits better on the plate, but also so that everything isn't lined up. Remember, imperfection is key!


When you get to this point, it's time to add your critters. I decided that my little bird looking off to the side would really work well next to the skull. It's a little Poe, yes, but isn't he kind of the big-headed-king-of-creepy?


Then, much like with a flower arrangement, you have to add in details all around so that it looks good from all directions. I spread a couple of spiders and mice around the back of the piece so keep it textured. You could also work in some black roses or fake flowers depending on the look you're going for (just keep them away from any flame!).


I finished it all off with some short pillar candles and bam! I've got a totally scare-tastic centerpiece to give you chills. I'm really liking the way it came out and I can't wait to put it together a little different next year!


Just in case you are getting tired of CREEP-O-VISION, here it is in the slightly less creepy black and white.


Now, you might be asking, "But Cait, you had two ravens. Where did the other one go?". I'm glad, you asked, reader of the interwebs. I actually ended up giving him a roost on the new drum lamp shade. He seems pretty happy up there, too.


What is your favorite part of Halloween? Any plans for some awesome costumes this year? Let me know in the comments!

Not So Secret Garden

When we moved in, we realized pretty early on that we would like the landscaping in our yard to go a different direction. It was a bit slap-dash, especially the little welcoming garden at the end of the driveway.


So while Mom was here, we decided to make a quick project out of it. We started by pulling out all the weeds everything. Thankfully, in Lexington we have big outdoor bins that are picked up at our home that doesn't need bags, so we filled it up. We managed to get the whole thing cleaned out in under 30 minutes.


We then ran over to our Home Depot and grabbed a couple of plants that would be good for the winter.


We were ready to start!


We laid everything out first, to make sure the spacing was correct. We made sure to leave room for someone parked on the lower portion of the driveway to open their door and step out of the car. We also tried to make sure that the spacing looked correct from every angle since it was going to be seen from the sidewalk, house, and road.

We also set them up in layers so that they could really look landscaped. We chose the taller bushes because they reflected the tall light pole that is right behind them. We then chose the more squat evergreens because they added a shorter, medium layer. Then, the grassy ferns at the bottom are a nice ground-hugging level. The pansies are great for color and to fill in, but will also come back next year.

Then, we started planting. First, we dug a hole for the plant, then removed the plant from the pot. We then pulled the roots apart from the bottom just to break them up a bit. After they were placed in the hole, we filled the hole with water and let it soak in. Next, we moved dirt back around each plant and squashed it down to keep air out. We did this plant by plant until we finished.


The plants we included were ones that were pretty hardy for cold weather. We did this because our fall season is hitting pretty hard and we wanted to make sure that they would make it through our upcoming winter. My favorite are the little dwarf mugo pine evergreens. They are so cute with their little afros! All of the plants that we chose are full sun (These shots are in the evening, so it's in the shade, but you get the idea). Here are the tags if you've fallen in love and want to pick up any of these guys for your own garden!


It looks great! Now we just need to start tackling the plants closer to the house. That'll be a bit of a bigger job to say the least!


Are you tackling any end of season gardening projects? Let me know in the comments!

Sunday, October 20, 2013

You Light Up My Life

My mom came in on Wednesday and left eeeeearly this morning. In her wake, she left our house that much more improved with a couple of projects that Scott and I had discussed doing, but hadn't gotten our butts to yet.

Scott and I are hosting Thanksgiving this year, which we are really excited about. It's been fun to host since I had Mom, Dad, and Patrick eating on my little futon in my two room apartment on South Limestone all those years ago. Now, with a house and a decent sized kitchen and dining area, we are going to be able to sit at a real table and eat like adults. We couldn't be more excited!

The only problem was that we were without a table. After two weddings and moving into the house this year, we weren't quite ready to lay down any large bills on a dining set, so we were biding our time till we found something that we really loved. That's when Mom and Dad decided that sitting in our living room eating off of our laps again for the traditional turkey meal wasn't strictly necessary, so off we went on our search for a dining table.

We probably visited about all of the furniture stores in Lexington that we thought might have a style that really spoke to me. We even visited the Peddlers Mall (more on that in another post!).  Scott and I tend to share design styles, so I knew that I was looking for something either mid century modern or craftsman style. To be honest, though, mid century modern has always had a place in my heart.


Tables like this have always had a lot of personality to me. Their sleek design adds both a nice line to a room as well as well as a lot of negative space, which tends to make rooms feel bigger.  The table pictured above, though, was also $1,600. Waaaaaay out of a sane person's price range. The same prices were also seen on many of the antique or 'previously owned' ones. The search continued.

We ended up getting on the internet and doing a bit of searching there. Most of the options were either too high priced, or on Ebay and only for local delivery (to places in South Carolina, New York, and Chicago). That's when I started on some of the go-to design websites. Joss & Main, Wayfair, and Pottery Barn held only larger, clunkier tables. Any of the ones that caught my eye were also round, which wouldn't work in our rectangular space.


That's when I ended up over on West Elm (The website, not the street, lol) where it felt as though destiny was waiting for me. The Parker Mid-Century Expandable Dining Table. It was everything I wanted in a piece of furniture. He (Yes, he gets a pronoun. He is wonderful) was the style and color I was looking for. Practically, he was narrower (at a mere 30 in.) than most of the other tables we had looked at, but expanded to fit 10 people comfortably. We decided after much measuring, hmming, and measuring again that the larger 72"-92" was our best bet, and so he was ordered. And on discount, too! the $594 (before tax, surcharge, and delivery) was a great price compared to the $1,600 (not including any delivery fees) tables we had previously seen.

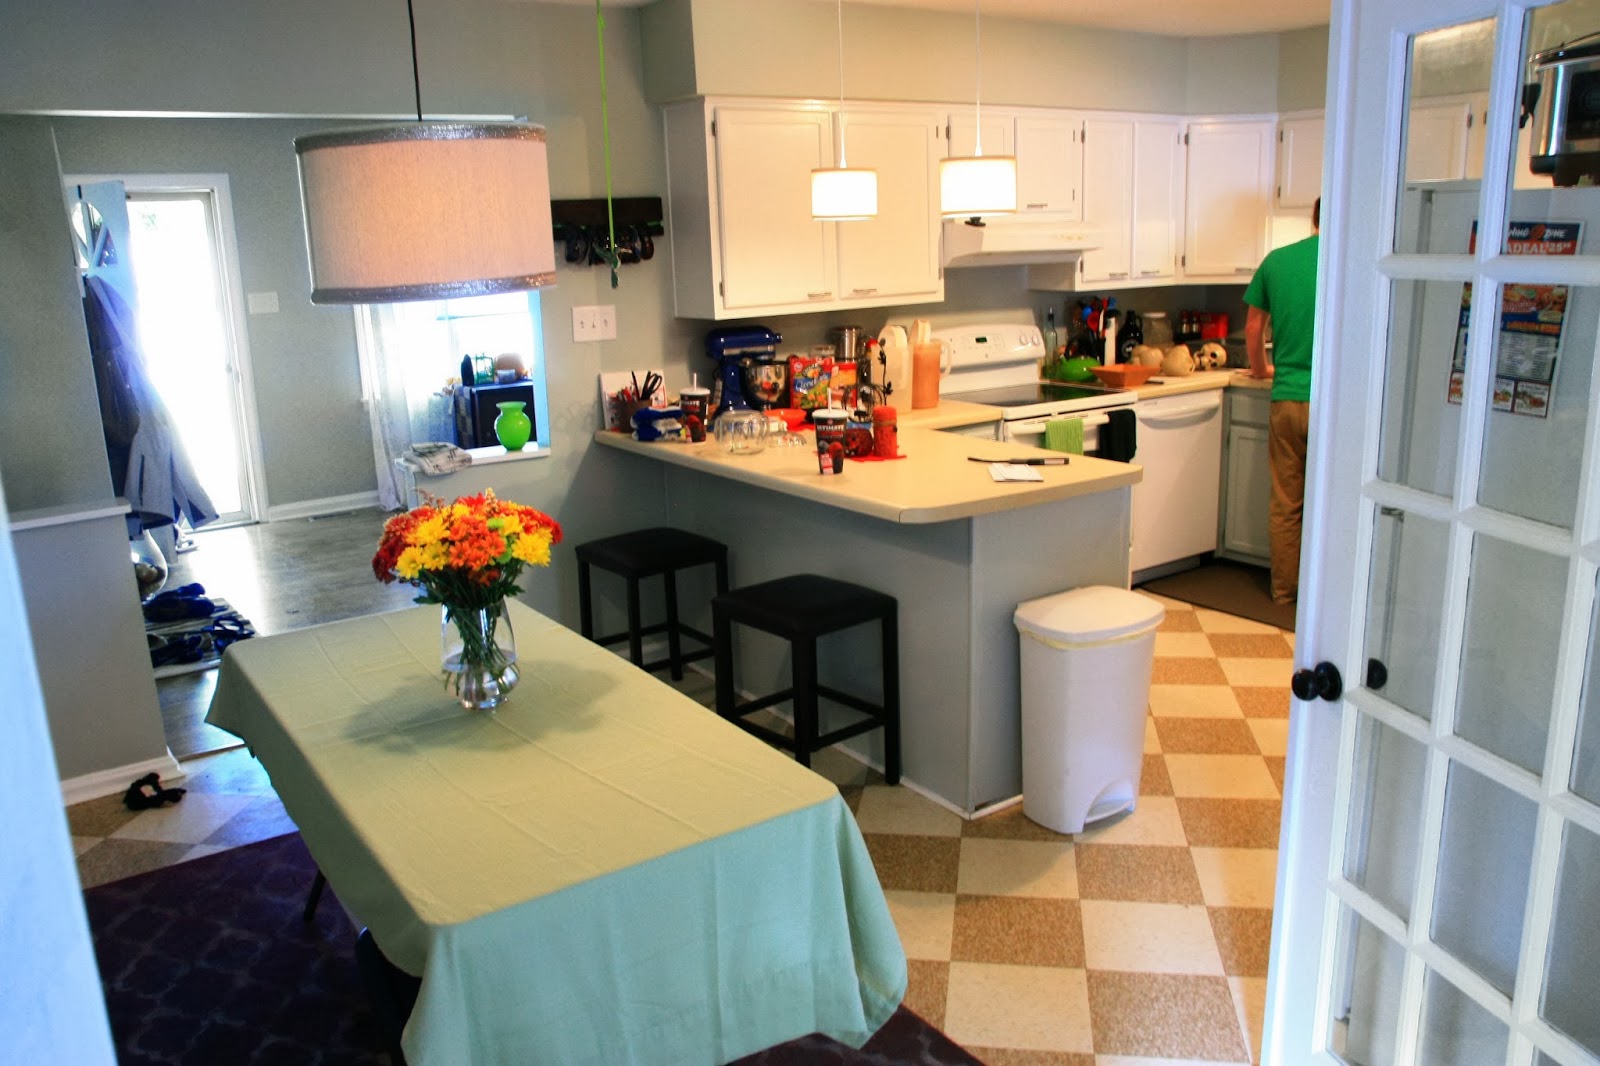
So with our table ordered (and with it's impending "white glove delivery", wooOOOooo), we turned focus to the dining room itself. With such a cool table on it's way, the light in the room needed to match it's coolness. When we moved in, there was a ceiling fan hung over the dining area. Some people like the idea of a fan here. I do in other areas of the house, such as our living room, but not in the dining room. I always have images of the dust from the fan blades getting in my food no matter how much I clean it, or the fact that when they are on, nothing placed on the table stays hot enough to enjoy eating. Our little ceiling fan was also pretty unattractive and had a noisy motor, so it had to go.


To replace it, Mom and I ventured to Garden Ridge and searched through the stacked-high mountain that was their shade area. We came out of our search with this guy for $29.99. Not bad for a 17" linen drum shade.


We weren't really crazy about the plaid black and yellow ribbon on the top and bottom, though. We ended up grabbing some wire glittery ribbon from the Christmas floral section of Michaels and using it to cover the plaid. We simply used hot glue to attach it.

A quick note as to how to properly attach ribbon to a shade like this. We found through trial and error that you should put the hot glue in two lines down the ribbon itself, not the shade. That way you get good coverage and it helps avoid gaps against the shade surface.


By time the ribbon was attached, Scott had the old fan down. We used (much like on other projects) a black pendant light kit for the light itself. Knowing the shade wouldn't fit on the hanging wire with the included fitted washer, we simply fed the wire though the hole in the shade meant for a finial attachment. I had to take a Dremel to both to get them to lay straight, but when all was said and done, it worked quite well.


To get the height correct for the light to hang, I looked up the 'correct' distance online (Which we read as about 30"). I personally felt that this was a little too high, though, so we hung it about 2-3 inches below the suggested height. I just felt that this made the room feel cozier when the light was down. To make sure we liked the height, we sat in one of our folding chairs and made sure we weren't looking at the light bulb or the broad side of the shade itself.

I personally love it. It's so nice and moody (which is my favorite type of lighting). We can't wait to have the real table underneath it and actually eat in our dining room. Until then, it is being hung a little higher from a hook that is off-center on the ceiling so that people don't hit their heads on it (like so). When we do get our official table, we will probably keep it over to the side a lot anyway, so this will also make sure that the lamp stays centered over the table even when it's put away.


What do you think? Scott says he doesn't even mind the touch of glitter. And don't worry, I'll update here with pictures of the new table in it's proper place. We also can't wait to have our little 6 ft. table back for some extra traveling surface space (because it's currently what is in our dining area). Now, to find chairs....the search begins!