
Scott was in the attic and I was handing him things from the garage when this little conversation happened.
Scott: "Hey, there is a bunch of trim pieces up here."
Cait: "Really? How much?"
Scott: "Quite a bit."
Cait: "Alrighty, hand it down and we can probably use it somewhere."
Little did we realize that we were dealing with close to 40 ft. of molding in pretty good shape. These are only two of them!

We decided that since they were in larger sections, they might be just what we needed to cover the odd little piece of wood that is between the original outside wall of the house and the addition drywall extension at the top. In this picture, the weird wood planks (which are white) are highlighted. Ignore the speaker wire randomly hanging out.

The planks were used to attach the two walls to each other, but were less than attractive and had bothered us from day one. Our intention was always to cover them with molding, but it was a step that was not on top of our to do list for the moment. When we found this free molding in the attic, though, it suddenly became pretty cost effective to just go ahead and get this little project out of the way.
Before we did anything, though, I took a picture of the end of one of the pieces with my phone. I wanted to make sure we weren't using crown molding or floor trim where we were supposed to be putting molding meant for a wall space. I then went inside and looked it up online, using my phone photo for reference.
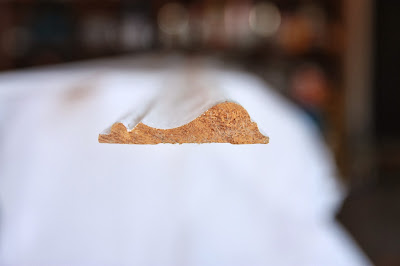
Upon my first search at Lowes.com, I found it easily. Huzzah! Chair rail! We have a winner.

After taking in the price and how much money we DIDN'T spend on this project, we then headed to the garage where we evaluated how much work they needed. All four of the 12 ft pieces need a little love. You could tell that they had been up there for a while and that the original primer had been rubbing off.

We took some steel wool to them and wiped them down. Then we chose the two best looking pieces (Because we only needed to span 22 ft. wall) and set those up on two of our folding chairs (No, we don't have saw horses yet).

Then, I used a Rustoleum Universal (which is a paint and primer in one) to give them each two good coats of new paint. The transformation was pretty amazing.


The planks were used to attach the two walls to each other, but were less than attractive and had bothered us from day one. Our intention was always to cover them with molding, but it was a step that was not on top of our to do list for the moment. When we found this free molding in the attic, though, it suddenly became pretty cost effective to just go ahead and get this little project out of the way.
Before we did anything, though, I took a picture of the end of one of the pieces with my phone. I wanted to make sure we weren't using crown molding or floor trim where we were supposed to be putting molding meant for a wall space. I then went inside and looked it up online, using my phone photo for reference.


After taking in the price and how much money we DIDN'T spend on this project, we then headed to the garage where we evaluated how much work they needed. All four of the 12 ft pieces need a little love. You could tell that they had been up there for a while and that the original primer had been rubbing off.


Left: paint and prime/ Right: abandoned in the attic
We then used the nail gun and compressor that David and Beth let us borrow to put it all up. We did have to use a piece of wood behind the molding as a spacer to give it clearance over the gnarly stone, but that was done with a piece of 1/2 thick wood that we nailed on first.
Then, we aligned the first piece of molding and nailed it up. We were sure to keep it as lined up with the white boards as possible so that it would cover well.

When we had both pieces up, I went back and spackled the holes left behind from the counter sunk nails we used. We still need to put another coat of paint on to hide the spackle, but for now, it's just a vast improvement over the weird transition that was there before.

It's almost like it's on purpose!
Also, yay for free things!

When we had both pieces up, I went back and spackled the holes left behind from the counter sunk nails we used. We still need to put another coat of paint on to hide the spackle, but for now, it's just a vast improvement over the weird transition that was there before.

Also, yay for free things!


