
Showing posts with label Hot tub. Show all posts

Friday, August 1, 2014

Tub Step

The hot tub is plugged in, filled up, and bubbling away on our back porch. It's been so nice having it lately, because we use our TV cable app and sit outside in the tub, watching TV on my tablet and hanging out. A nice little paradise in the middle of KY.


When we picked it up from the Bachmeyer household, it came with a box of chemicals, a thermometer, and steps. We were excited that it came with steps because stepping that far off the ground to get into an elevated, slick surfaced tub is kind of a no-no.


Unfortunately, the steps had seen better days. When you put your weight on them, the top step would almost cave in. They also had some issues when flipped over.


As you can see, there was just the TINIEST hint of rot. Just a little. I don't want to get technical, but I'd say an iota of rot...

Just kidding. It was everywhere. The rot had pretty much taken over all of the exposed wood on the interior of the steps (where there was no exterior paint) and around the bottom edge. Setting this on a solid surface still felt you were stepping on a marshmallow.


We knew that we would need to replace them, but we didn't quite know how to go about it. I decided to check the Amazon and see what the price of  'plastic hot tub steps' would be. It was a little outrageous. Close to $90 just for two steps. We didn't need a whole staircase!

As always, I said, "Um, no, I can do it cheaper".

I remembered seeing pre-cut stair supports at Home Depot, so I bought one. It cost $10. (By the way, on this project, I will only spend the astronomical amount of $10.)
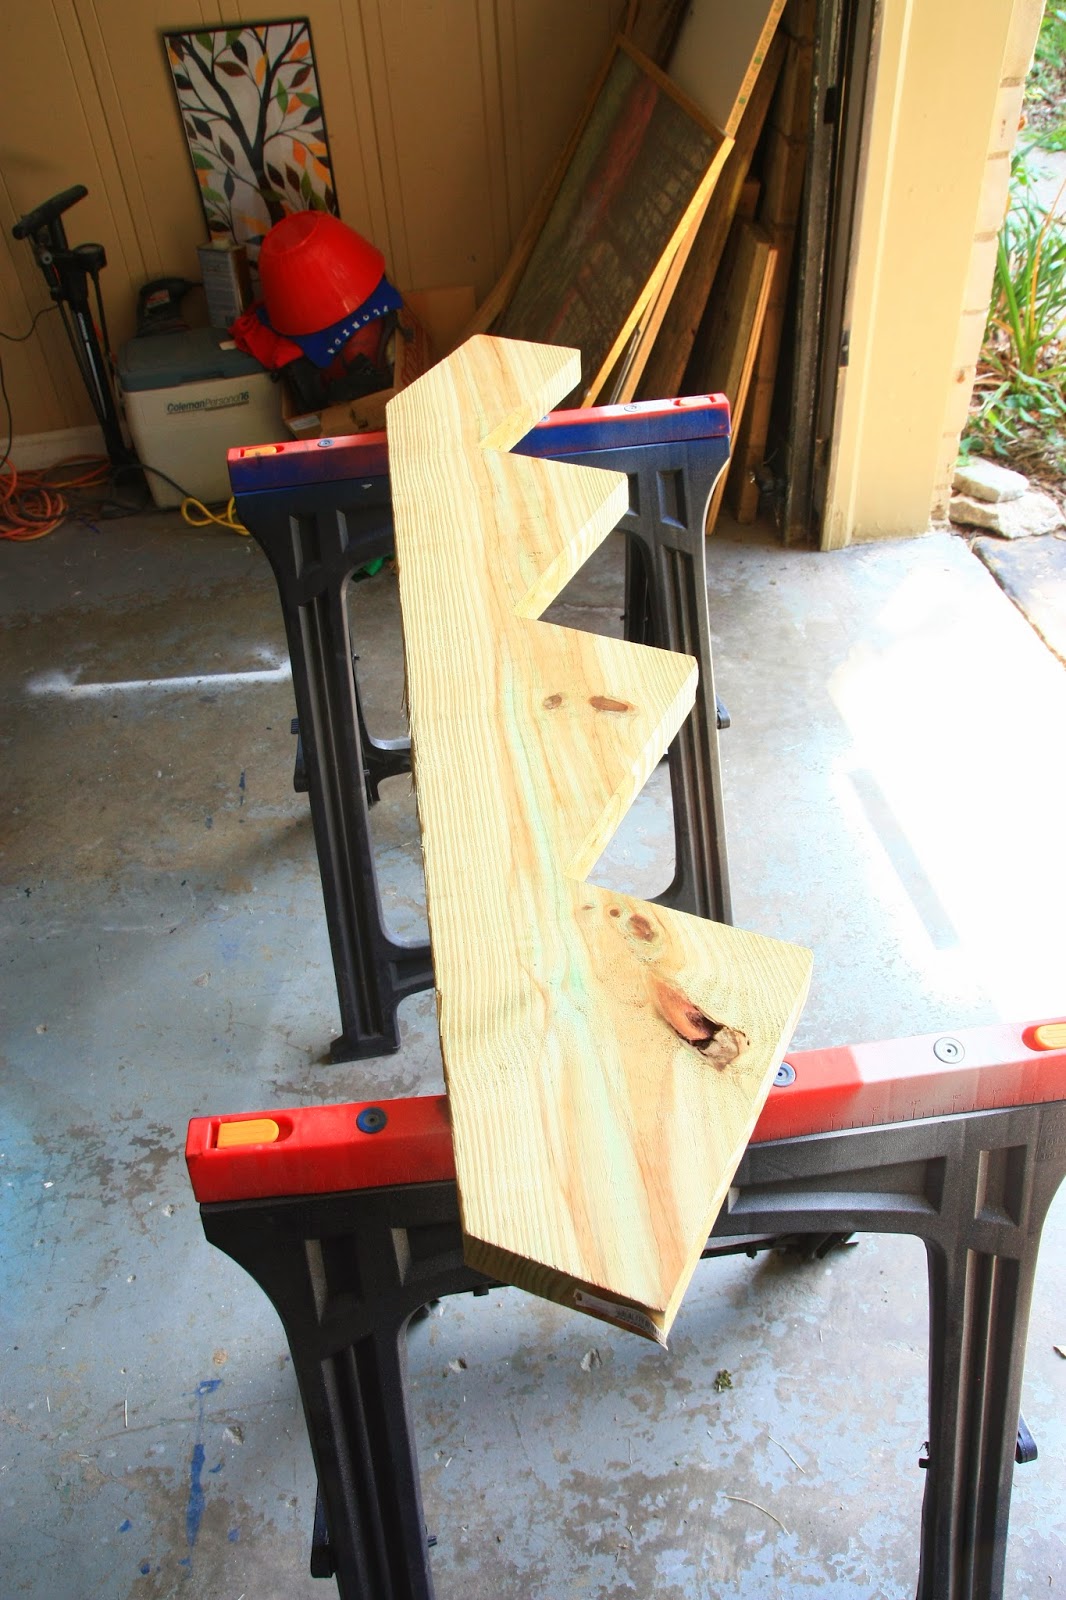

I could either make half of a four step ladder that was terribly supported, or I could cut it in half and make two steps. Though tempted by the first option, I decided to go for the more practical approach.

I cut it in half, following the same angle as the nearest step to the center of the overall support. Here is the line I used (drawn with a straight edge). I then cut along the line.


For the steps to sit correctly, they have a different angle at the top and bottom of the support. I simply put one piece on top of the other and marked my next cuts. This would make sure that they were the exact same piece.


I trimmed the one to match the other and I was done. This took about 5 minutes of work.


Then I went to the wood pile and grabbed a couple of pieces of 5.5 in. by 1 in. (If you decide to do this project and you are making it for an outdoor space, please be sure to use pressure treated lumber. All of the lumber you see me using in this post is pressure treated.).

I measured the top of the old steps. It was 27 in. wide at the top, so I cut four pieces of the 1 x 5.5 to 27 in. in length.


Measuring and cutting probably took a good 10 minutes. When I had finished, I was ready to start assembly.

I started with the bottom step. I used 3 inch exterior screws (because that's what we already had). I pre-drilled every screw, making my life a lot easier. This is why two drills are better than one.


The board you see on the right inside portion of the second step is there as a support. I decided to add support to the rear to keep the whole thing from falling when you stepped on it. (Because it's all about the little details). I took an extra board and marked and cut my pieces.

To install them, I clamped them to the stair supports. This way I could drill from the outside in, leaving the exposed tips of the screws away from naked ankles and soft toes.


I repeated the process for the other side.


After having supported the structure, I added the second step. I made sure that the overhang was the same as the bottom step, allowing for the width of the wood and a crack between for drainage (from both tub water and rain).


It's still in need of a good sanding. I would really like to cover the steps with some of the sticky exterior safe tread, but for now, we are just trying it on for size. (Which, size-wise, it's exactly the same height and width as the previous stairs. Just 100% less fally-aparty)


So much nicer than wondering if you're going to be the person who falls through the step! I am going to paint it the same color as the tub, too, so help it blend a bit. Honestly, the whole kaboodle took about 30 minutes to complete, so it was a nice to knock it out before Scott got home.

There is even a bit of an added bonus with our new stairs. See the giant grey rope? That's actually the electrical from the tub. Since there is a little gap between the stair support and the back legs of the stair, it fits much nicer. Huzzah!


Monday, June 23, 2014

CAN I GET A HOT TUB?!

Hopefully you read the title of this post like this:


The quick answer: Yes...yes you can.

That is if you get as lucky as we did. About two weeks ago, one of our friends mentioned that her mother wanted to get rid of the hot tub she had in her backyard. We asked her if her mother might possibly sell it to us (because we have wanted a hot tub ever since the one next to our hut cooled our worn tootsies after walking all of Key West on our honeymoon). She talked to her mom and came back with the best possible reply, "If you can move it, you can have it".

Seriously.

So the research started. We started looking into hiring someone to move it for us, but apparently that doesn't exist anywhere in the Lexington area. Scott probably called 5-7 different places, all of which said that they 'used to', but don't anymore. It looked like it was up to us to move it ourselves.

Youtube provided videos of others who had moved tubs, including professionals, and we decided that it probably wouldn't be that bad. We could totally do this. Our group of six people managed to use a technique that involved turning the tub on it's side onto some furniture dollies, then slowly rolling it down plywood to the flatbed truck. It was like this.


But I'm getting ahead of myself.

Before we could even get to that point, I ventured over to the Bachmeyer house and took a good looky loo at the tub itself. It was in need of some love.

It's in there somewhere, next to Waldo.

That afternoon was spent killing the wasps nests that had developed in the electric box and under the tub cover. We also managed to get rid of the forest that had grown up around it from the year or so of not being used.


When we had finished and bagged as much of the chopped foliage as we could, getting this tub out seemed much more plausible.


We were also able to get a much better look at it. We turned it on and messed with the controls. Everything still worked. Mrs. Bachmeyer has an electrician as a neighbor who came a day later and unhooked it. The process was chugging along nicely.


Mrs. Bachmeyer then presented us with every possible chemical that could possibly be purchased to even glance at a properly maintained tub. The box included the following:


 If anyone is wondering, we are choosing to do bromine over chlorine. Thankfully, the Bachmeyers already had this covered.


Along with test strips, a floating thermometer, some Jet cleanser, and all of the paperwork for any of the repairs that had been done in the past. This was the real deal. We felt like we were ready to bring it home as soon as possible. We checked out the forcast and were a little worried about rain, but decided that Saturday was the day to try the move.


There aren't a lot of pictures from the move itself. There was no rain, Scott almost got the Home Depot truck stuck in the place that we least worried about (because it didn't weigh enough), and he powered the fully loaded truck with tub up the steep hill at the Bachmeyer house and backed it up the steep hill here at the Sturdivant house. It was very labor intensive and we were so happy that our friends came out to help us. Every single person had a job to do and every single person was very intent on doing it. The entire move took about two hours, so we were very efficient. When we finally had it on the porch, we all sighed with relief.


We had prepped the porch before getting the tub by moving the picnic table into the yard and the umbrella to the other side of the space.


When we had the tub in place on the porch, Scott noticed that there was a bit of a gap underneath the far corner between the tub and the pavers. It wasn't level and everything we have read says, "Never ever shim a hot tub. It will crack." Scott was dissatisfied.

The next day we slide the empty tub over a couple of feet and he pulled each of the pavers up individually, leveling them with paving sand.


The difference was a big one. Here is a picture of the tub on the pavers once they were leveled out.


See the gap? Full of water, that might have done major damage. It also might not have. Thankfully we don't have to find out.

First things first, we took the cover off completely. There are two zippers, one for each side. We unzipped them and pulled out the foam pieces that were in them. We set the foam and the cover itself out to let it all dry really well overnight.

Scott started on the tub by grabbing a drill and taking off the access panel on the side. Besides wanting a good idea as to what was in there, we were able to remove the roots that had grown into it over time.  For anyone who hasn't seen the inside panel of a tub, here ya go.


It's usually pretty obvious to find because it has screws all around. Undo the screws and you'll find this. It has a separate door to more efficiently heat the tub. THE ROOTS DO NOTHING.


Take out the two screws (and roots) that hold on the inside door and you reveal the inner workings of the spa.


We cleaned it all out and put it back together. We then began the arduous and sometimes gross task of cleaning out a used tub. For the record, I really feel as though we've done a good job of sanitizing it and I feel comfortable getting in it, but the things I have seen come out of it will probably haunt my dreams for a long time. Essentially, it went like this:

1. Removed and cleaned filter with Leisure Time Instant Cartridge Clean product. It turned it WHITE. We are going to use this filter for the entire setup process, then get a brand new one when everything it ready to go. This was just a nice refresher.

2. Use Clean & Perfect All Purpose Cleaner by Natural Chemistry to scrub and wipe down the ENTIRE inside of the tub itself. I used microfiber clothes to do this step so I could avoid scratching or harming the interior.

3. Spray down the interior with the hose. It was set to the harshest setting (jet) to really get all of the soap and other nasties off the tub surface. I did this twice while Scott set up a drainage hose to empty the water.

4. Empty the dirty water from the tub. All the way. All of it. The stuff we couldn't get with the siphon we got with some old towels. This helps keep any sort of contamination down.

5. Refill the tub with fresh water. This time, we just let the hose run till the tub was filled just above the highest jet.

We put the cover back together and gave it a good once over with the Clean & Perfect. We have it on the tub, now, to keep as much debris out of it as possible.

Next on our list is to:

1. Hook up the tub to electricity (We have water in it because you should never hook a tub up to power without it being full)

2. Run the Leisure Time Jet Flush to clean out all of the pipes (Need to be able to run the jets to flush them, though, which is why we were waiting).

3. Drain completely AGAIN to keep down contamination.

4. Get a new filter for the system.

5. Laze in our new hot tub!

We are so excited and thankful to our friends for helping us move it. Mrs. Bachmeyer, who is so sweet, was just as excited as  we were (she is moving a gazebo where the tub was, so she can sit outside and look at the stars!), so the whole process went really smoothly and we couldn't be more appreciative.

I'll update a little later with more on the revamp process (and maybe I can get Scott to write a How To on hooking the tub up to electricity.)

Sorry that my posts are further apart! There are a couple of projects currently in the works, but I hate writing about stuff before it's finished (unless it's a loooooong post like a hot tub procurement).  If you get a hankerin' for some DIY, check out Beth at Over on Dover and their recent walkway paving! We helped with that, too!

Till next time, think Summery thoughts!


PS- I took all of the photos for this post with my new HTC One phone. Not bad, eh?