Tuesday, November 12, 2013

Oh Deer

Casey, Daniel and I were wandering around Garden Ridge when the Christmas ornaments caught our eye. They have been planning on getting more for their tree, so they searched and found a couple they liked. While they were pulling some out, Casey held up a deer head ornament/wall decoration and as soon as I saw it, major plans ran through my head. He had to come home with me.


What really secured his purchase was the price. I have seen a lot of these stag heads floating around decor boards and magazines and I always liked the look. The ones I like are ceramic and come with a pretty decent price tag. For instance, on Amazon, you can get a stag head around the same size.

http://www.amazon.com/Templeton-Miniature-White-Faux-Taxidermy/dp/B00D8GXZH8/ref=pd_sim_sbs_hg_4

$44.99 is a fortune compared to the little fuzzy guy I picked up.


That's right. $9.99! He is plastic, but it's a pretty durable and thick plastic, so I felt like he would be pretty easy to work with. To start, though, I had to get off his fuzzy exterior.


For some reason, my mind immediately said, 'Oh, I know what to use."


That's right. More uses for liquid sander and deglosser! To be sure that I wasn't making a huge mistake, I first put a dab on the back where the head is mounted and let it sit for about 20 minutes. Then I just wiped it off and the fur came right up with it.


After I knew that my efforts wouldn't be in vain, I started out at the end of one of the antlers. I just soaked half the antler in the deglosser and let it sit for another 30 minutes, then came by and wiped the fuzzy stuff off. In some parts, I ended up using my nail to scrape at the fur, but doing so didn't damage the plastic. Also, don't judge my beginning set up. The bag of chips was empty and I needed something that the deglosser wouldn't eat through!


I eventually found a lid to an aluminum tray that we had used earlier and ended up moving over to that.

As I worked, I also used an old sponge to keep soaking the fur in the deglosser. Here you can see where I let the face soak. Each time, I left it on for around 30 minutes. I just had it set up in the living room and I would work on scraping and resoaking it between shows.


It looked kind of cool and semi-realistic with just the antler exposed, but that wasn't the look I was personally going for. I wanted something more like this.


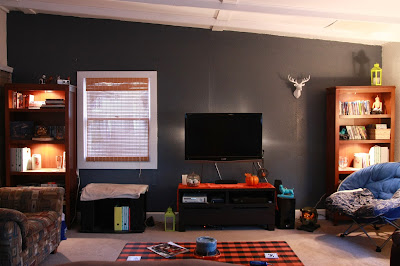
I loved how the white contrasts with the darker walls, and I knew I wanted to have this as part of a frame wall around our TV in the living room. The dark blue wall behind it would really make it pop.

When I had finished taking off all of the fuzzies, I gave it a good scrub down with a toothbrush and let it dry. A lot of detail that was hidden under the fur emerged, which was a great surprise. So far, he wasn't looking too bad!


Then, I used Rustoleum Primer to give the glossy white paint a good base. I started on the back so that if there was any tacky paint left when I went to flip it over, it would stick to the back, not the front.


Then, once both sides were primed, I gave it two coats of Rustoleum glossy white (again, starting from the back). I chose glossy because I want it to look as ceramic as possible. It actually does a really good job of making plastic look a little 'higher class'.


Because it decided to be really cold outside, I took a board and placed it underneath the drop cloth. After I finished a coat, I would bring it inside to dry. That way it was actually warm enough to cure.

When he was finished, I mounted him on the wall near the TV.


For now he looks a little lonely, but the final product will look a little closer to this, with large picture frames surrounding the TV.


He is probably one of my favorite hanging things in the house right now, though. He even has a little smirk on his face!


So, that's how I managed to make a $50 stag head for $10. Super simple, just make sure you run out to Garden Ridge soon or you might not get one. Ours only had 2 left as of Monday. There are so many different ways you can paint them (gold/silver antlers, matte black, fun teal or pink) and I can't wait to put a scarf on him for the winter months! What a party animal!

Attic of Improvement

As you can probably tell, we've gotten a lot done in a weekend. I finished the frame wall in the bedroom, reassembled the headboard after it was refinished, we put up new bamboo blinds in the living room and we also decided to clean up the garage a bit. Mostly boxes of Halloween decor and some things that we decided we didn't need in the closet if we weren't going to use them till next summer.

Scott was in the attic and I was handing him things from the garage when this little conversation happened.

Scott: "Hey, there is a bunch of trim pieces up here."
Cait: "Really? How much?"
Scott: "Quite a bit."
Cait: "Alrighty, hand it down and we can probably use it somewhere."

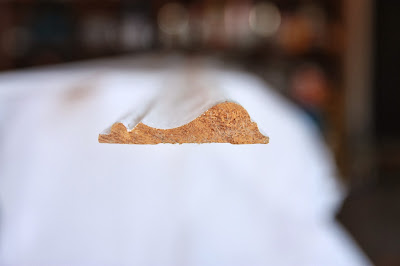
Little did we realize that we were dealing with close to 40 ft. of molding in pretty good shape. These are only two of them!


We decided that since they were in larger sections, they might be just what we needed to cover the odd little piece of wood that is between the original outside wall of the house and the addition drywall extension at the top. In this picture, the weird wood planks (which are white) are highlighted. Ignore the speaker wire randomly hanging out.


The planks were used to attach the two walls to each other, but were less than attractive and had bothered us from day one. Our intention was always to cover them with molding, but it was a step that was not on top of our to do list for the moment. When we found this free molding in the attic, though, it suddenly became pretty cost effective to just go ahead and get this little project out of the way.

Before we did anything, though, I took a picture of the end of one of the pieces with my phone. I wanted to make sure we weren't using crown molding or floor trim where we were supposed to be putting molding meant for a wall space. I then went inside and looked it up online, using my phone photo for reference.


Upon my first search at Lowes.com, I found it easily. Huzzah! Chair rail! We have a winner.


After taking in the price and how much money we DIDN'T spend on this project, we then headed to the garage where we evaluated how much work they needed. All four of the 12 ft pieces need a little love. You could tell that they had been up there for a while and that the original primer had been rubbing off.


We took some steel wool to them and wiped them down. Then we chose the two best looking pieces (Because we only needed to span 22 ft. wall) and set those up on two of our folding chairs (No, we don't have saw horses yet).


Then, I used a Rustoleum Universal (which is a paint and primer in one) to give them each two good coats of new paint. The transformation was pretty amazing.

Left: paint and prime/ Right: abandoned in the attic

We then used the nail gun and compressor that David and Beth let us borrow to put it all up. We did have to use a piece of wood behind the molding as a spacer to give it clearance over the gnarly stone, but that was done with a piece of 1/2 thick wood that we nailed on first.

Then, we aligned the first piece of molding and nailed it up. We were sure to keep it as lined up with the white boards as possible so that it would cover well.


When we had both pieces up, I went back and spackled the holes left behind from the counter sunk nails we used. We still need to put another coat of paint on to hide the spackle, but for now, it's just a vast improvement over the weird transition that was there before.


It's almost like it's on purpose!

Also, yay for free things!

Future's so bright, gotta wear...

The windows in our living room have been very lackluster. They had no blinds and the curtains that were up were ones that I had purchased in haste to keep us from being blinded in the mornings by the sun. They were by no means the endgame when it came to the window treatments for that room.


Unfortunately, blinds are really expensive. We really liked the idea of bamboo blinds, but those ranged from $25-$45 depending on where you were looking. Even discount places like the Garden Ridge had them, but for 3 windows, we weren't paying their (still discounted) $20 each.

So when I was taking my weekly stroll through our ReStore on Saturday and saw some light colored bamboo blinds out of the corner of my eye and I decided to take a closer look. They had 5 of them, all wrapped up and in new condition. The best part? Each one was only $5! Perfect! I grabbed three and headed home.


We put them up with a couple of screws each and took down the gray curtains. We couldn't believe the difference they made!


It makes the whole room feel brighter, and they are much easier to adjust than trying to get the curtains to allow in certain amounts of light. The piece of wood that they are directly attacked to is hidden by a flap of the curtain itself, so you can't even see where the screws are, which gives it a clean look as well.


Now that they are up, though, there is one more thing that I think would really make them look finished.

http://www.younghouselove.com/2009/06/email-answer-its-curtains-for-you/

I would really like to hang white sheer or thin curtains around them. I know that they might not seem important, but besides lightening up the space even more, they make the room feel softer and they also filter the light that comes out of the sides of the curtains. I was looking for a reference for this online when I found the picture above. Apparently Young House Love used this same technique and I didn't even know till today! At least I know I'm on the right track (and how cute is Burger?).


For the time being, they are just hangin' around, lookin' awesome. They do make our TV look awful lonely, though, which makes me want to attempt something like this on that wall, but with larger frames. The offset of only having one window rather than the TV being flanked by them doesn't help, but that's why I'm hoping using larger white frames will help the balance. The asymmetry will also add interest to the wall in general.

See, I'm using art school references! Balance! Offsets! Asymmetry!

Education is important.