Tuesday, November 12, 2013

Oh Deer

Casey, Daniel and I were wandering around Garden Ridge when the Christmas ornaments caught our eye. They have been planning on getting more for their tree, so they searched and found a couple they liked. While they were pulling some out, Casey held up a deer head ornament/wall decoration and as soon as I saw it, major plans ran through my head. He had to come home with me.


What really secured his purchase was the price. I have seen a lot of these stag heads floating around decor boards and magazines and I always liked the look. The ones I like are ceramic and come with a pretty decent price tag. For instance, on Amazon, you can get a stag head around the same size.

http://www.amazon.com/Templeton-Miniature-White-Faux-Taxidermy/dp/B00D8GXZH8/ref=pd_sim_sbs_hg_4

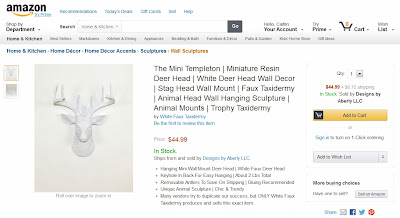
$44.99 is a fortune compared to the little fuzzy guy I picked up.


That's right. $9.99! He is plastic, but it's a pretty durable and thick plastic, so I felt like he would be pretty easy to work with. To start, though, I had to get off his fuzzy exterior.


For some reason, my mind immediately said, 'Oh, I know what to use."


That's right. More uses for liquid sander and deglosser! To be sure that I wasn't making a huge mistake, I first put a dab on the back where the head is mounted and let it sit for about 20 minutes. Then I just wiped it off and the fur came right up with it.


After I knew that my efforts wouldn't be in vain, I started out at the end of one of the antlers. I just soaked half the antler in the deglosser and let it sit for another 30 minutes, then came by and wiped the fuzzy stuff off. In some parts, I ended up using my nail to scrape at the fur, but doing so didn't damage the plastic. Also, don't judge my beginning set up. The bag of chips was empty and I needed something that the deglosser wouldn't eat through!


I eventually found a lid to an aluminum tray that we had used earlier and ended up moving over to that.

As I worked, I also used an old sponge to keep soaking the fur in the deglosser. Here you can see where I let the face soak. Each time, I left it on for around 30 minutes. I just had it set up in the living room and I would work on scraping and resoaking it between shows.


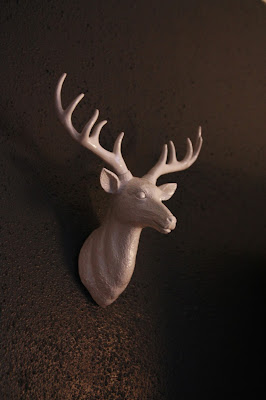
It looked kind of cool and semi-realistic with just the antler exposed, but that wasn't the look I was personally going for. I wanted something more like this.


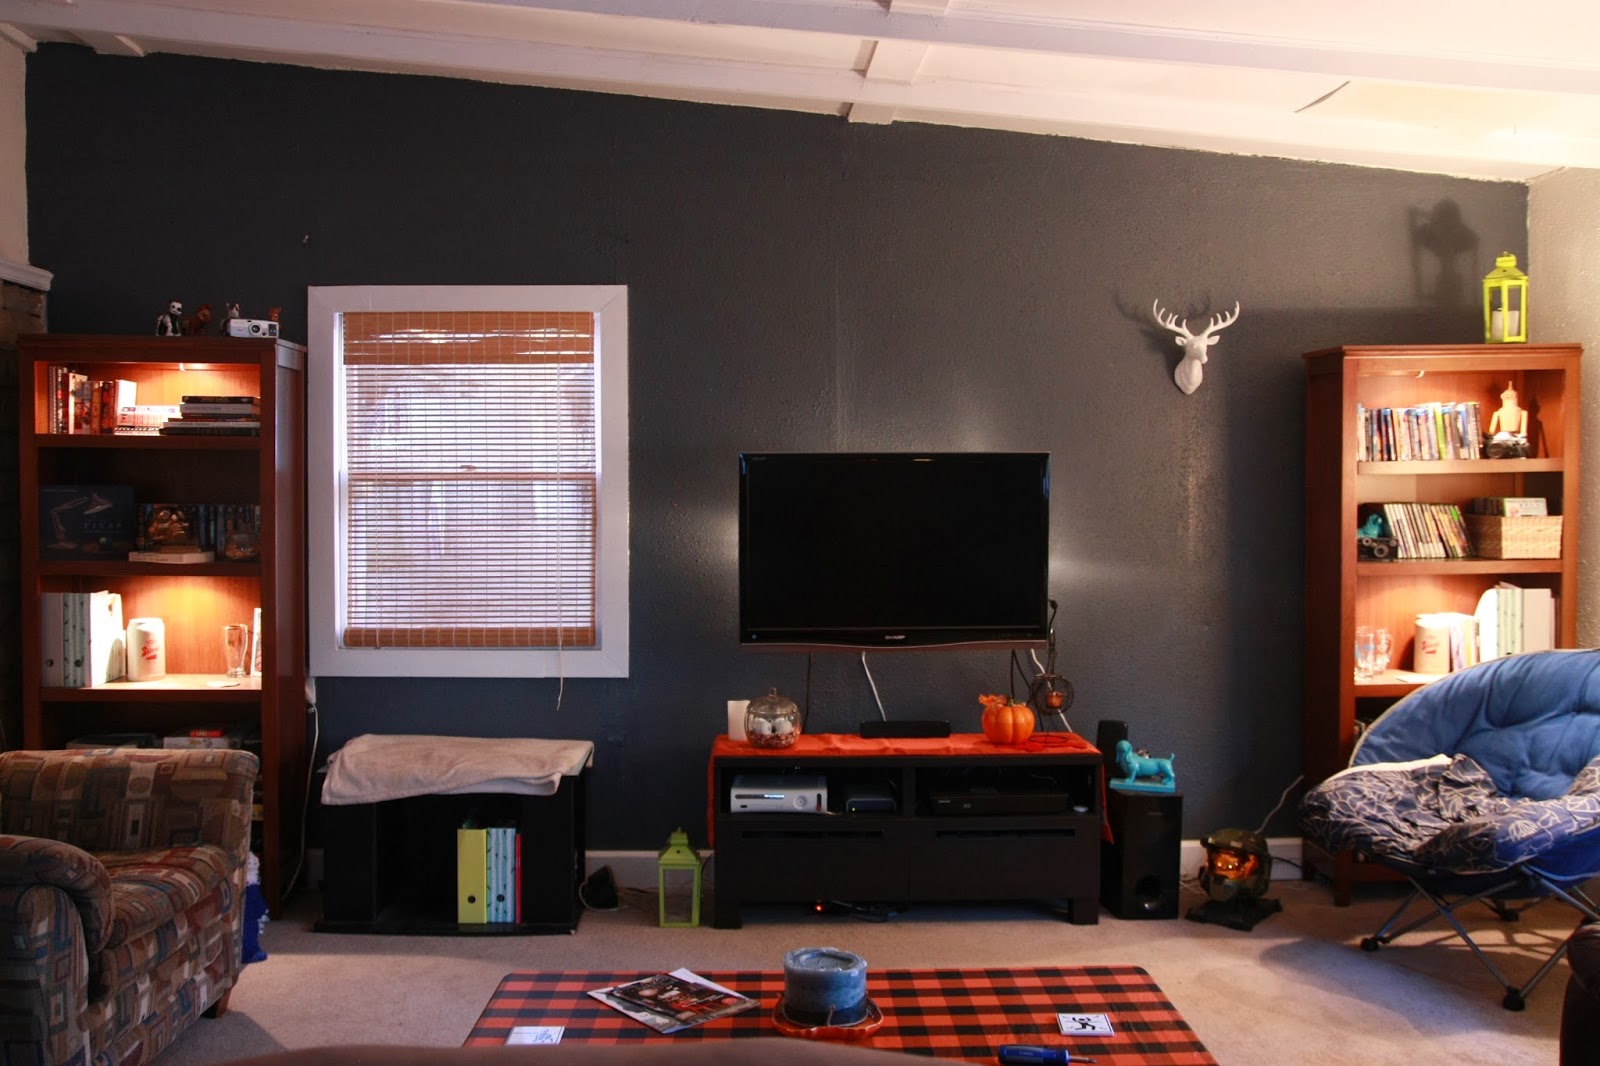
I loved how the white contrasts with the darker walls, and I knew I wanted to have this as part of a frame wall around our TV in the living room. The dark blue wall behind it would really make it pop.

When I had finished taking off all of the fuzzies, I gave it a good scrub down with a toothbrush and let it dry. A lot of detail that was hidden under the fur emerged, which was a great surprise. So far, he wasn't looking too bad!


Then, I used Rustoleum Primer to give the glossy white paint a good base. I started on the back so that if there was any tacky paint left when I went to flip it over, it would stick to the back, not the front.


Then, once both sides were primed, I gave it two coats of Rustoleum glossy white (again, starting from the back). I chose glossy because I want it to look as ceramic as possible. It actually does a really good job of making plastic look a little 'higher class'.


Because it decided to be really cold outside, I took a board and placed it underneath the drop cloth. After I finished a coat, I would bring it inside to dry. That way it was actually warm enough to cure.

When he was finished, I mounted him on the wall near the TV.


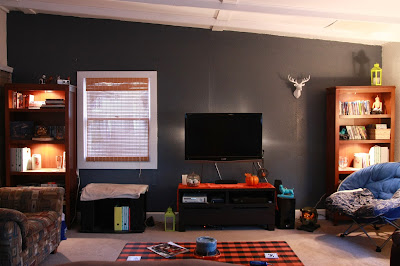
For now he looks a little lonely, but the final product will look a little closer to this, with large picture frames surrounding the TV.


He is probably one of my favorite hanging things in the house right now, though. He even has a little smirk on his face!


So, that's how I managed to make a $50 stag head for $10. Super simple, just make sure you run out to Garden Ridge soon or you might not get one. Ours only had 2 left as of Monday. There are so many different ways you can paint them (gold/silver antlers, matte black, fun teal or pink) and I can't wait to put a scarf on him for the winter months! What a party animal!

Attic of Improvement

As you can probably tell, we've gotten a lot done in a weekend. I finished the frame wall in the bedroom, reassembled the headboard after it was refinished, we put up new bamboo blinds in the living room and we also decided to clean up the garage a bit. Mostly boxes of Halloween decor and some things that we decided we didn't need in the closet if we weren't going to use them till next summer.

Scott was in the attic and I was handing him things from the garage when this little conversation happened.

Scott: "Hey, there is a bunch of trim pieces up here."
Cait: "Really? How much?"
Scott: "Quite a bit."
Cait: "Alrighty, hand it down and we can probably use it somewhere."

Little did we realize that we were dealing with close to 40 ft. of molding in pretty good shape. These are only two of them!


We decided that since they were in larger sections, they might be just what we needed to cover the odd little piece of wood that is between the original outside wall of the house and the addition drywall extension at the top. In this picture, the weird wood planks (which are white) are highlighted. Ignore the speaker wire randomly hanging out.


The planks were used to attach the two walls to each other, but were less than attractive and had bothered us from day one. Our intention was always to cover them with molding, but it was a step that was not on top of our to do list for the moment. When we found this free molding in the attic, though, it suddenly became pretty cost effective to just go ahead and get this little project out of the way.

Before we did anything, though, I took a picture of the end of one of the pieces with my phone. I wanted to make sure we weren't using crown molding or floor trim where we were supposed to be putting molding meant for a wall space. I then went inside and looked it up online, using my phone photo for reference.


Upon my first search at Lowes.com, I found it easily. Huzzah! Chair rail! We have a winner.


After taking in the price and how much money we DIDN'T spend on this project, we then headed to the garage where we evaluated how much work they needed. All four of the 12 ft pieces need a little love. You could tell that they had been up there for a while and that the original primer had been rubbing off.


We took some steel wool to them and wiped them down. Then we chose the two best looking pieces (Because we only needed to span 22 ft. wall) and set those up on two of our folding chairs (No, we don't have saw horses yet).


Then, I used a Rustoleum Universal (which is a paint and primer in one) to give them each two good coats of new paint. The transformation was pretty amazing.

Left: paint and prime/ Right: abandoned in the attic

We then used the nail gun and compressor that David and Beth let us borrow to put it all up. We did have to use a piece of wood behind the molding as a spacer to give it clearance over the gnarly stone, but that was done with a piece of 1/2 thick wood that we nailed on first.

Then, we aligned the first piece of molding and nailed it up. We were sure to keep it as lined up with the white boards as possible so that it would cover well.


When we had both pieces up, I went back and spackled the holes left behind from the counter sunk nails we used. We still need to put another coat of paint on to hide the spackle, but for now, it's just a vast improvement over the weird transition that was there before.


It's almost like it's on purpose!

Also, yay for free things!

Future's so bright, gotta wear...

The windows in our living room have been very lackluster. They had no blinds and the curtains that were up were ones that I had purchased in haste to keep us from being blinded in the mornings by the sun. They were by no means the endgame when it came to the window treatments for that room.


Unfortunately, blinds are really expensive. We really liked the idea of bamboo blinds, but those ranged from $25-$45 depending on where you were looking. Even discount places like the Garden Ridge had them, but for 3 windows, we weren't paying their (still discounted) $20 each.

So when I was taking my weekly stroll through our ReStore on Saturday and saw some light colored bamboo blinds out of the corner of my eye and I decided to take a closer look. They had 5 of them, all wrapped up and in new condition. The best part? Each one was only $5! Perfect! I grabbed three and headed home.


We put them up with a couple of screws each and took down the gray curtains. We couldn't believe the difference they made!


It makes the whole room feel brighter, and they are much easier to adjust than trying to get the curtains to allow in certain amounts of light. The piece of wood that they are directly attacked to is hidden by a flap of the curtain itself, so you can't even see where the screws are, which gives it a clean look as well.


Now that they are up, though, there is one more thing that I think would really make them look finished.

http://www.younghouselove.com/2009/06/email-answer-its-curtains-for-you/

I would really like to hang white sheer or thin curtains around them. I know that they might not seem important, but besides lightening up the space even more, they make the room feel softer and they also filter the light that comes out of the sides of the curtains. I was looking for a reference for this online when I found the picture above. Apparently Young House Love used this same technique and I didn't even know till today! At least I know I'm on the right track (and how cute is Burger?).


For the time being, they are just hangin' around, lookin' awesome. They do make our TV look awful lonely, though, which makes me want to attempt something like this on that wall, but with larger frames. The offset of only having one window rather than the TV being flanked by them doesn't help, but that's why I'm hoping using larger white frames will help the balance. The asymmetry will also add interest to the wall in general.

See, I'm using art school references! Balance! Offsets! Asymmetry!

Education is important.

Hacking on the Side

If you aren't familiar with the idea of "hacking" furniture, allow me to explain.

Much like "hacking a computer program" means that you have changed the program from it's intended purpose to suit your own needs, furniture can also be changed to fit your personal style or need. This is sometimes the only route someone can choose (for oddly sized rooms or spaces), but usually this is deployed to save the furniture hacker from having to buy a more expensive piece of furniture. There are even entire websites dedicated to it, such as IKEA Hackers, where you can get tips from others who have solved their own design issues.

Lately, I have been seeing a lot of gold working its way back into the mainstream. Most of the time, it's being used on accent pieces and small tchotchkes. Some of the other places I have seen it pop up have been furniture legs. This table, for example is simple enough, but the gold legs hike the price because it's in vogue. $79.99 for a small side table? Really?!


So I came home and glanced around and saw one of the side tables we had purchased for a mere $10 a couple of months ago that had the same shape. I decided to go for the 'high end hack'. It was pretty simple. In the end, it turned out well and cost me nothing extra.


Originally, the legs were black, so I began by taking them off using an Allen wrench and these bolts on the legs.


Then I just grabbed the same can of spray paint that I had used previously on the Halloween trophies and gave them two good coats. Wait overnight for them to dry and reassemble. Easy Peezy.


What I really like is that this spray paint is slightly metallic, so It really does lend it a nice contrast. Gold is also a color that we really don't have in the living room, so it adds another layer to the space.

So there you have it, the really easy hack that I pulled off without spending a cent. Isn't is amazing what some spray paint can accomplish?

Monday, November 11, 2013

Frame of Mind

The other day when I decided to refinish the headboard for our bed, it became a very "If you give a mouse a cookie" situation. "If you give a Cait a bedroom, she will want to rearrange it", and that's kind of how all of this came about.

So once the headboard was off the bed, sanded, stained, and drying in the garage, I was left with a couple of hours on my hands. I decided to play around with the way the furniture was arranged to see if there was a way of making the room feel a little bigger. I switched out our two big dressers and took one smaller one out completely. It made a huge difference.


It feels so much better in there now! We can walk around the bed and not have to skirt a dresser every time. It's difficult to tell, but the bed is really not that close to the bathroom door, either. You can also see a light taupe patch on the wall that we would like to use as a wall color in there. The inspiration train was leaving the station!

The issue that immediately bothered me though was one that had never hit me before moving the bed: The TV on the wall looks so lonely. I decided I wanted to decorate around it, and after a couple of Pinterest searches and chats with Beth, I found a great way of incorporating and disguising it so that it would fit into the rest of the room better. A frame wall!


What sold me on the idea even more was the fact that the frames wrapped around to the smaller wall. We have a tiny area of wall next to our window that I knew would be perfect for the wrap around effect, so I decided this was the way to go.

Something like this is what I was going for.


Unfortunately, frames are expensive. SUPER expensive. Even with discounts, sales, and Michaels coupons, a large frame will run around $10 each, and I was in need of MANY of them. Instead of searching for the best deal at a retail store, I decided to just go to my local Goodwill and see what they had. It was perfect! The largest frames that they had were around 30 in. and were only $7.50 where as the smaller 8x10 frames were only around $1 each. I grabbed a bunch and walked out with 6 for $12. Not too bad, eh?

They did need a little work, though.


First, I peeled off the price tags and gave them each a good rub down just to get rid of any dust. Then, I turned them over and began disassembling them.

 
I had to cut out where the indention was with an exacto knife to get the paper up. This doesn't have to be a perfect cut,exposes the backing. This left me with the back of the picture itself and the little bit of cardboard or foam filler behind it.


From here, I took a flat head screwdriver and carefully bent all of the staples up to get them out of the way. Don't get rid of them completely, though, because you can reuse them to hold your own picture in the frame. They can be seen here.


Then, carefully take out the backing, the picture AND the glass to get it out of the way. Store it somewhere safe for use later. Be sure not to break or throw it away. This leaves you with the frame itself.


Take a spray primer and give it a good coat or two so you can give the paint some adhesion. Then give it a coat with whatever color paint you want. Allowing for drying time, the whole process takes about an hour and a half, so you can do a bunch in batches.


Clean the glass that you took out of each frame and then put in your own art and bend the staples back into place. You're done! So easy (and cheap!), but not cheap looking. When all my frames were up, I was really pleased with the result.


I opted for different colors of frames randomly spaced (because some of the framed art we already had before the project), and I really like the texture that it gives. Having the other squares and rectangles around the TV really helps not make it stand out as much when it's off, leaving the room much cozier than it would have been otherwise. I love the result! Between this and the headboard going on the bed, the room is certainly taking shape.

Does this inspire you to run to a Goodwill for some frame goodness? Let me know in the comments!

Saturday, November 9, 2013

A Not New Redo

Scott and I have focused so much on the other parts of the house that we haven't had a moment to really turn our attention to our own bedroom. What makes it worse is the fact that we spend all this time in the other, more comfortable rooms, then go to sleep in the most unfinished of them all.

I knew that I wanted to paint and put up some pictures, but to begin this Journey to the Center of the Bedroom, I knew that I really wanted to emphasis the bed. I had seen a lot of bedrooms in lighter colors that have darker headboards, and they really caught my fancy.


The headboard that we had was actually one that my dad and I built a while ago, but that I still love, so I wanted to try to work with it. Unfortunately, it was disappearing behind our much darker bedding.


I decided to take it off and refinish it in a darker color. First, I unattached it from the bed and took it out to the garage.


Here you can see better the alternating wood pattern that we accomplished. Because I had to sand it to get off the old polyurethane, I also had to sand the pattern. If you ever encounter anything like this, remember that you must sand with the grain, even if that means the job will take longer. It's worth it. I also used my mouse sander and 120 grit sandpaper and it made the job a little easier. Sanding took close to two hours in all.


When I had it completely sanded (front, panels, sides, sunken portion of the frame, top), I took the shop vac and gave it a good once over. Then, I wiped the whole thing down with a barely damp rag and let it sit for an hour.


During the hour, I ran to Home Depot and picked up some stain. I wanted to get a smaller container of the one I liked, but unfortunately, they didn't offer it, so I ended up with the $7.99 can. I didn't want a color that came across as a black, so I ended up with a darker wood with not a lot of red in it: Jacobean (which in my mind, I seem to pronounce 'yakobean', lol).


I would use my foam brush to brush on some of the stain, then I would use a soft cloth to wipe off the excess. I started with the leg to make sure I liked the color. That way, If it was too dark or too light, it would be behind the bed where no one could see it.


I then continued around the frame in the same fashion. Brush then wipe. I wanted it slightly darker, but rather than leaving it thick (which makes it really sticky and doesn't dry properly), I waited until after the first coat was finished to do a second coat later on.


Same rule applies for sanding as staining: go with the grain. That's part of the reason I left the interior portion for last. I just carefully went through, making sure not to leave any bubbles with the stain, and brushed and wiped each individual rectangle separately.


The difference in color was pretty amazing. You can see how much darker the stain was than the original wood color, and it just made it feel much richer.


When the first coat was finished, I let the entire thing dry for 4 hours. I then applied another coat to darken it slightly and allowed that to dry over night. Two more coats of polyurethane later, and it was looking pretty snazzy.


Because our weather has been really cold and windy lately, I wanted to make sure that the headboard was super dry before it touched any of our bed linens. I brought it in and let it stay overnight in the dining room so that it could sit in a dryer, warmer environment for a while. This made all the difference because the finished piece felt much less sticky and more completed before attaching it back to the bed frame.

This little make over took our bed from this

To this

Which is quite an impact for such an easy DIY. We love it!

(Yes, we did move the room around a little too. We also took on another project in there, but more on that in a later post!)